- How to add, edit, and delete device
- Check connectivity
- Manage device credentials
- Manage device owner and groups
- Share device
- Make device group public
- Share device group
- Device details
- Next steps
- Your feedback
Devices are fundamental IoT entities in ThingsBoard that can generate telemetry data (such as temperature, humidity, GPS coordinates, etc.) and transmit it to the ThingsBoard platform, as well as respond to Remote Procedure Call (RPC) commands. Devices can be either physical (e.g., sensors, controllers, trackers) or virtual (e.g., emulators) network-connected objects that are capable of:
- Generating telemetry data — send measured data such as temperature, humidity, or location.
- Transmitting data to the ThingsBoard platform via supported protocols (MQTT, HTTP, CoAP, etc.).
- Responding to RPC commands — receiving and executing on remote procedure calls sent from the platform.
Each device:
- is stored as a separate entity.
- can belong to one or more device groups.
- has a device profile that defines type, transport settings, firmware, alarm rules, etc.
- can be assigned an owner.
- supports both attributes (static or semi-static properties) and telemetry (time-series data).
ThingsBoard supports device management functions via both the web UI and the REST API.
Practical video course 🎥
Explore a hands-on video course that provides detailed explanations on how to create and manage devices in ThingsBoard.
The course includes practical examples to help you better understand how to work with dashboards, resources, and devices, including their configuration and real-world usage.
How to add, edit, and delete device
Tenant administrators and users with appropriate permissions can create, edit, or delete devices in ThingsBoard.
Adding new device
To add a new device:
- Navigate to Entities ⟶ Devices. By default, you will see the “All” device group.
- Click the “+” icon in the upper-right corner and select “Add new device” from drop-down menu.
- In the device creation form, fill in the required fields:
- Name – a unique name for the device.
- Device profile – by default, the profile is set to “default”, but you can choose a different profile if needed.
-
If required, you can fill in additional fields such as label or description, assign a different owner to the device, and add the device to a group.
- Click “Add”.
Device successfully created and is now available in the list.
A window will immediately open where you can check the device’s connection to ThingsBoard platform. This step is optional. For now, let’s close this window and return to the connection check in more detail later.


You'll also receive a notification (bell icon) indicating the device was added.

Creating device group
Devices can belong to one or multiple groups, which helps organize and manage them effectively.
To create a new device group:
- Go to the "Entities" section - "Devices" page. By default, you navigate to the device group "All". Navigate to the "Groups" tab and click on the "plus" icon in the upper right corner;
- Enter the name of the device group and click "Add";
- Your device group has been added.


Managing device groups. How to add, move, remove.
From the Devices page, you can add devices to groups, move them between groups, or remove them from a group.
The “All” device group always contains all devices at the selected owner level (Tenant or Customer).
Add a single device to groups:
- Open the device details ➜ click Manage owner and groups.
- In the dialog, adjust Owner if necessary and select groups to add or remove the device from.
- Click Save.
Add multiple devices to one group:
- On the Groups tab, open any device group (e.g., “All”).
- Select devices using the checkboxes (on the left of their names).
- Click the “Add to group” (plus-in-circle icon) in the top-right.
- In Add to group window, choose Select existing entity group or Create new entity group.
- Select an existing or create a new device group.
- Click Add to confirm adding the devices to the group.
Note: This adds devices to the chosen group without removing them from other groups.
Move devices to another group:
- Open a specific (non-All) group.
- Select devices and click Move to group (two-arrow icon).
- In “Move to group” window, choose Select existing entity group or Create new entity group.
- Select an existing or create a new device group.
- Click Move to confirm.
This action removes devices from the current group and adds them to the selected group.
Remove devices from a group:
- Open a specific (non-All) group.
- Select devices and click Remove from group (minus-in-circle icon) in the top-right.
- Confirm removal.
Note: Devices are not deleted; they remain in the owner’s “All” device group.
Edit device
You can change the device name, its device profile, label, assign the firmware and software. To edit the device, you need to:
- In the devices list, locate and click on the desired asset, then click the "pencil" (✏️ Edit) icon on the right to open the edit form.
- Make the necessary changes and click the "Apply changes" button to save them.


Delete device
You can delete a device using one of the following ways:
First way:
- Click on the "trash can" icon can opposite the device's name you want to delete.
- Confirm deleting the device in the dialog box.


Second way:
- Click on the device that you want to delete. In the device details window, click the "Delete device" button;
- Confirm deleting the device in the dialog box.


Check connectivity
Check connectivity is a built-in feature that provides ready-to-use commands for testing device connectivity to ThingsBoard using different communication protocols. It allows you to quickly verify network access, validate credentials, and confirm that incoming telemetry is processed correctly.
Using this feature, you can publish test telemetry data (for example, a temperature value of 25) and immediately ensure that the device is able to communicate with the platform.
To verify device connectivity:
- Click on device to open its details page.
- Click Check connectivity.
- Select the communication protocol (MQTT, HTTP, etc.) and your operating system.
- Copy the generated command and execute it in a terminal.
If the connection is successful:
- The device status changes from Inactive to Active.
- Telemetry data appears on the Latest telemetry tab.
For guidance on connecting devices based on your technology stack, see the available connection guides.
For advanced protocols and API options, refer to the ThingsBoard API reference.


Manage device credentials
Supported credential types:
- Access Token (default).
- X.509 certificate.
- MQTT Basic.
To change or manage credentials:
- Open "Device details" window and click the "Manage credentials" button;
- Select the desired credential type and generate or enter required fields. Click "Save".


Manage device owner and groups
You can change a device’s owner (which can be either a Tenant or a Customer, see glossary) to control who can access the device and its data. Changing the owner moves the device to the selected level and updates access based on groups.
Unlike the Community Edition (CE), where you can only assign a device to a specific customer, in the Professional Edition (PE) you can also manage ownership and group memberships using the “Manage owner and groups” button.
To do this:
- Click the device to open its Device details.
- Click the “Manage owner and groups” button.
- In the Owner field, select Tenant or a specific Customer.
- Add the device to the relevant device groups or create a new group if needed.
- Click “Update” to confirm and apply the changes.
Note: Changes to group membership and ownership take effect immediately and update user access according to the roles of the assigned groups.


A Tenant Administrator always has the right to reassign or revoke device ownership.
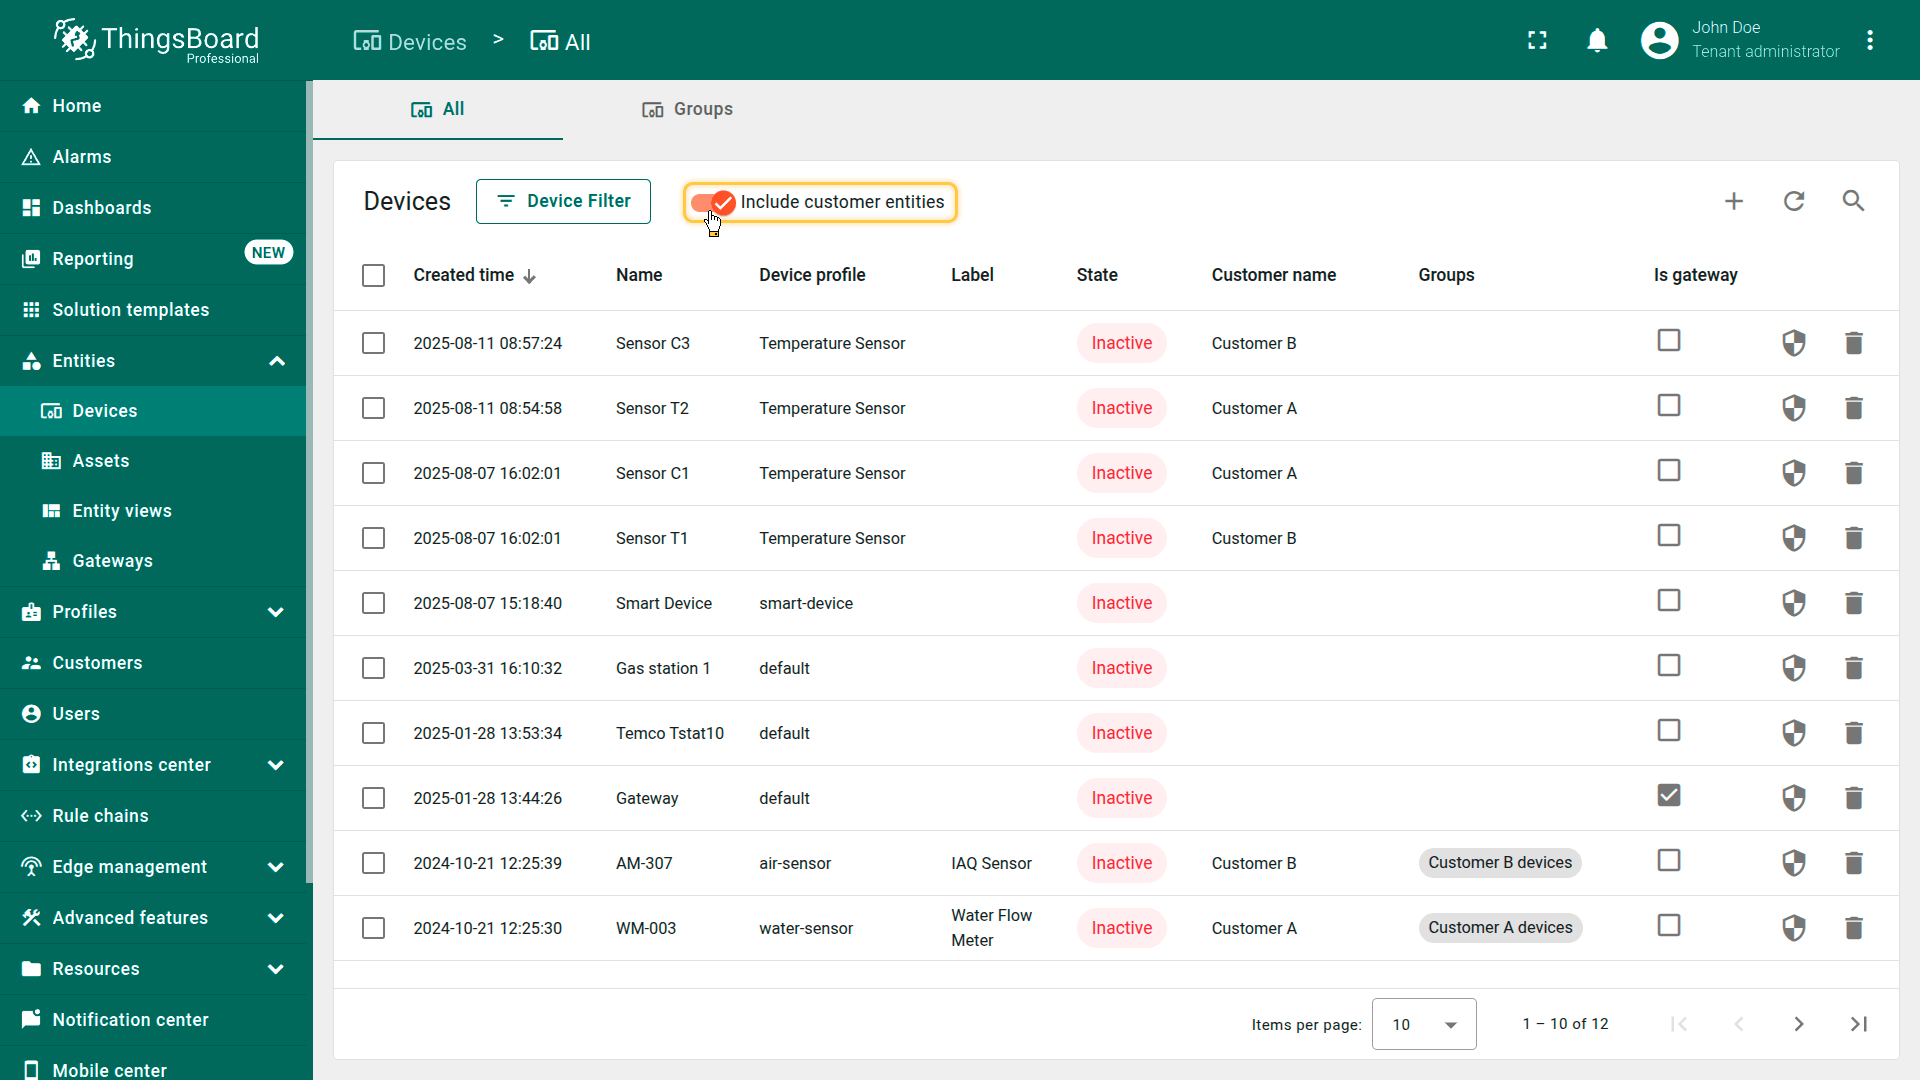
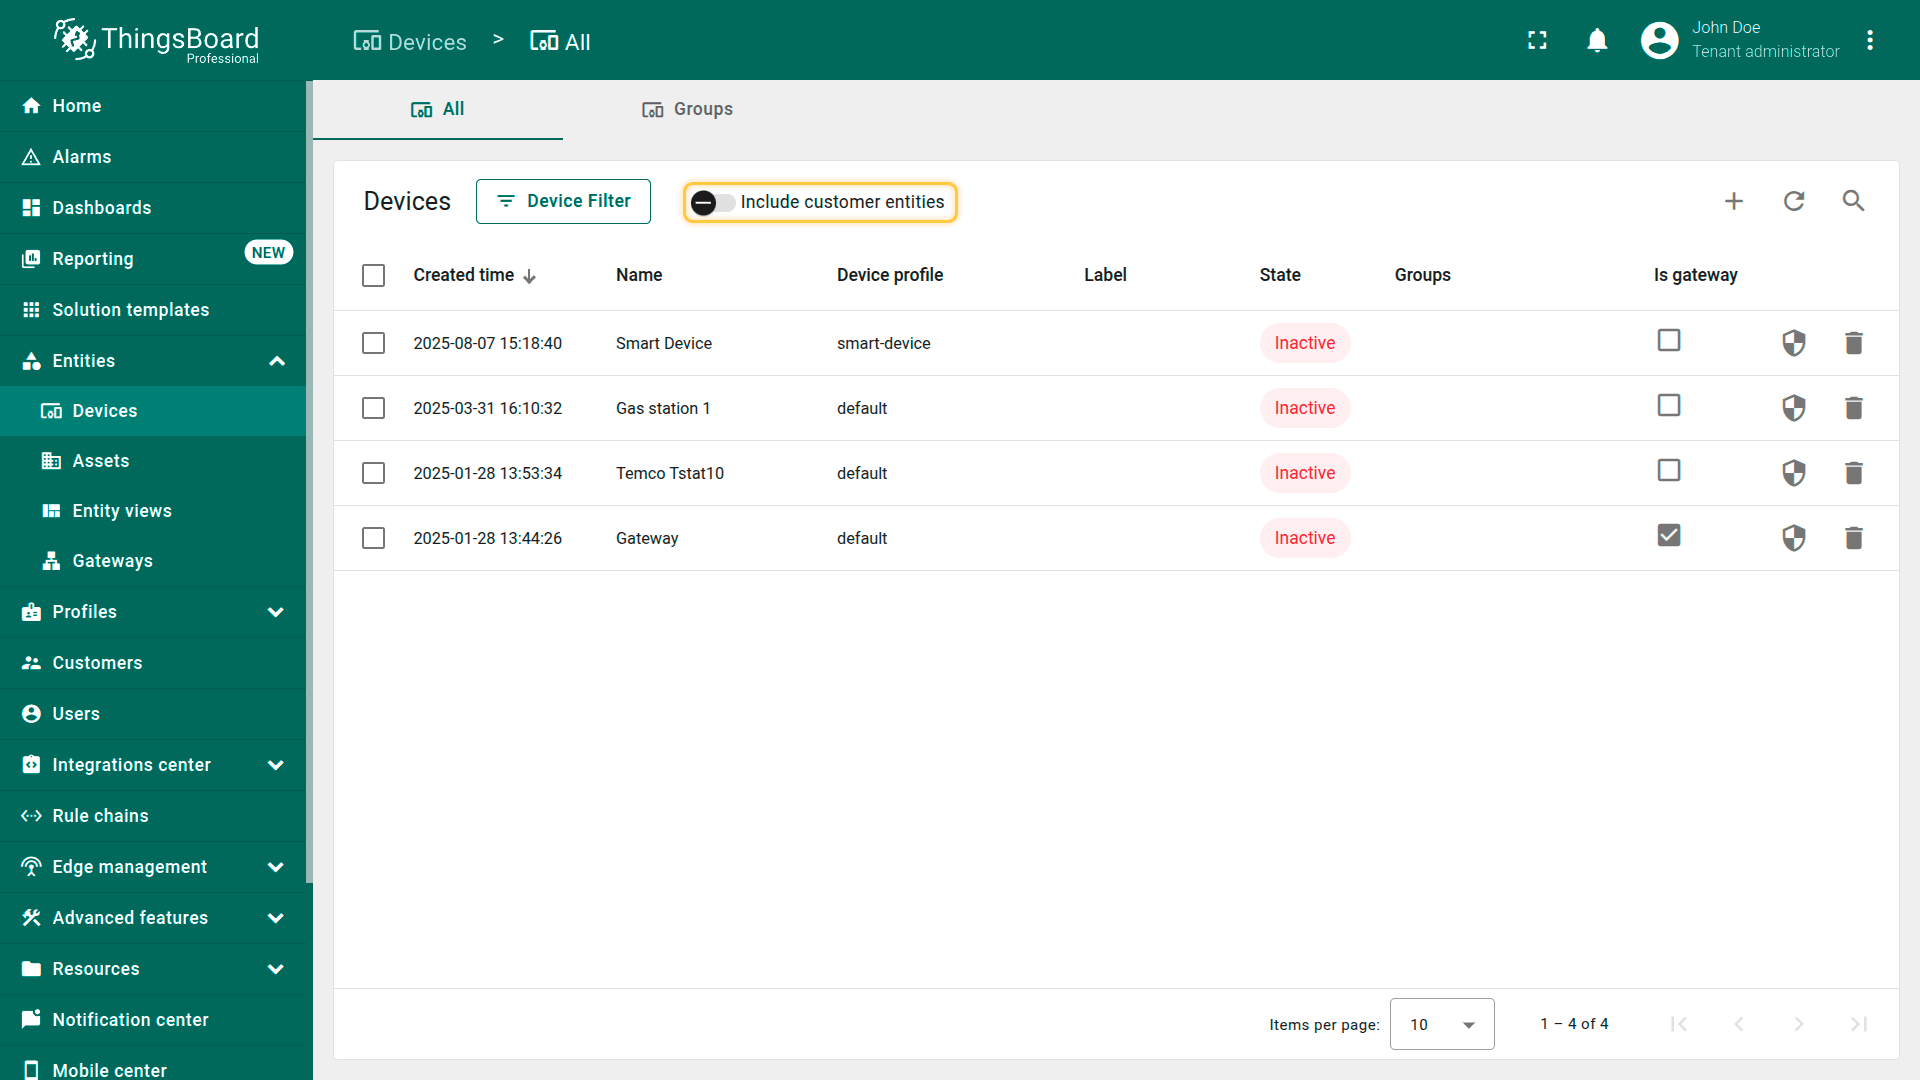
Include customer entities
On the “Devices” page there is an option “Include customer entities”, which defines whether the list will display devices that belong to your customers.
- When the switch is enabled (default state) — the table shows all available devices, including those owned by customers.
- When the switch is disabled — the table shows only your own devices.
Share device
You can share devices by adding them to a device group and then sharing the group with a customer.
For detailed instructions, please see the section on how to Share device group.
Make device group public
You can make a device group public to ensure that all data within it is accessible to everyone. This is ideal for:
- Creating public demo dashboards that require access to device data.
- Supporting open data use cases.
You cannot share an individual device directly — only the device group that contains it.
To make a device group public:
- Locate the desired device group in the list.
- Click the “Make public” icon next to it.
- Confirm your action in the popup dialog.

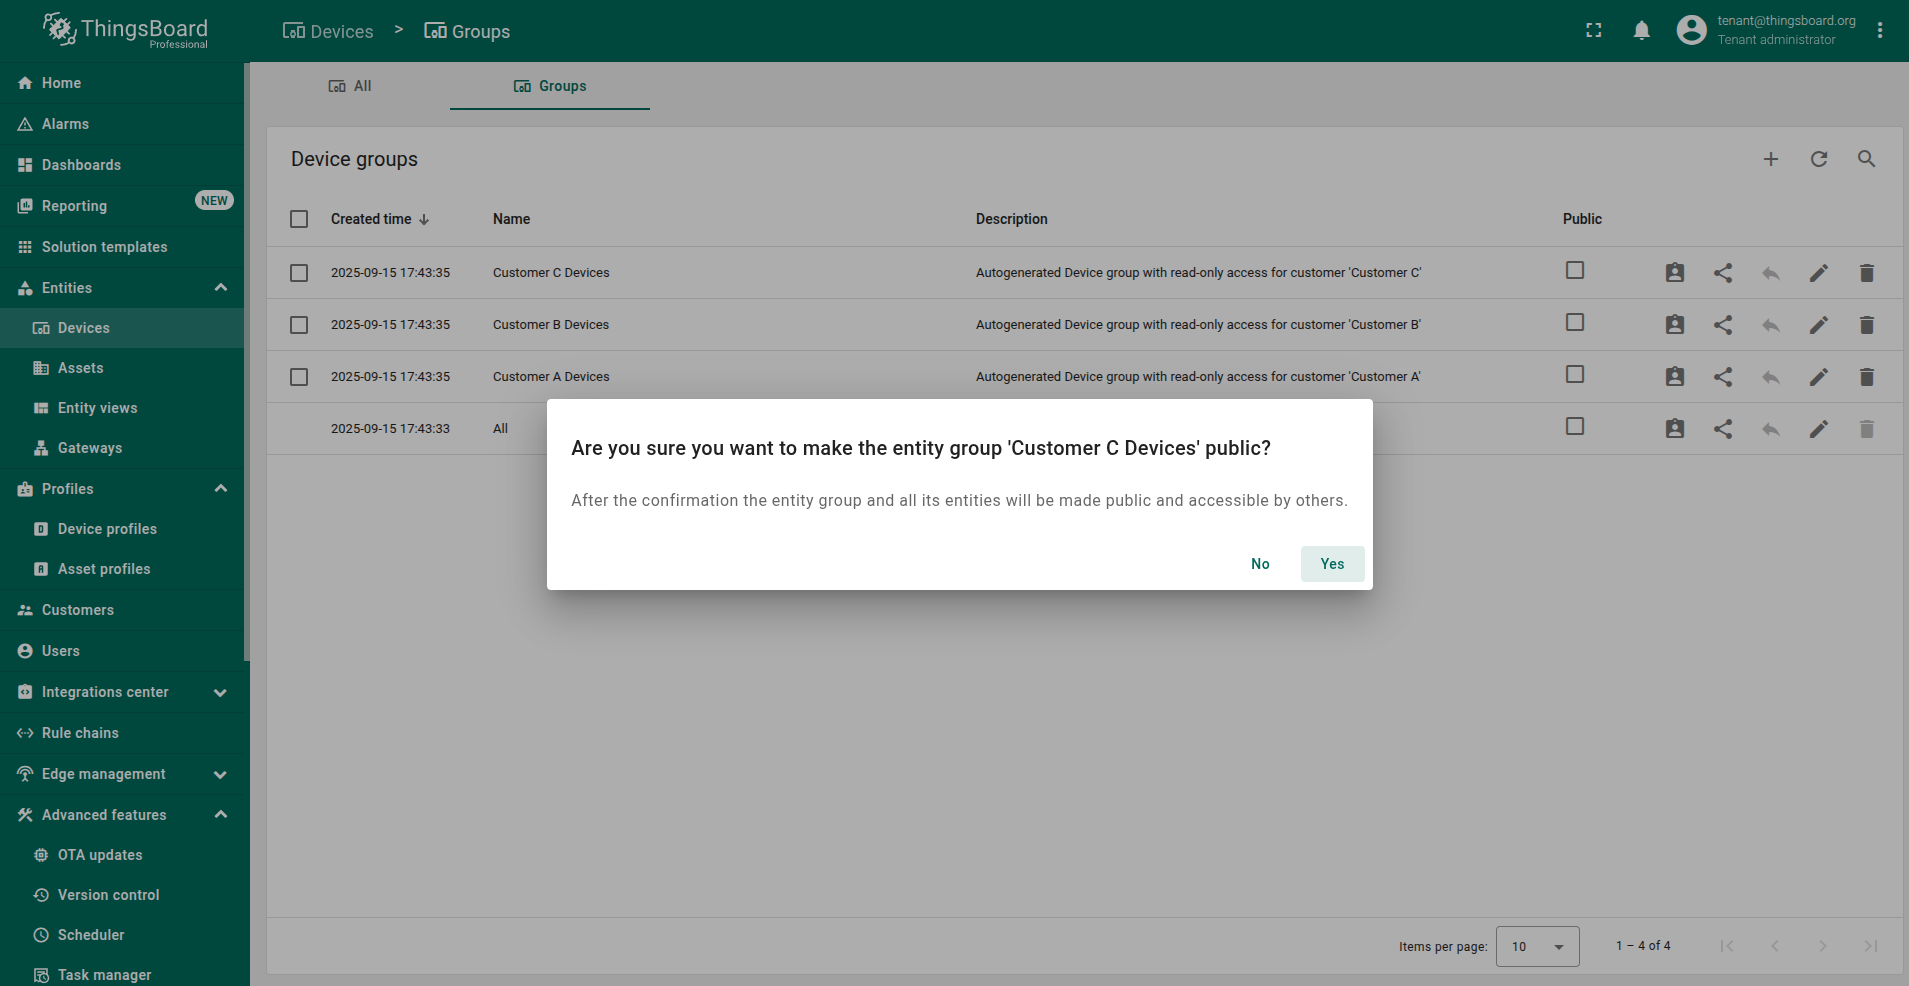
Once public, any dashboards or external systems referencing devices in this group will have access without requiring authentication.
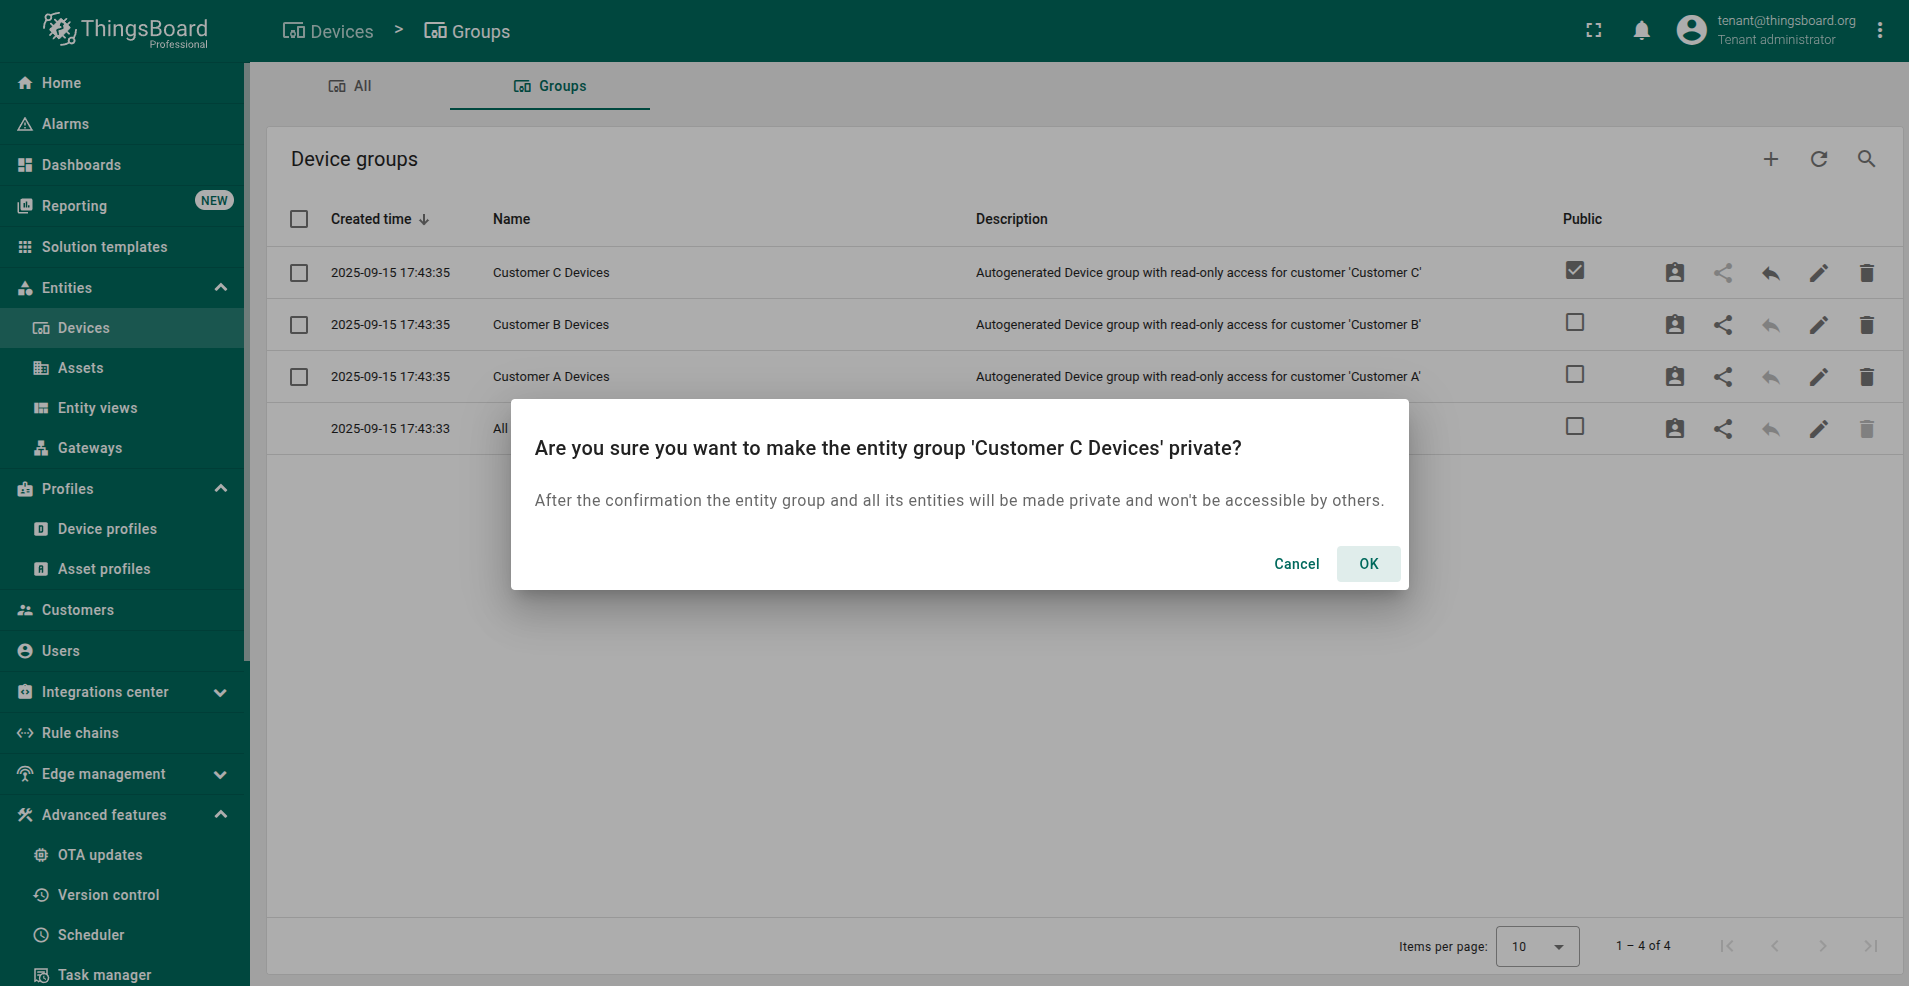
To make the group private again, follow the same steps using the “Make private” icon.

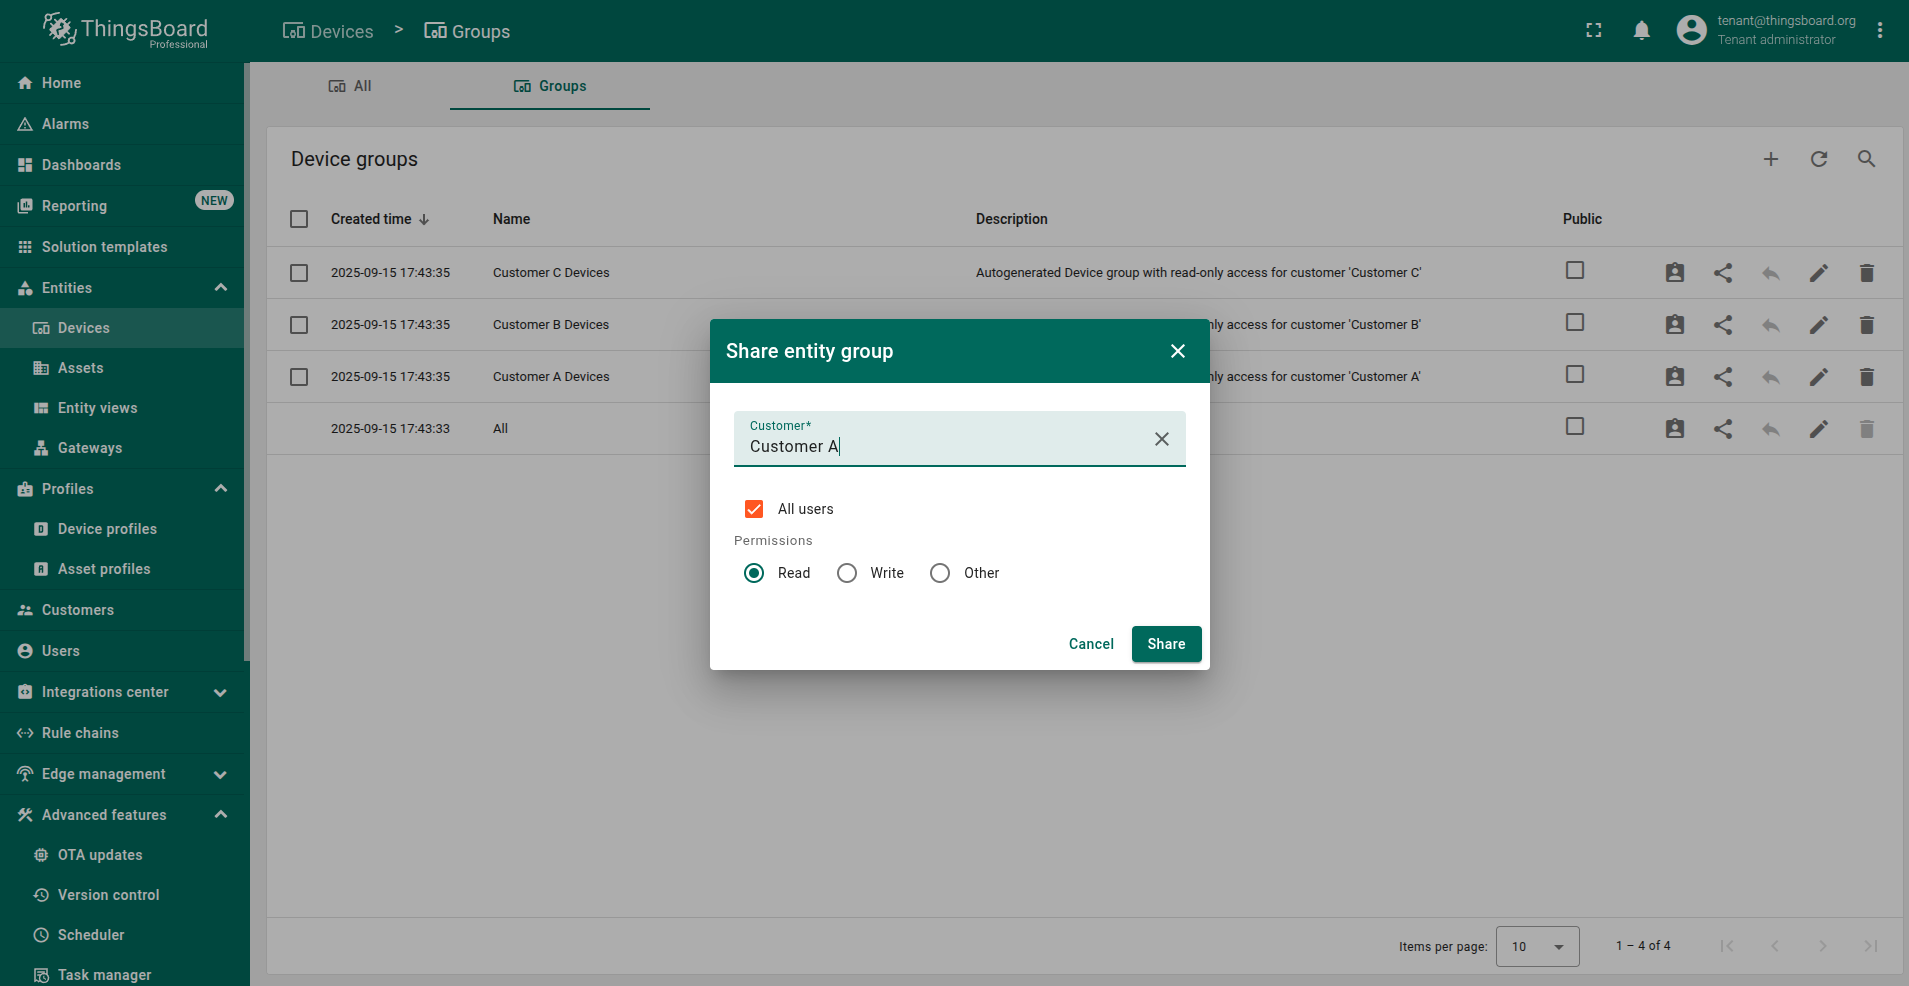
Share device group
You can share a device group with one or more customers. This is useful, for example, when multiple customers need access to the same device.
You cannot share an individual device — only the device group that contains it.
To share an device group:
- Locate the desired device group in the list.
- Click the “Share” icon next to it.
- Select the target customer from the dropdown list.
- (Optional) Specify the user group within that customer to share the device group with.
- Confirm the action by clicking “Share”.

Managing and Verifying Permissions
After a device group has been shared, you can view, edit, or revoke permissions at any time.
-
From the “Device groups” list, click on the pencil button of the desired group to open the “Entity group details”.
-
Navigate to the Permissions tab.
-
On this tab, you will see a complete list of all permissions granted for this group. Here you can:
-
Add a new permission: Click the “+” icon in the top right corner of the panel. A dialog window will appear where you can select a role and a user group to grant access to.
-
Edit an existing permission: Click the pencil icon next to the permission you want to modify.
-
Delete a permission: Click the trash can icon to remove access for that user group.
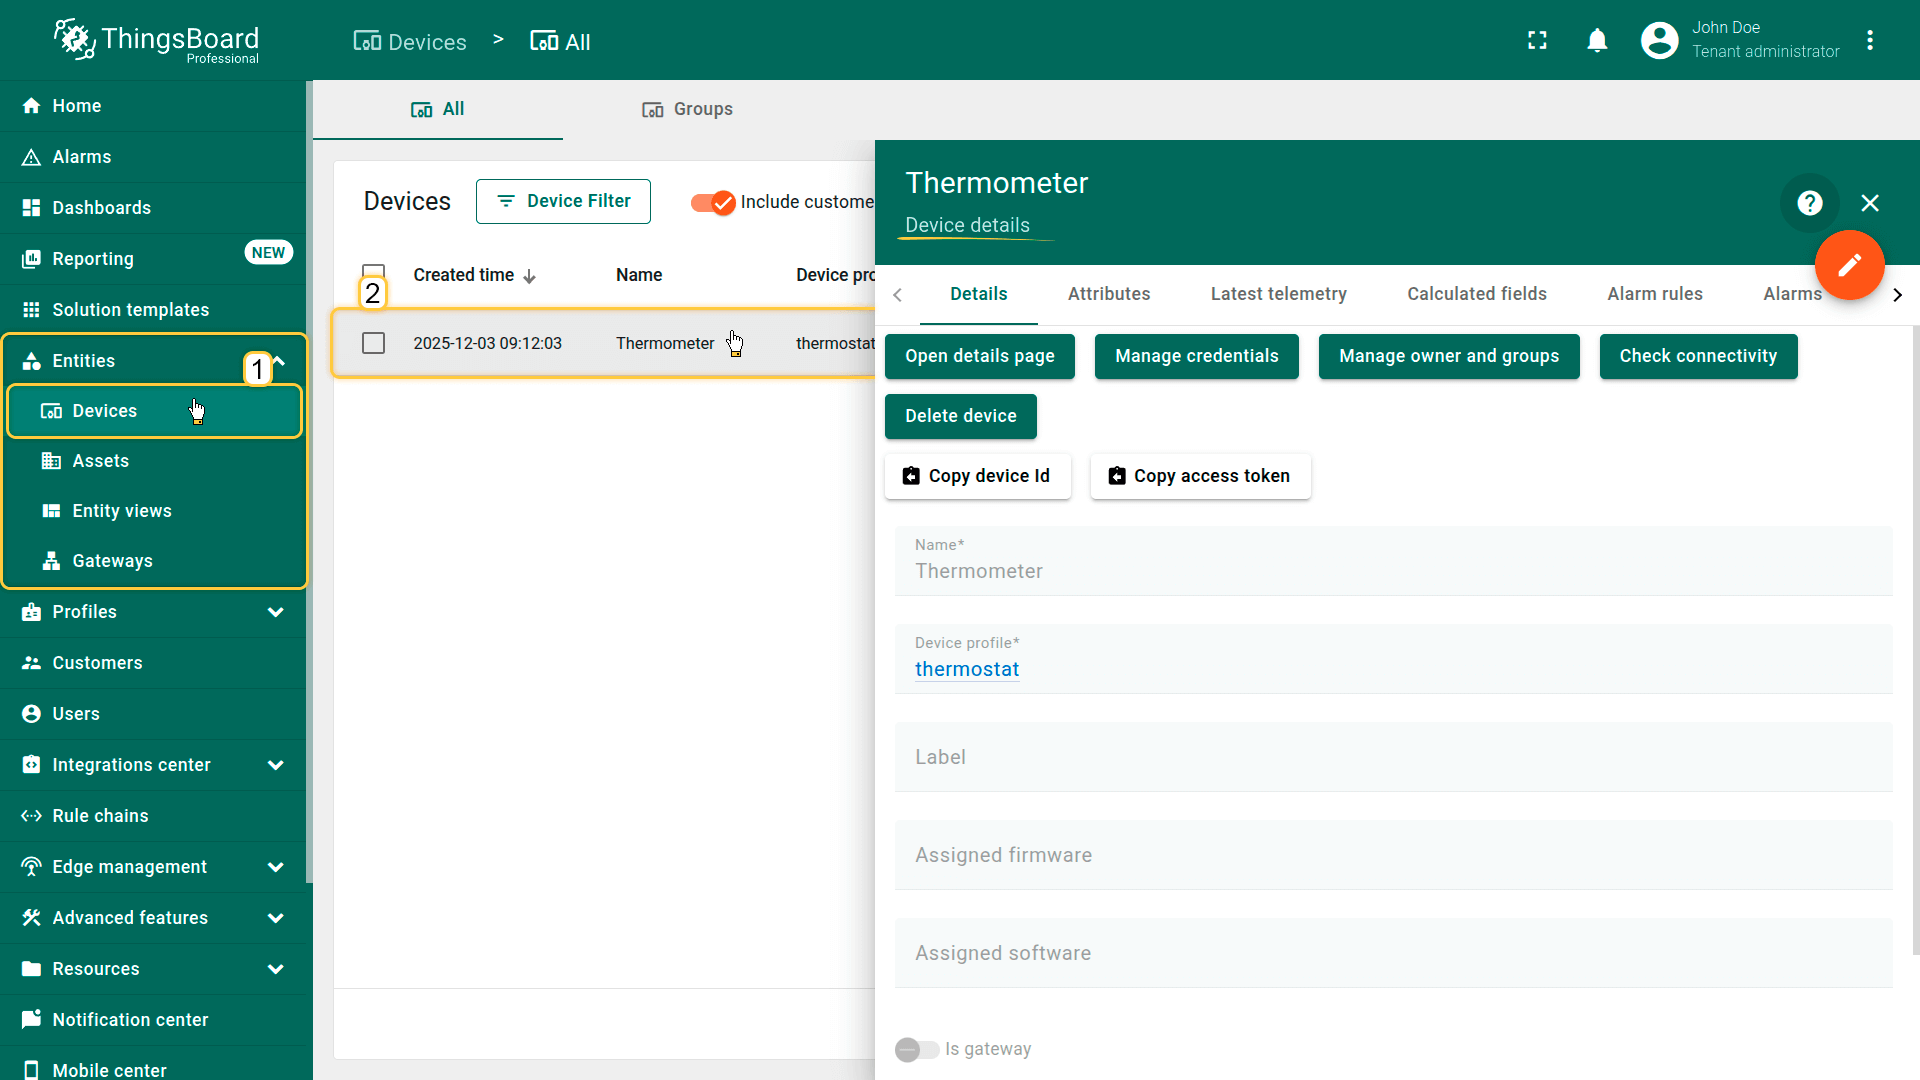
Device details
Clicking on the device opens a window where you can access and manage various aspects of that device.
Copy device ID
Allows you to quickly retrieve the device's unique UUID. Click Copy device Id to copy it to your clipboard. The ID is used in API calls, integrations, and scripts.
Copy device credentials
Depending on the authentication type, you can copy:
- Access Token
- MQTT Credentials
Click the corresponding button to instantly obtain the credentials required for connecting the device to ThingsBoard.
Attributes
This tab displays client, server, and shared attributes — static or semi-static key-value pairs associated with the device. Typical examples include serial number, model, and firmware version.
Latest telemetry
Shows the latest telemetry values sent by the device, including sensor readings, status updates, and other real-time parameters.
- Adding telemetry: Click the “+” icon, enter the key name, value type, and value.
- Deleting telemetry: Click the trash icon, choose the deletion mode (all data, latest value, all except latest, or by time period), and confirm the action.
Calculated fields
Displays fields whose values are computed from existing attributes or telemetry using formulas. This allows you to define derived parameters without modifying the device firmware. Learn more about Calculated fields here.
Alarm rules
Contains the rules that define how alarms are generated for the device. You can review conditions, thresholds, triggers, and configured alarm actions. Learn more about configuring alarm rules here.
Alarms
Shows all active and historical alarms related to the device. Helps monitor device health, track warnings, and identify critical events.
Events
Displays system events associated with the device, including logs, warnings, errors, and other lifecycle-related records. Useful for diagnostics and activity tracking.
Relations
Shows all directed relations between this device and other entities, such as assets, devices, dashboards, and rule chains. Provides context on how the device fits into the overall system.
Audit logs
Provides a record of user actions related to the device — creation, updates, configuration changes, and deletions. Useful for security auditing and traceability.
Version control
Enables exporting and restoring ThingsBoard entities using the built-in Git-based version control service. Supports backup, collaboration, and configuration version management.
Next steps
-
Connect your device - Learn how to connect devices based on your connectivity technology or solution.
-
Data visualization - These guides contain instructions on how to configure complex ThingsBoard dashboards.
-
Data processing & actions - Learn how to use ThingsBoard Rule Engine.
-
IoT Data analytics - Learn how to use rule engine to perform basic analytics tasks.
-
Advanced features - Learn about advanced ThingsBoard features.
Your feedback
Don't hesitate to star ThingsBoard on github to help us spread the word. If you have any questions about this sample, please contact us.