- Create alarm rule
- Managing alarm rules
- Export / Import alarm rule
- Examples of alarm rule configurations
- Example 1. Simple alarm condition: temperature monitoring
- Example 2. Alarm clear condition
- Example 3. Alarm condition with a duration
- Example 4. Alarm with dynamic duration (based on an attribute value)
- Example 5. Alarm with repeating condition
- Example 6. Define alarm rule schedule
- Example 7. Advanced thresholds
- Next steps
- Your feedback
Alarm rules define the conditions for triggering alarms, the logic for setting severity levels, and the rules for clearing and automatically closing notifications. This enables administrators and developers to maintain full control over system behavior in real time and respond promptly to abnormal conditions.
Starting from ThingsBoard 4.3, alarm rule configuration capabilities have been significantly enhanced. Rules can now be defined at the level of a Device, Asset, their Profiles, or even a Customer, enabling a multi-layered monitoring system that respects organizational structure and contextual logic. This approach allows precise control over when and where an alarm should be raised — globally, at the profile level, or for a specific device or entity.
Unified mechanisms for alarm uniqueness, severity levels, timestamps, and alarm propagation ensure consistent data handling and help operators efficiently analyze, filter, and process critical events.
Create alarm rule
The alarm rules page allows you to centrally manage all alarm rules in the system — both for individual entities and for profiles.
Note: The process of creating an alarm rule is the same for Devices, Assets, Device profiles, Asset profiles, and Customers.
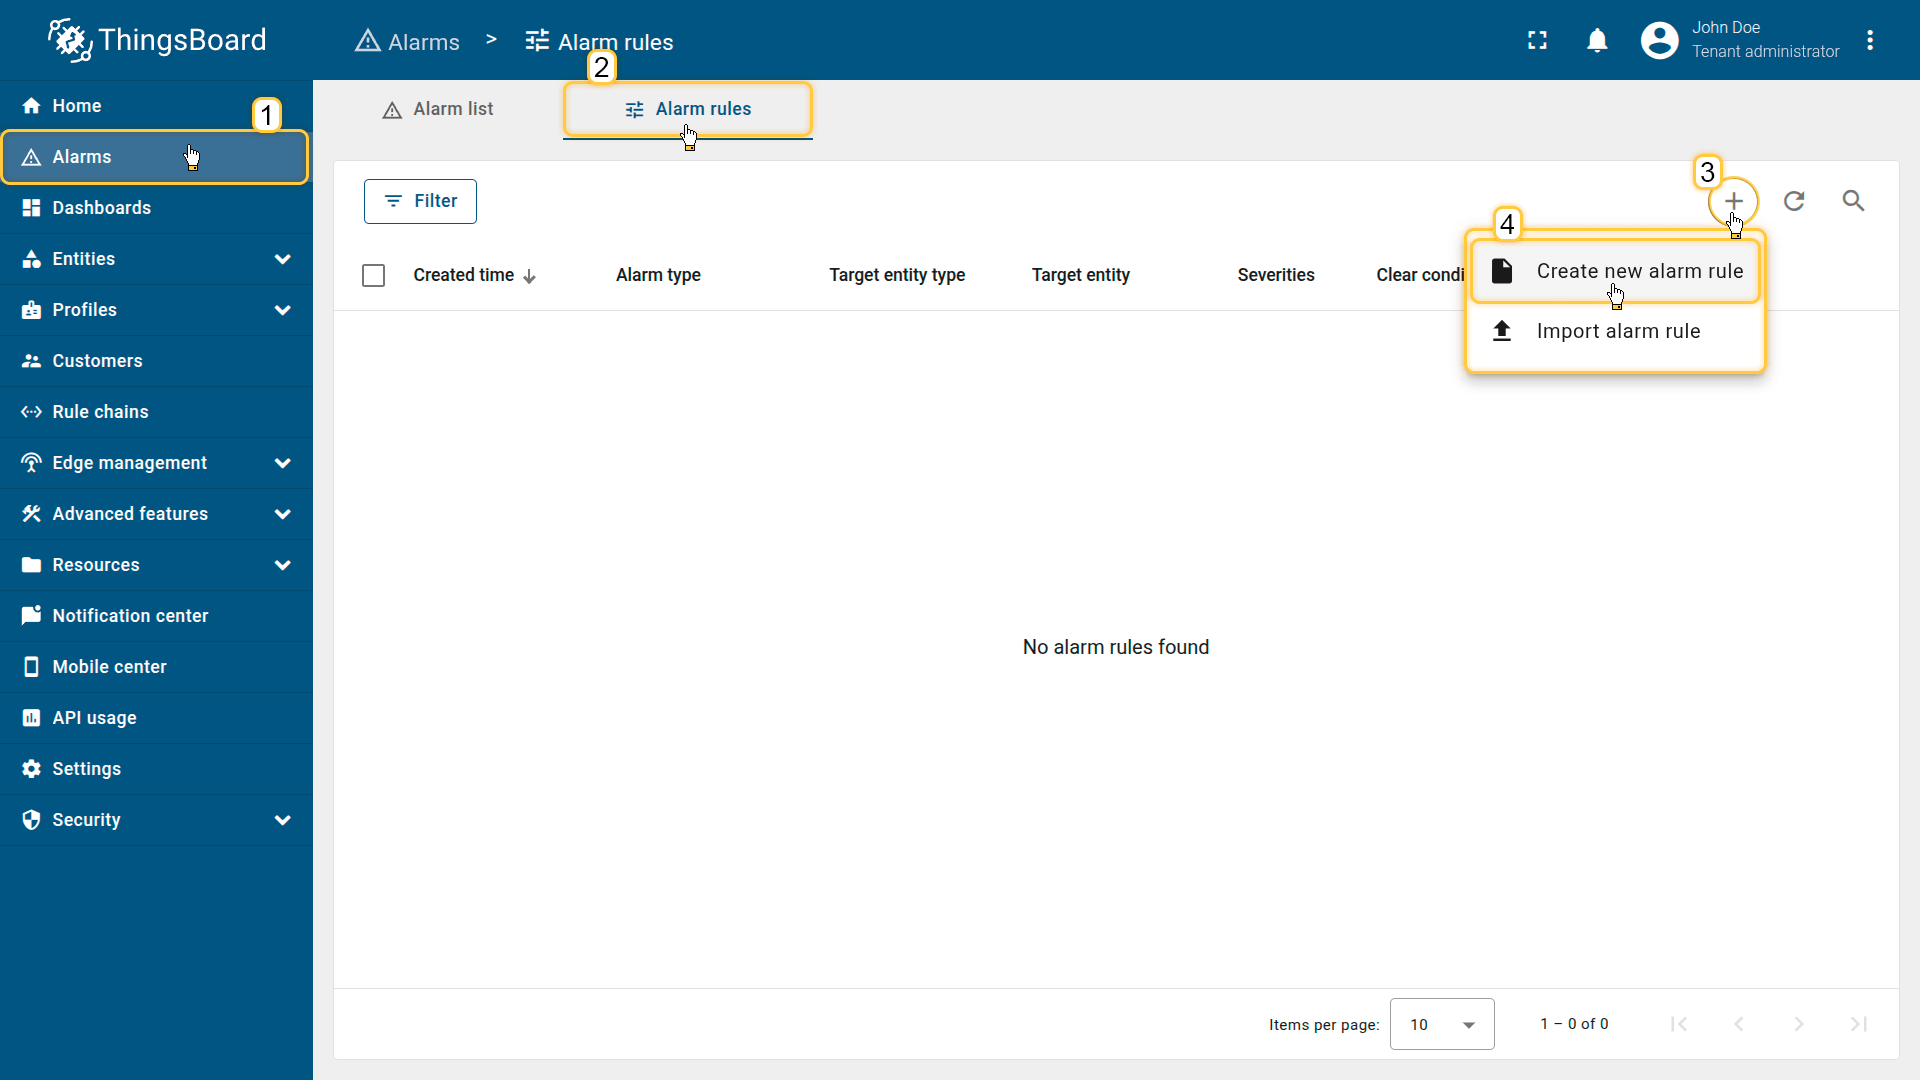
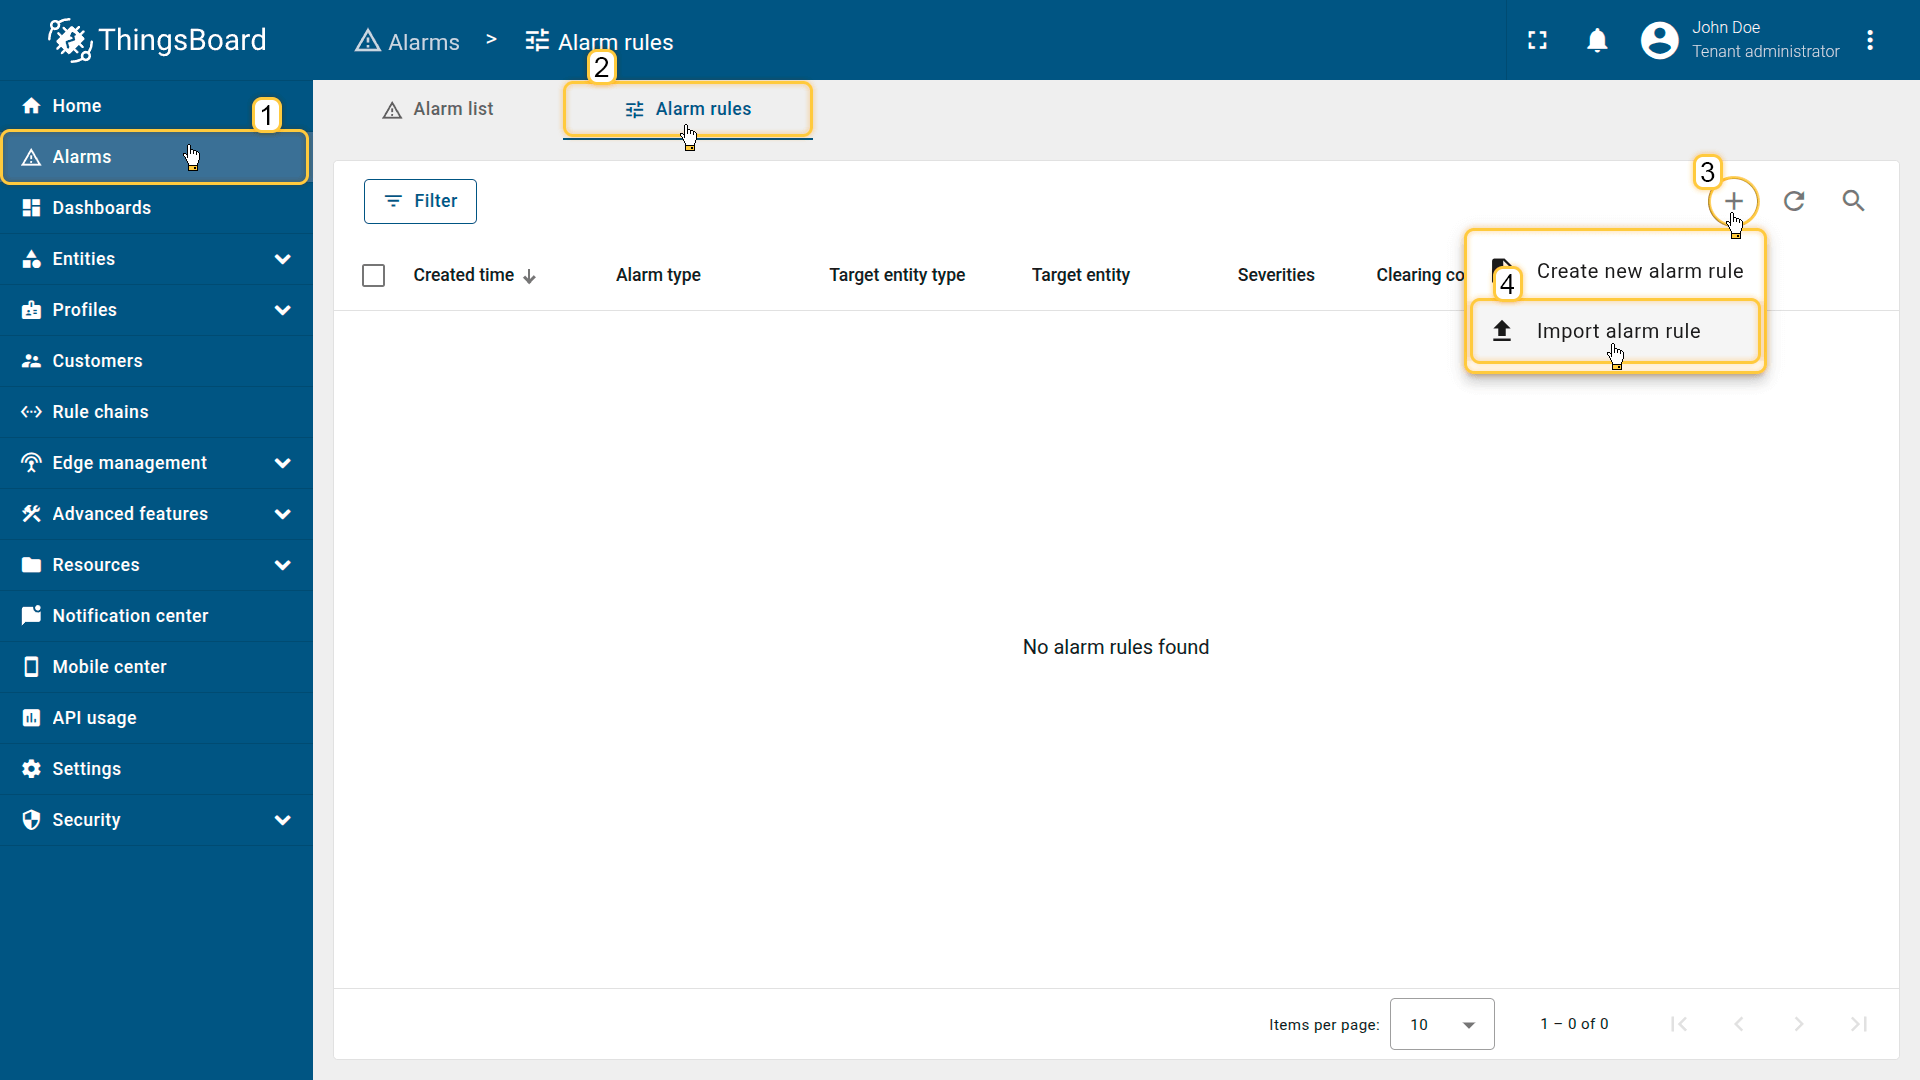
- Open the Alarms page from the left-hand menu.
- Go to the Alarm rules tab.
- Click the “+” button in the top-right corner.
- Select Create new alarm rule from the dropdown menu.
This page allows you to centrally manage all alarm rules in the system — both for individual entities and for profiles.
Recommendation: Create alarm rules in Device profiles or Asset profiles to avoid duplicating configurations across multiple entities.
General
The “General” section defines the basic configuration of the alarm rule:
- Alarm type — the name and unique identifier of the alarm (for example, “High Temperature”). The alarm type defines which event the alarm represents and allows ThingsBoard to determine whether a new alarm should be created or an existing active one should be updated.
- Entity type - the target entity or entity profile where the alarm rule will be applied.

- Set the entity type - the target entity or entity profile where the alarm rule will be applied.
Debug mode
Enabling debug mode allows you to track events, states, and potential errors related to the execution of alarm rule. This greatly simplifies development and troubleshooting.
Note: Debug mode can quickly increase disk usage because all debug events are stored in the database. Starting from ThingsBoard 3.9, the platform stores the full set of debug events only during the first 15 minutes after the alarm rule is created; afterward, only error events are retained.
Debug mode settings can be combined or disabled entirely.
Arguments
Before defining alarm conditions, you must add at least one argument — a data source that the rule will use during evaluation.
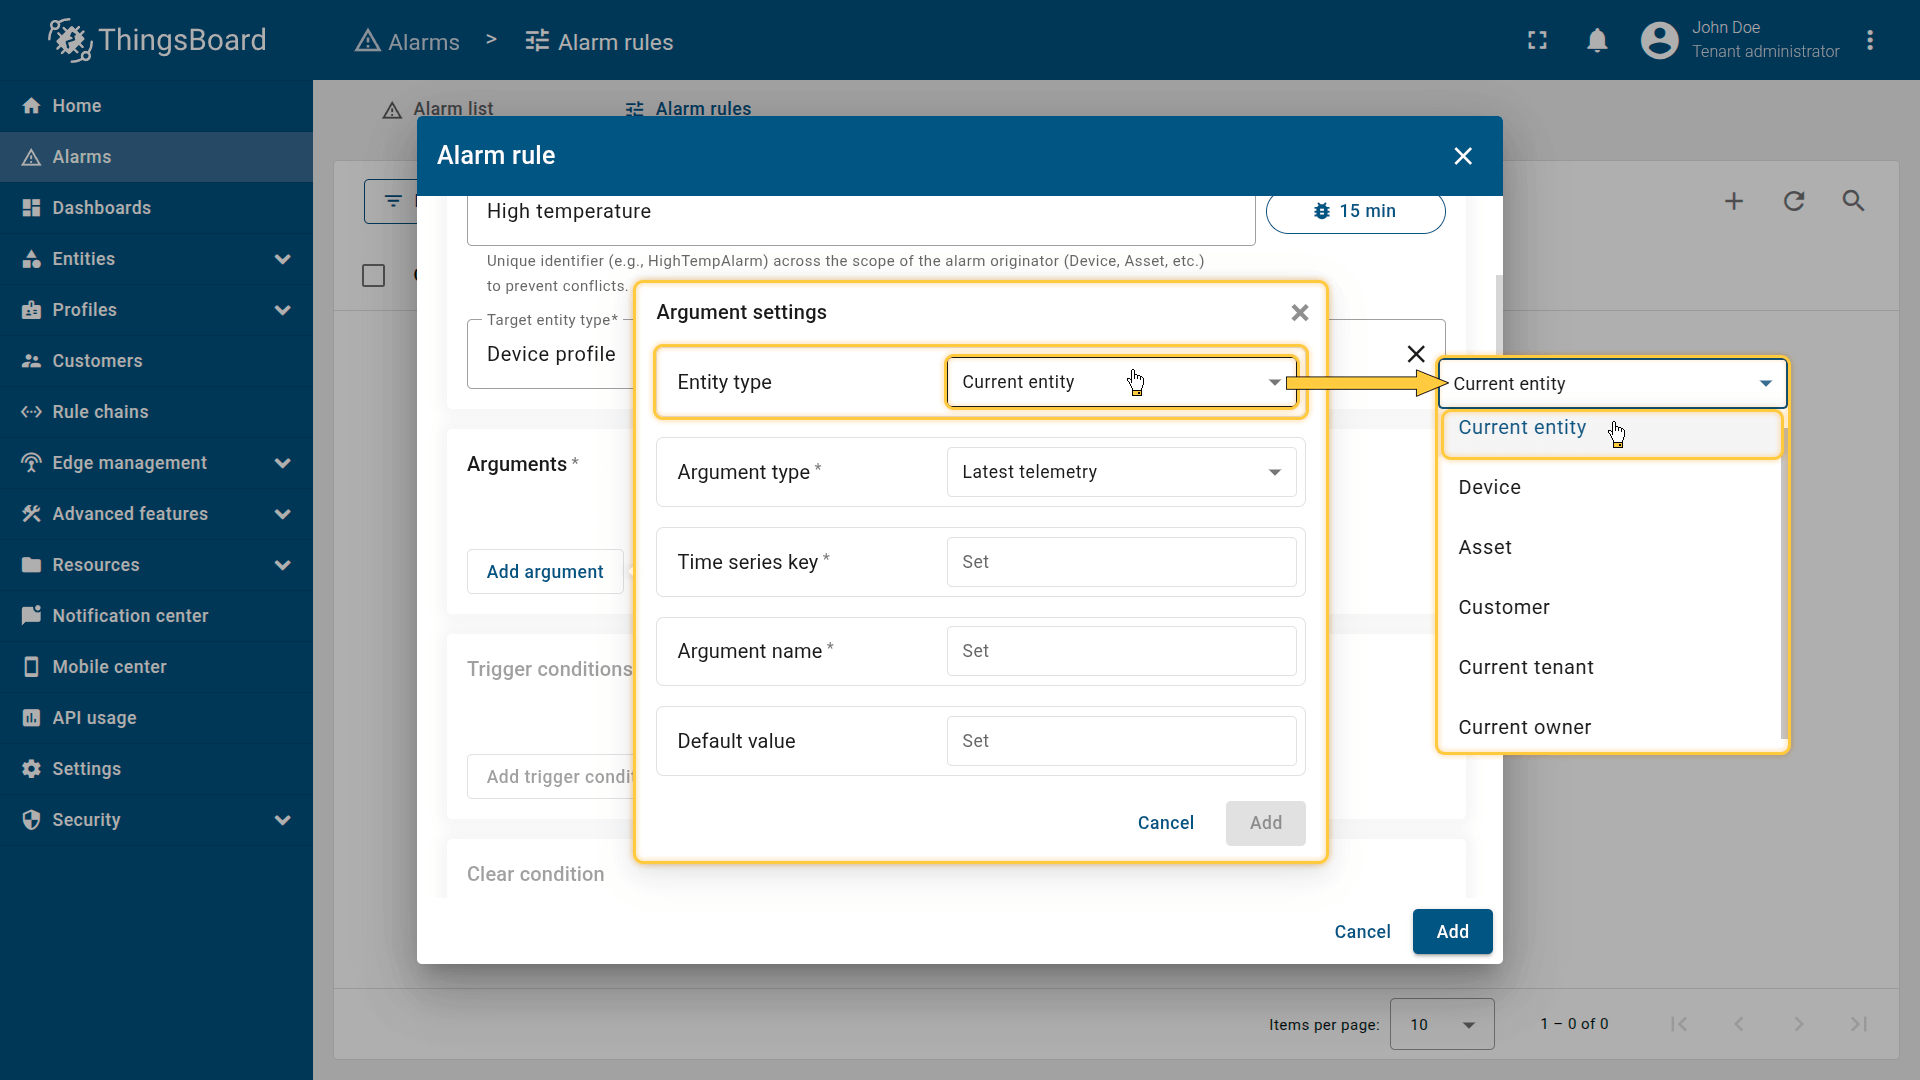
Click Add argument and configure the following parameters:

Entity type
Defines where the argument value comes from:
- Current entity — the entity you are configuring (device, asset, customer, or profile).
If the rule is created at the Device profile or Asset profile level, it will apply to all entities that use this profile. - Another Device or Asset — references telemetry or attributes from a different device or asset.
- Customer — retrieves data from the associated customer entity.
- Current tenant — uses data from the tenant entity.
- Current owner — data from the owner of the current entity.
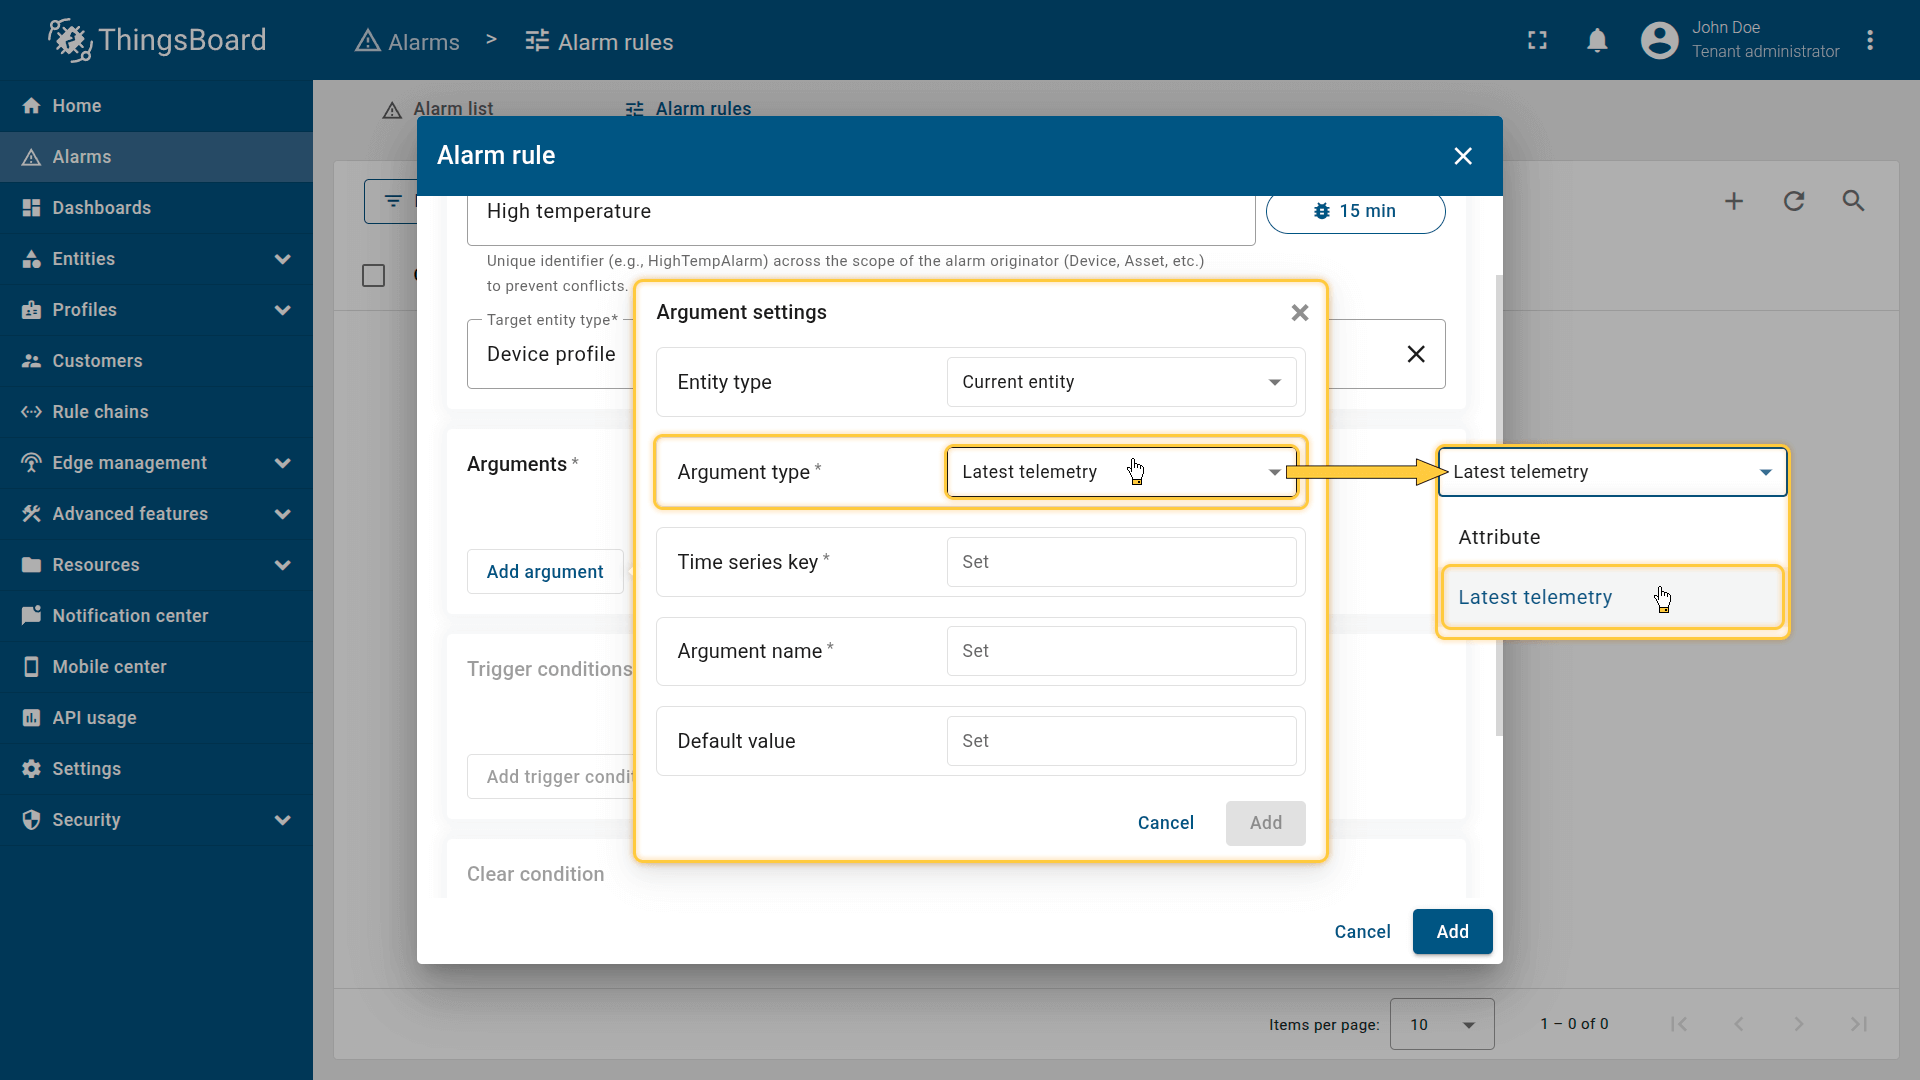
Argument type
Defines what kind of data the argument will represent:
- Attribute. Uses a key–value attribute stored on the entity. (e.g., model, max temperature).
You must specify:- Attribute scope: Server attributes, Client attributes, or Shared attributes
- Attribute key
- Optional: Default value (used when attribute value is missing)
- Latest telemetry. Uses the latest time series value from the entity. (e.g., temperature, speed, voltage).
You must specify:
- Time series key
- Optional: Default value
Argument name
Enter an argument name — the identifier you will use in formulas and conditions (e.g., temperature, maxThreshold, deviceEnabled).
After configuring the fields, click Add.

After configuring the fields, click Add.

Trigger conditions
This step defines the core logic of the alarm rule:
- when the alarm should be created,
- which severity it receives, and
- when the rule is active based on the schedule.
Click Add trigger condition and configure the following parameters:
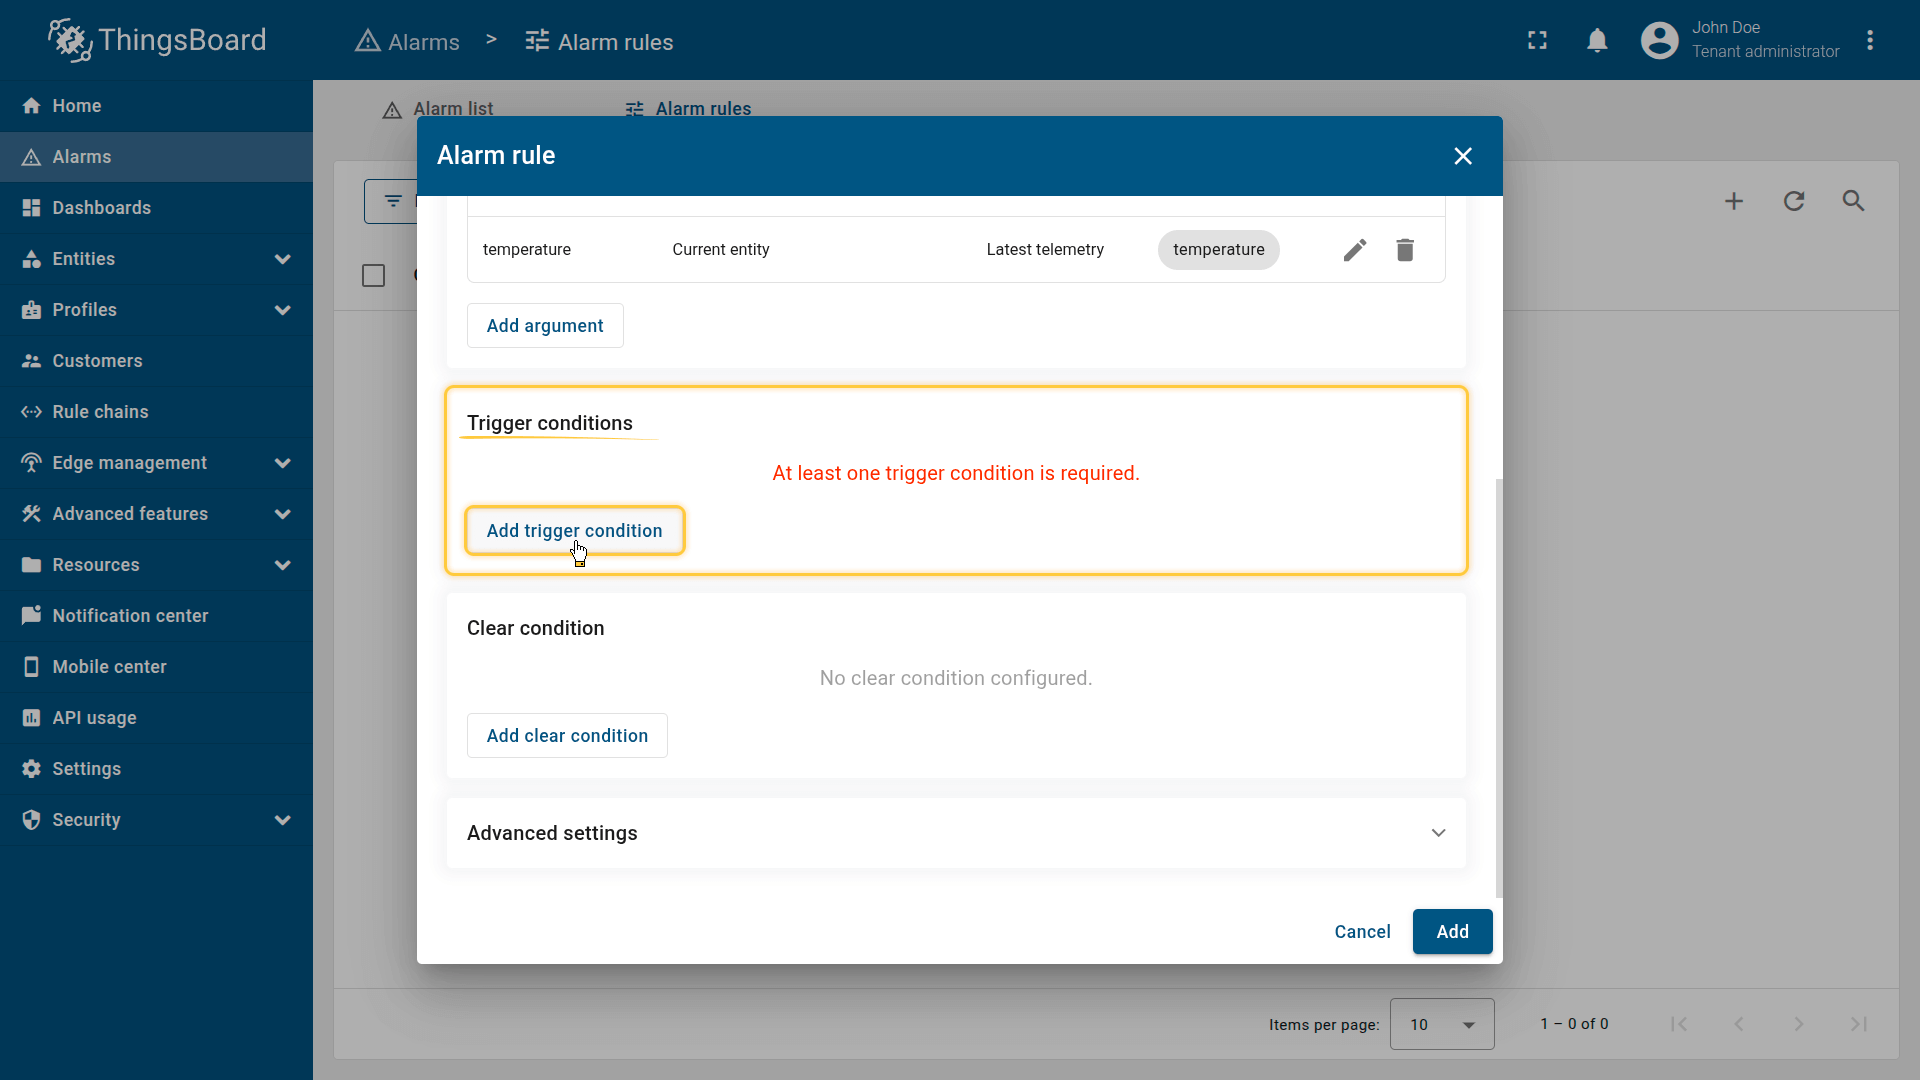
Click Add trigger condition and configure the following parameters.
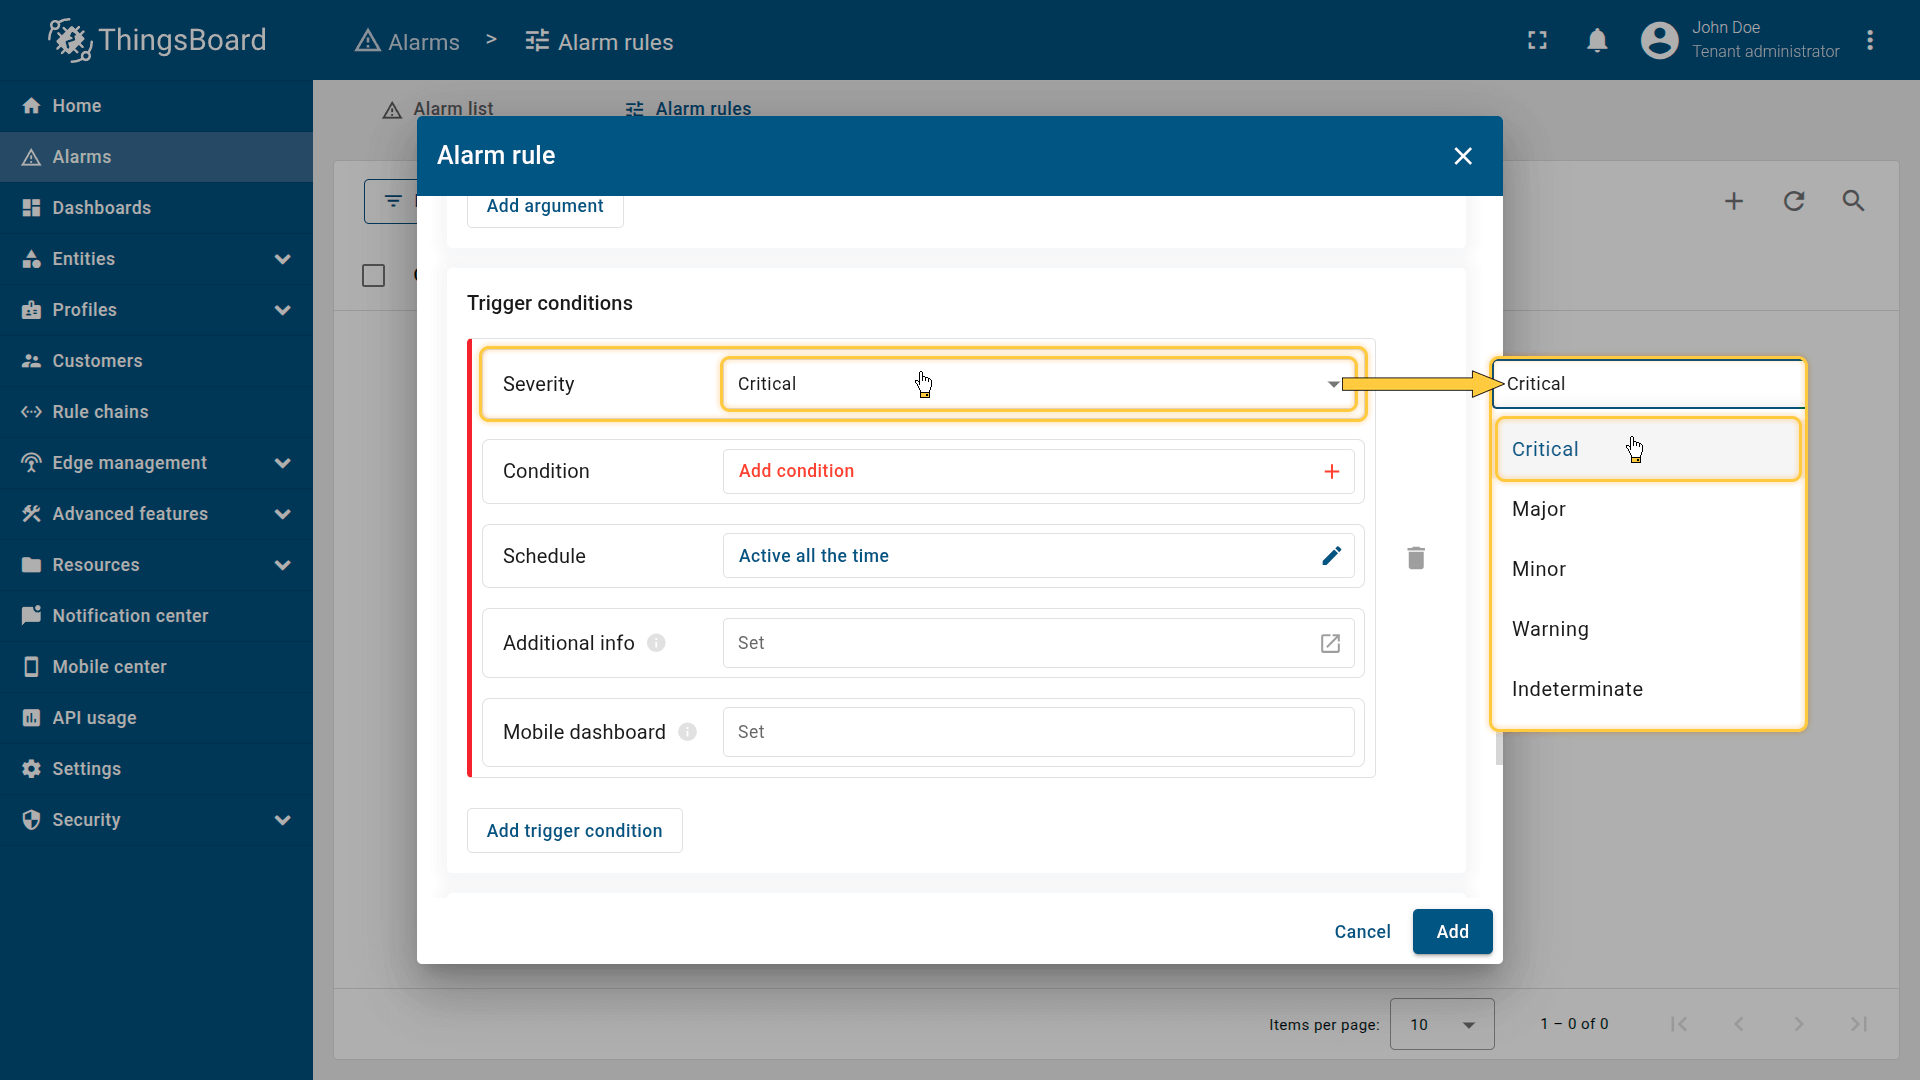
Severity
In ThingsBoard, alarm severity indicates how critical an alarm condition is and helps prioritize response actions.
The following severity levels are available:
- Critical — Indicates a severe condition that requires immediate action, such as equipment failure, safety risks, or conditions that may cause data loss or system downtime.
- Major — Represents a significant issue that can impact system operation but is not immediately critical, for example, performance degradation or operation outside recommended parameters.
- Minor — Used for less severe problems that should be monitored or addressed later, such as temporary threshold violations or early warning conditions.
- Warning — Indicates a potential or emerging issue that does not yet affect normal operation but may require attention if it persists.
- Indeterminate — Used when an alarm is raised but the severity cannot be clearly determined, often due to incomplete data or ambiguous conditions.
Choosing the appropriate severity helps ensure effective monitoring, escalation, and response in IoT systems.
How severity works
The severity level applies to:
- New alarms created by the rule
- Updates to an existing active alarm, when the create condition triggers again with different criteria For example, if a Warning alarm remains active but the new condition qualifies as Major, the severity will be increased.
It affects incident prioritization, UI representation, and automation workflows (Rule Engine, notification rules, etc.).
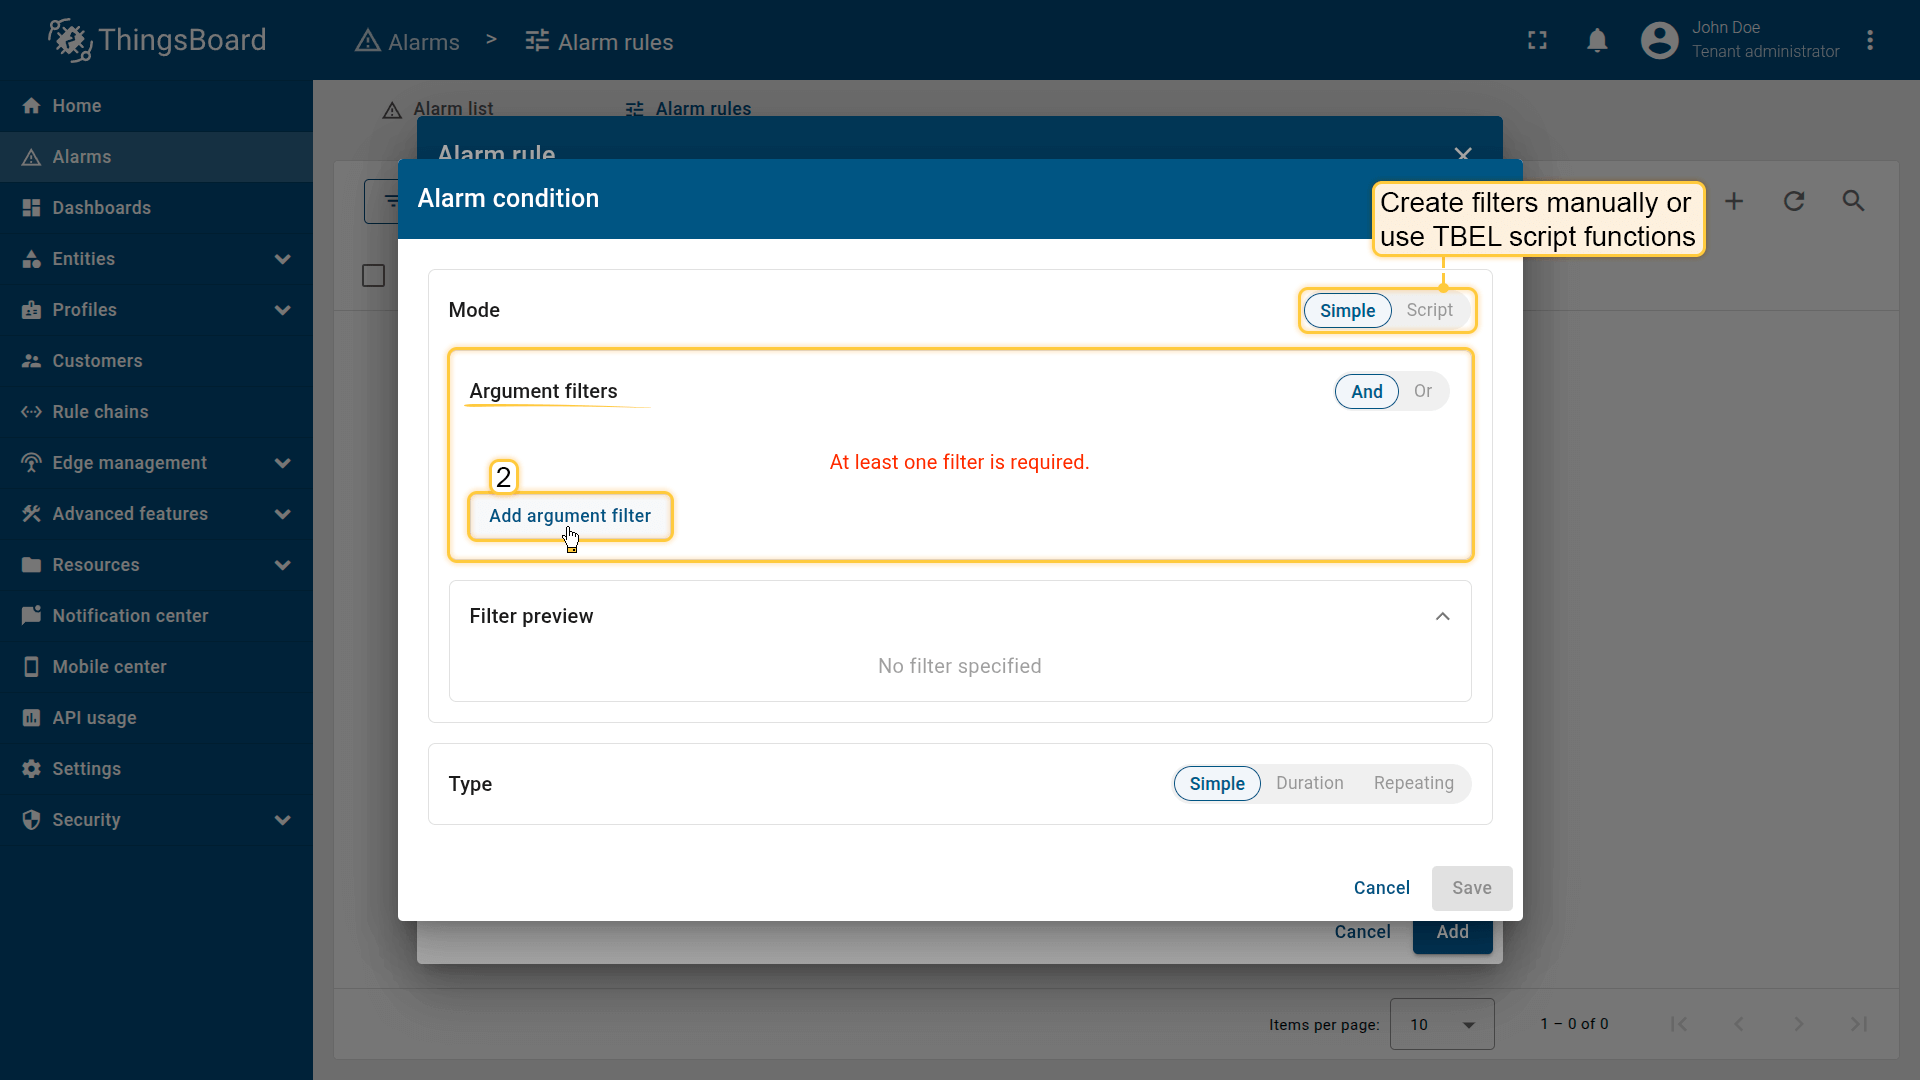
Condition
The Condition defines the logic that determines whether an alarm should be created or updated.
This is the primary expression used to evaluate whether the rule is fulfilled.
Examples use cases:
- temperature > 30
- device is offline
- complex expressions using multiple arguments, telemetry fields, or attributes
(e.g., temperature > threshold AND doorState == open)
Add create condition
Click Add condition
Configure the alarm trigger logic by defining one or more filters.
You can create filters manually or use TBEL script functions for more advanced expressions.
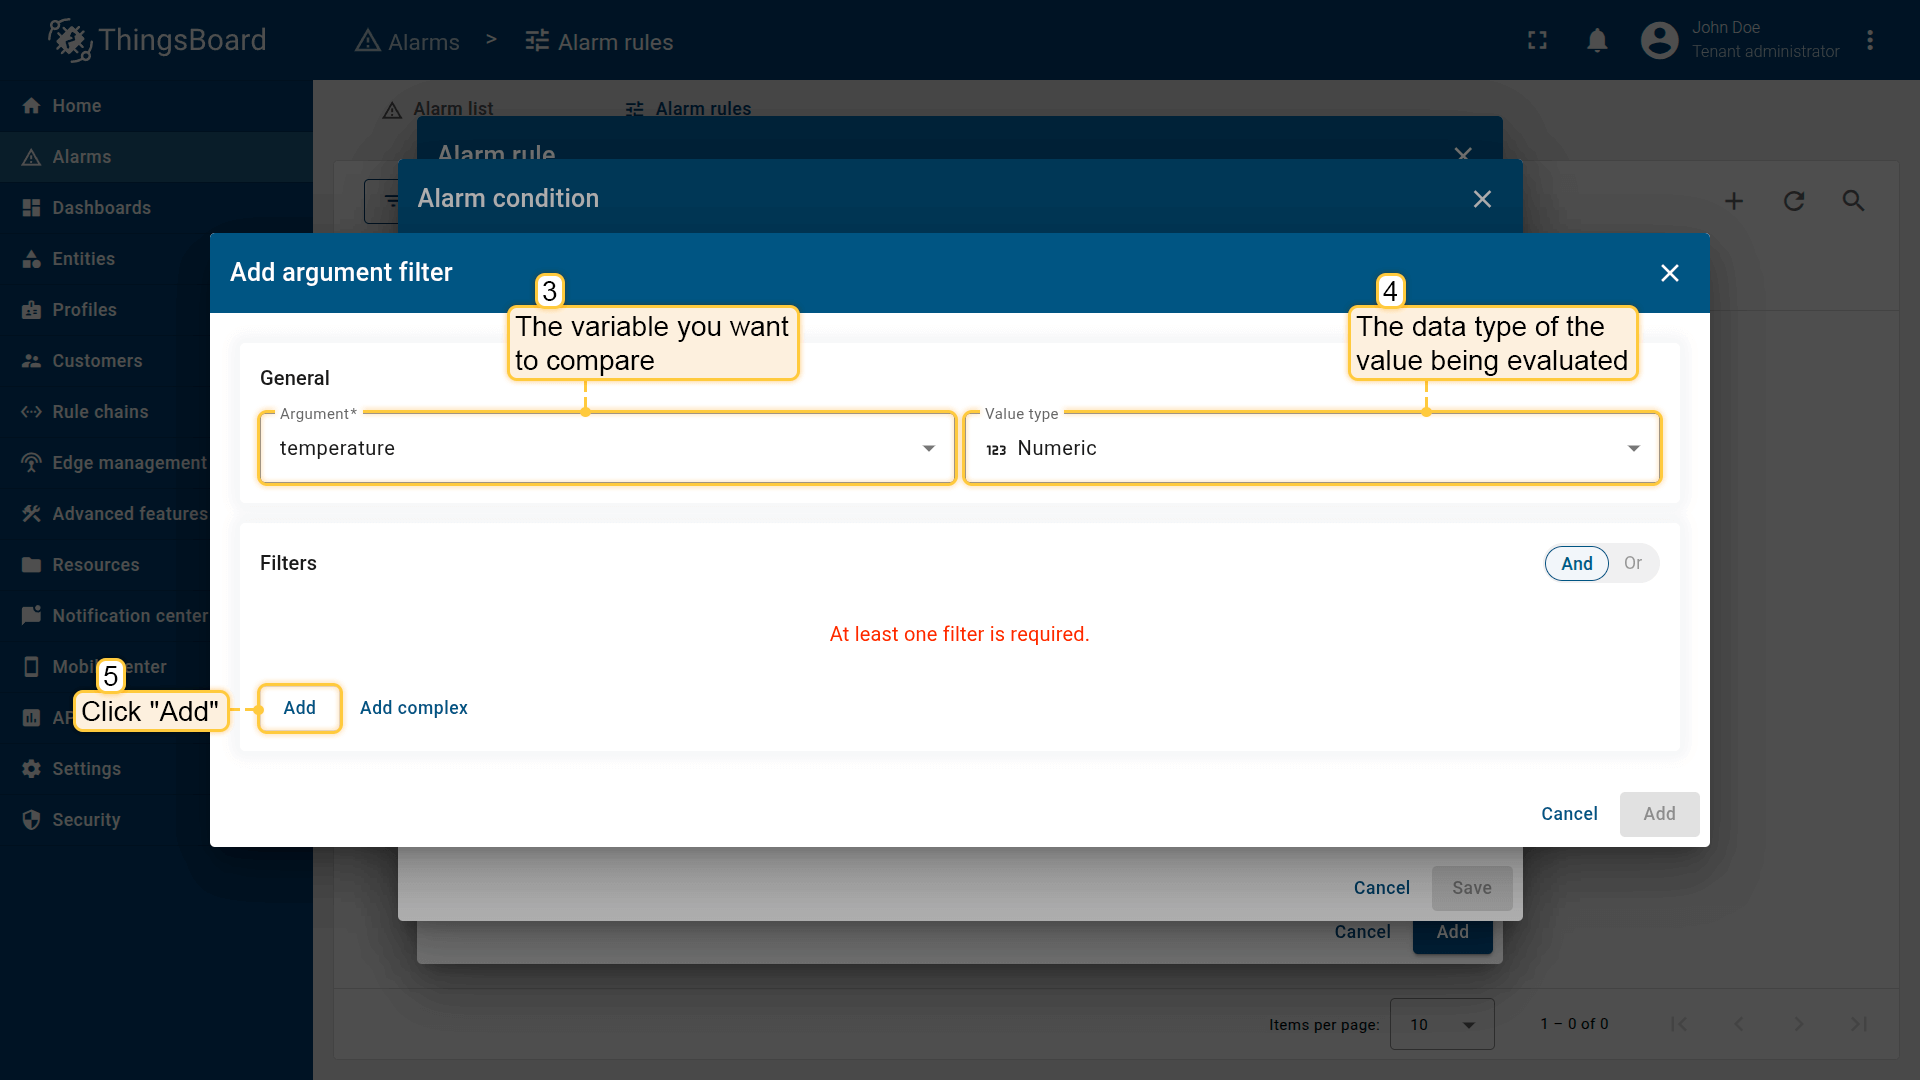
Click Add argument filter and configure:
1. General configuration
- Argument — the variable you want to compare (e.g., temperature)
- Value type — the data type of the value being evaluated (Numeric, Boolean, String, etc.)
2. Configure filters
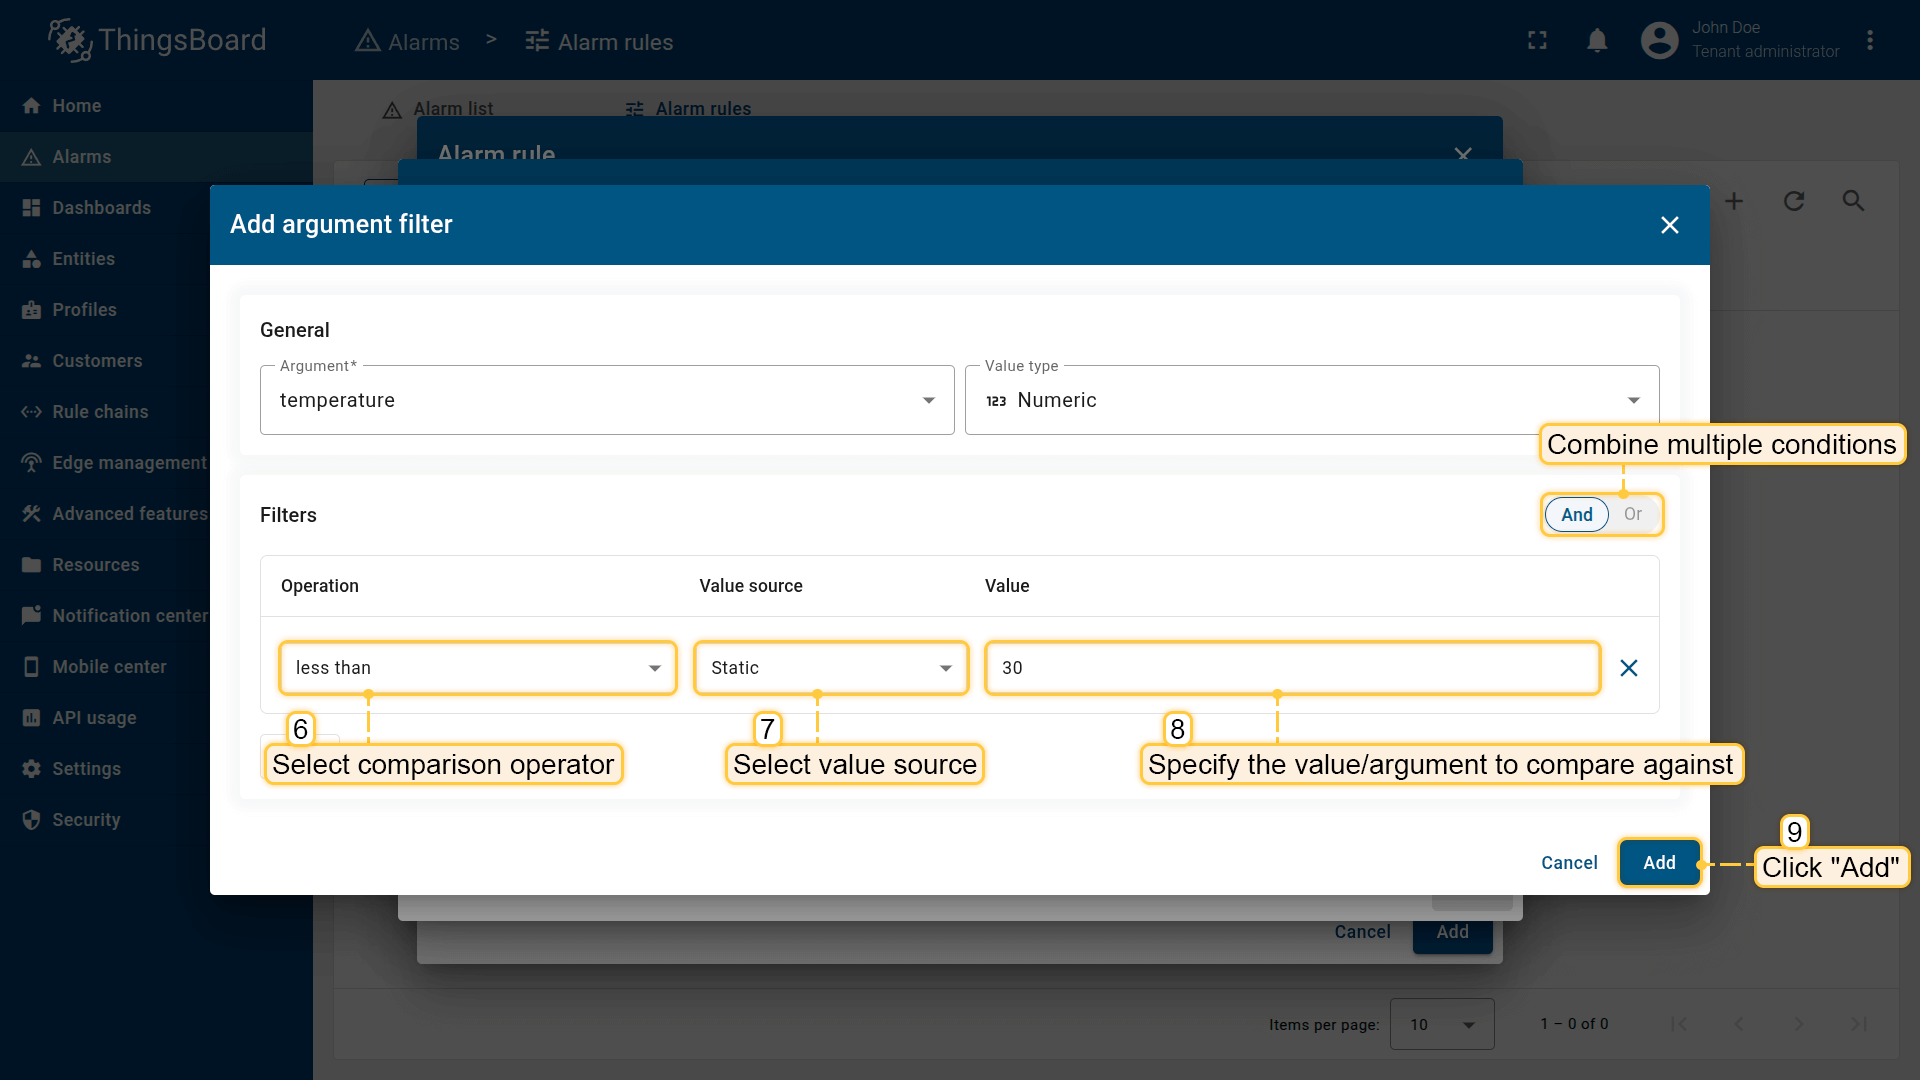
Under Filters, click Add and specify:
- Operation — the comparison operator, such as: equal, not equal, missing for, greater than, less than, etc.
- Value source — select one of the following:
- Static — use a fixed predefined value
- Dynamic — use a value retrieved from another argument
- Value — specify the value to compare against
Combine multiple conditions
If you add more than one filter, choose a logical operator:
- AND — all conditions must be true
- OR — at least one condition must be true
After adding all required filters, click Add to save the condition.


- Argument — the variable you want to compare (e.g., temperature).
- Value type — the data type of the value being evaluated (Numeric, Boolean, String, etc.).

- Operation — the comparison operator.
- Value source — select one of the following.
- Value — specify the value to compare against.
- After adding all required filters, click Add to save the condition.

Condition types
ThingsBoard supports three types of conditions:
- Simple.
Triggers immediately when the expression becomes true.
Used for instant threshold violations.
Example: temperature > 10 - Duration.
The condition must stay true continuously for a defined time period.
Helps reduce false positives caused by short data spikes.
Example: temperature > 10 for 60 seconds - Repeating.
Triggers only after the condition occurs a specified number of times.
Useful when repeated errors matter more than a single event.
Example: signalLost == true three times in a row
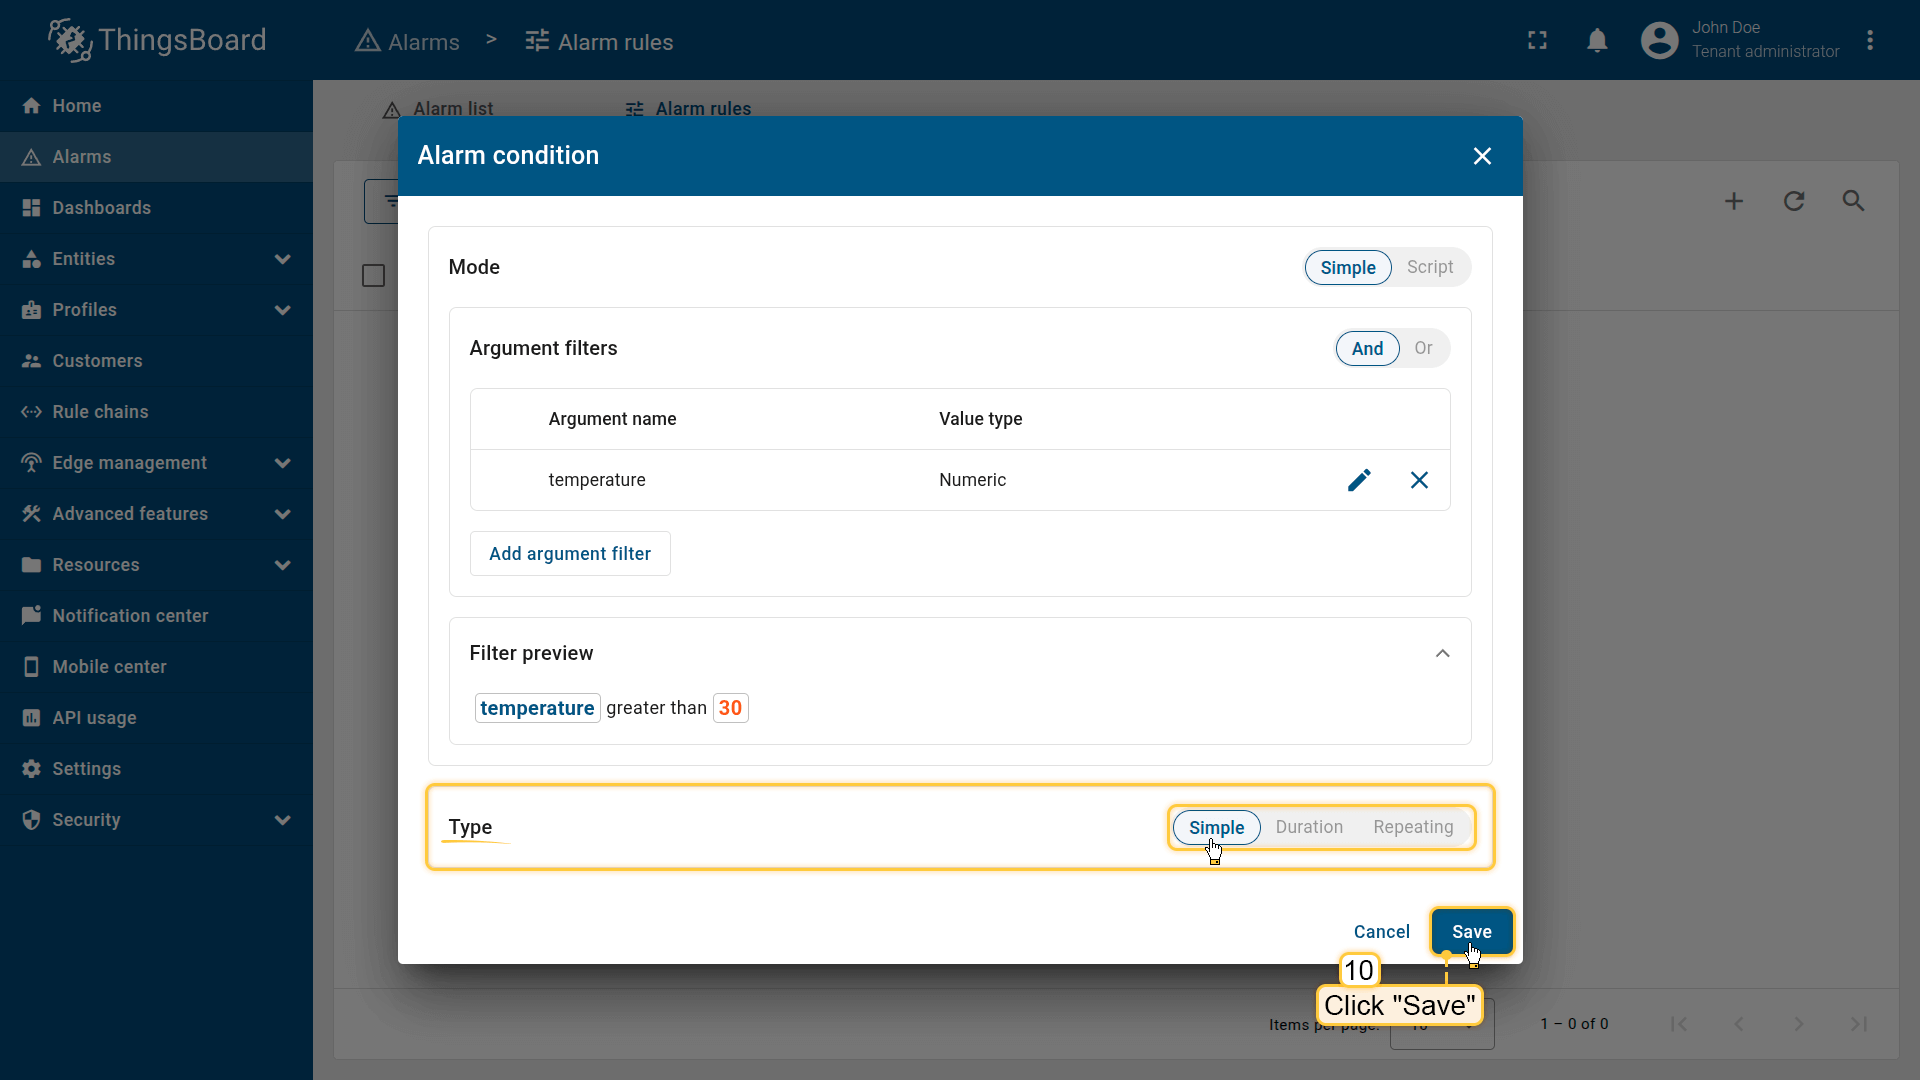
- Simple. Triggers immediately when the expression becomes true.
- Duration. The condition must stay true continuously for a defined time period.
- Repeating. Triggers only after the condition occurs a specified number of times.
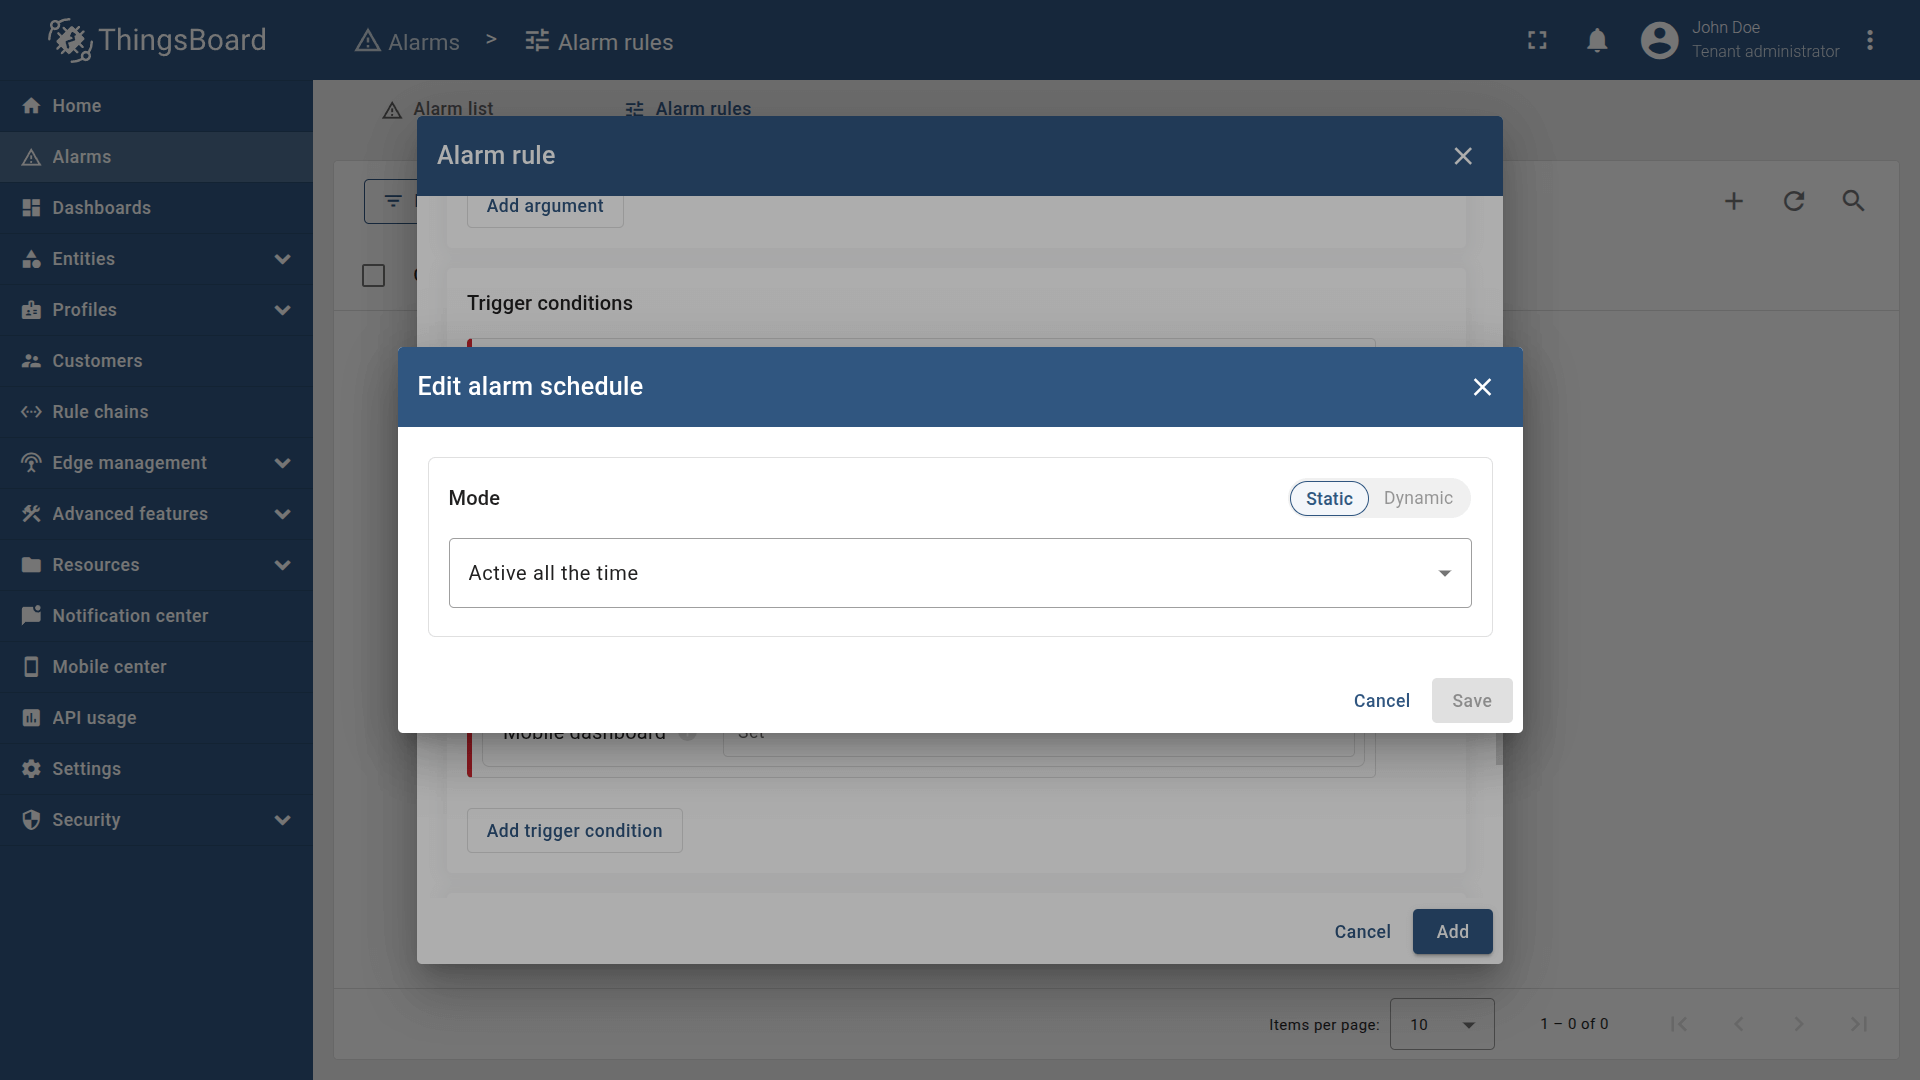
Schedule
The Schedule defines the time periods during which the alarm creation rule is active.
The system evaluates create conditions only when the current time falls within an allowed interval.
If the create condition becomes true outside the defined schedule, the alarm will not be created — even if the logical expression evaluates to true.


Schedule types
Static mode
ThingsBoard supports three schedule modes:
- Active all time — always active
- Active at a specific time range Example: Mon–Fri, 09:00–18:00
- Custom schedule - define different intervals for each day of the week

Dynamic mode
Instead of configuring the schedule manually, you can provide a JSON object through an attribute or telemetry. This is useful when the schedule needs to vary from one device to another or from one customer to another.
How to enable dynamic mode
- In the Schedule section, choose Dynamic mode.
- Select the argument (attribute or telemetry) that contains the JSON with the desired schedule configuration.

. Instead of configuring the schedule manually, you can provide a JSON object through an attribute or telemetry. This is useful when the schedule needs to vary from one device to another or from one customer to another.
Examples of schedule JSON
1. Active all time
The JSON object may include:
1
{}
or
1
2
3
{
  "type": "ANY_TIME"
}
2. Specific time schedule
This format allows you to define an exact time range for selected days of the week.
Example:
Active all day on Tuesday and Thursday:
1
2
3
4
5
6
7
{
  "type": "SPECIFIC_TIME",
  "daysOfWeek": [2, 4],
  "startsOn": 0,
  "endsOn": 0,
  "timezone": "Europe/Kiev"
}
Field explanation:
- timezone — the time zone in which the schedule is interpreted
- daysOfWeek — days of the week in numeric format (1–7, where 1 = Monday)
- startsOn — the start of the active period, in milliseconds from the beginning of the day
- endsOn — the end of the active period, in milliseconds from the beginning of the day
When both startsOn and endsOn are set to 0, it means the rule is active for the entire day.
3. Custom schedule
Defines a separate time interval for each individual day.
Example:
The schedule is active every day for the full 24 hours:
1
2
3
4
5
6
7
8
9
10
11
12
13
{
  "type": "CUSTOM",
  "timezone": "Europe/Kiev",
  "items": [
    { "dayOfWeek": 1, "enabled": true, "startsOn": 0, "endsOn": 0 },
    { "dayOfWeek": 2, "enabled": true, "startsOn": 0, "endsOn": 0 },
    { "dayOfWeek": 3, "enabled": true, "startsOn": 0, "endsOn": 0 },
    { "dayOfWeek": 4, "enabled": true, "startsOn": 0, "endsOn": 0 },
    { "dayOfWeek": 5, "enabled": true, "startsOn": 0, "endsOn": 0 },
    { "dayOfWeek": 6, "enabled": true, "startsOn": 0, "endsOn": 0 },
    { "dayOfWeek": 7, "enabled": true, "startsOn": 0, "endsOn": 0 }
  ]
}
Field explanation:
- timezone — the time zone used for interpreting the schedule
- items — an array containing the configuration for each day
Each item includes:
- daysOfWeek - a list of days in numeric format (Monday = 1, Tuesday = 2, etc.) during which the schedule will be active.
- enabled — whether the rule is active on that day
- startsOn - a timestamp in milliseconds from which the schedule becomes active for the specified days.
- endsOn: - a timestamp in milliseconds until which the schedule remains active for the specified days.
When both startsOn and endsOn are set to 0, it means the rule is active for the entire day.
Additional info
The Additional info field allows you to enrich an alarm with extra contextual data that may be useful for incident analysis or troubleshooting. This information is stored together with the alarm and displayed in the alarm details view, helping operators, technicians, and analysts work more efficiently.
Examples of useful additions:
- operator notes
- troubleshooting steps
- links to documentation
- contextual fields such as:
- zone ID
- critical threshold description
- responsible person
Mobile dashboard
This option defines which mobile dashboard will open in the ThingsBoard mobile app when a user views the alarm.
How it works
After selecting a mobile dashboard:
- the mobile app automatically opens it when navigating to the alarm
- the user immediately sees relevant widgets and indicators
- troubleshooting becomes much faster
Example use cases
- Diagnostic dashboard for High Temperature alarms
- Technician-focused dashboard with control buttons
- Geolocation dashboard for mobile assets
Especially useful when:
- field engineers respond to alarms on-site
- quick diagnostics is required
- monitoring distributed devices (refrigerators, sensors, vehicles)
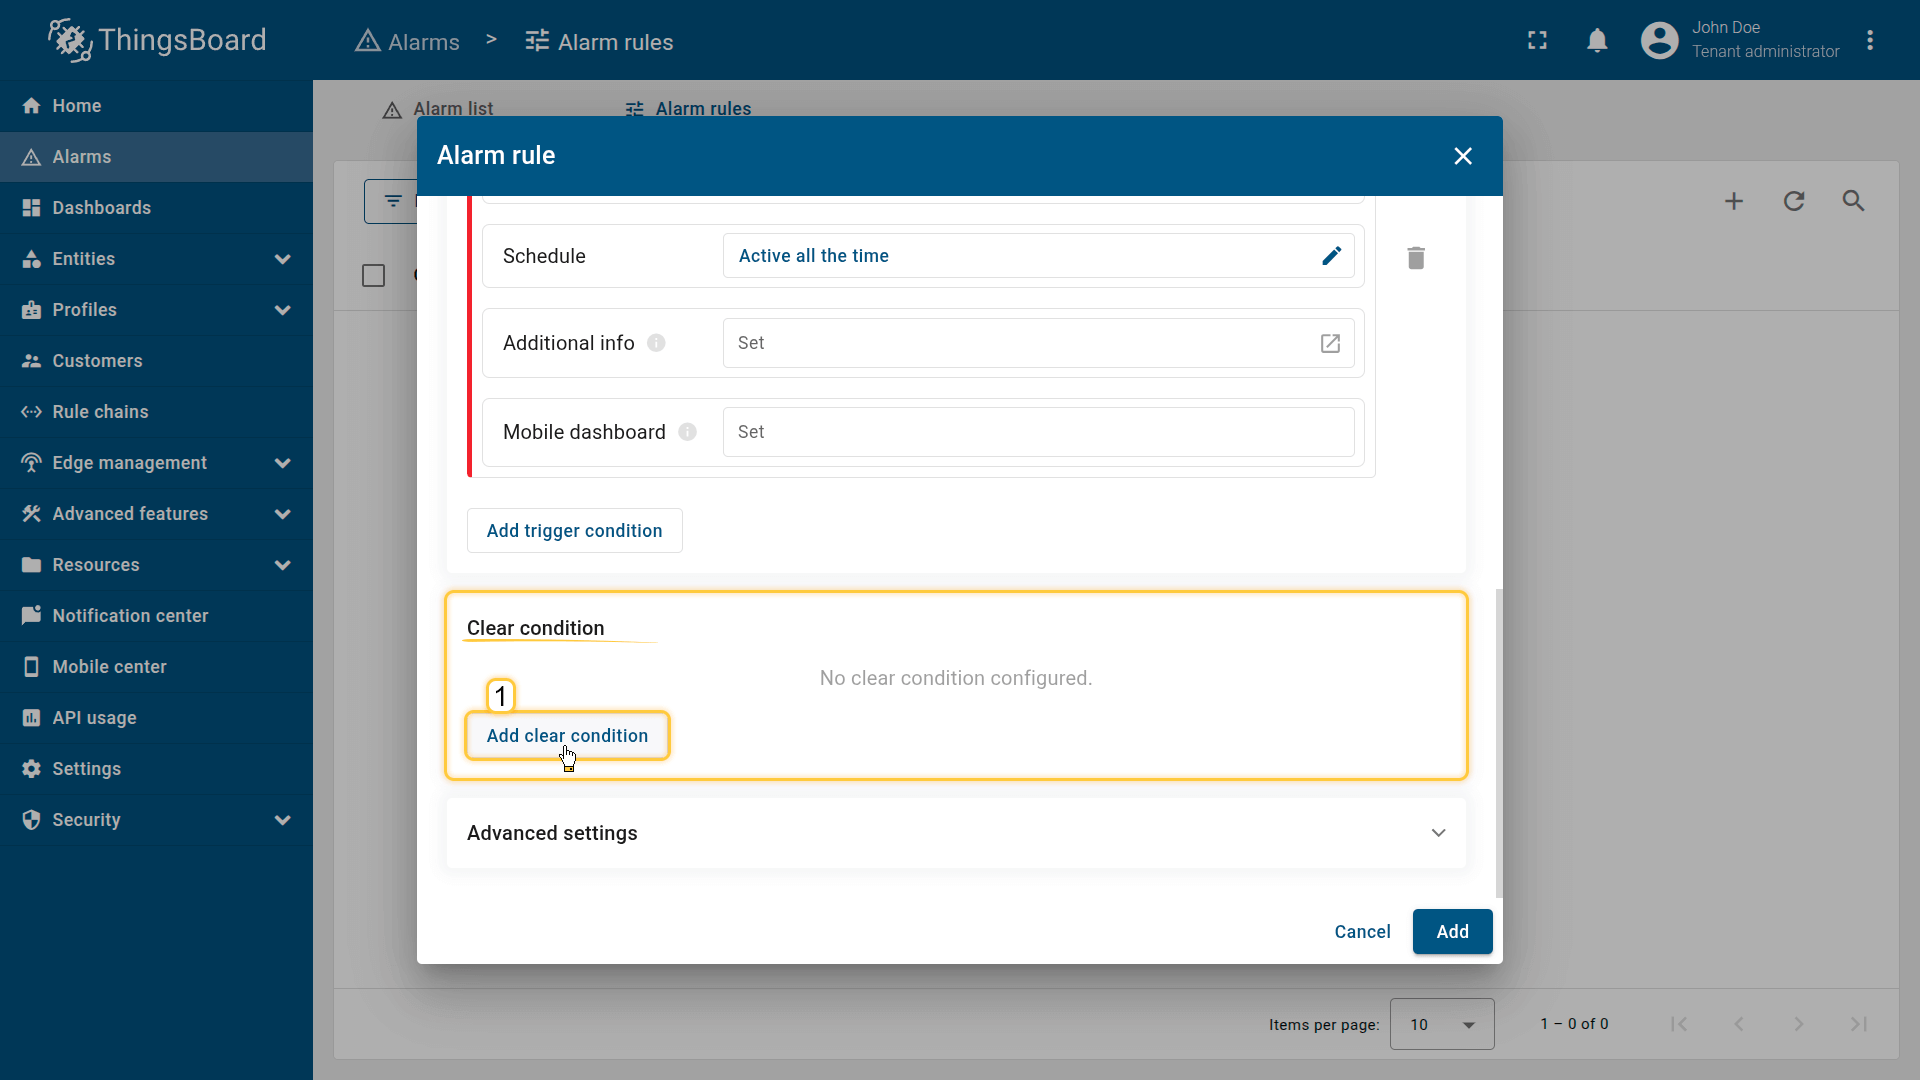
Clear condition
The Clear condition defines the logic by which ThingsBoard automatically transitions an alarm into the Cleared state.
If no clear condition is configured, the alarm will never clear automatically, even if the monitored values return to normal.
In such cases, the alarm can only be cleared manually — via the UI or API.
Click Add clear condition and configure the following parameters:
Step 5.1 Clear condition
The Clear condition specifies when an alarm is considered resolved and can safely transition into the Cleared state.
Examples of clear conditions:
- temperature ≤ 30
- values return to normal ranges
- device connection restored
- complex expressions involving multiple arguments
Add clear condition
Click Add condition to define the logic for clearing the alarm.
Configure the clear condition by adding one or more filters.
Filters can be created manually or using TBEL script functions for more advanced scenarios.
1. General configuration
Click Add argument filter and specify:
- Argument — the variable to evaluate (e.g., temperature)
- Value type — the expected input type (Numeric, Boolean, String, etc.)
2. Configure filters
In the Filters section, click Add and set:
- Operation — the comparison operator, for example: equal, not equal, missing for, greater than, less than, greater or equal, less or equal, starts with, ends with, contains, not contains, in, not in.
- Value source:
- Static — use a fixed value
- Dynamic — use a value retrieved from another argument
- Value — the value to compare against
Combine multiple conditions
If you add more than one filter, choose a logical operator:
- AND — all conditions must be true
- OR — at least one condition must be true
After adding all required filters, click Add to save the clear condition.


- Value type — the data type of the value being evaluated (Numeric, Boolean, String, etc.).
- Operation — the comparison operator.
- Value source — select one of the following.
- Value — specify the value to compare against
- After adding all required filters, click Add to save the condition.
Condition types
ThingsBoard supports the same condition types as for alarm creation:
- Simple — clears immediately when the condition becomes true
- Duration — must remain true for a specified period before clearing
- Repeating — the condition must be satisfied a certain number of times before clearing

- Simple. Clears immediately when the condition becomes true.
- Duration. Must remain true for a specified period before clearing.
- Repeating. The condition must be satisfied a certain number of times before clearing.
After completing all required configurations, click Save to store the clear condition.
Step 5.2 Schedule
The Clear Schedule defines when a clear condition is allowed to trigger.
Example use cases:
- callow automatic clearing only during working hours
- allow clearing only at night
- restrict clearing during specific time intervals
If the clear condition becomes true outside the allowed schedule, the alarm will not be cleared


- callow automatic clearing only during working hours
- allow clearing only at night
- restrict clearing during specific time intervals.
Step 5.3 Additional info
This block allows you to attach extra data that will be stored in Alarm Details at the moment the alarm is cleared.
Useful for:
- keeping a structured event log
- adding operator notes
- saving additional diagnostic context
- providing hints for follow-up actions
Supports dynamic placeholders using ${attributeName}.
Step 5.4 Mobile dashboard
Defines which mobile dashboard is opened in the ThingsBoard mobile app when viewing a cleared alarm.
This is useful when:
- additional diagnostics should be shown after clearance
- the operator must confirm system recovery
- the user needs to be redirected to another scenario or dashboard
Configure the advanced settings
In this step, you can define alarm propagation — how the alarm is distributed across other entities in the system.
Propagation determines who can see the alarm and at which level of the entity hierarchy it becomes visible.
This is especially important for multi-level asset structures, customer hierarchies, enterprise environments, and MSP deployments.
Available propagation options
Propagate alarm to related entities
When enabled, the alarm becomes visible to all entities related to the originator, regardless of the relation type.
Useful when:
- a Device is assigned to an Asset
- an Asset is linked to a Customer
- you want alarms to be visible across interconnected entities
This ensures that all entities within the relation graph—such as Device ⇾ Office ⇾ Building — can view and process the alarm.
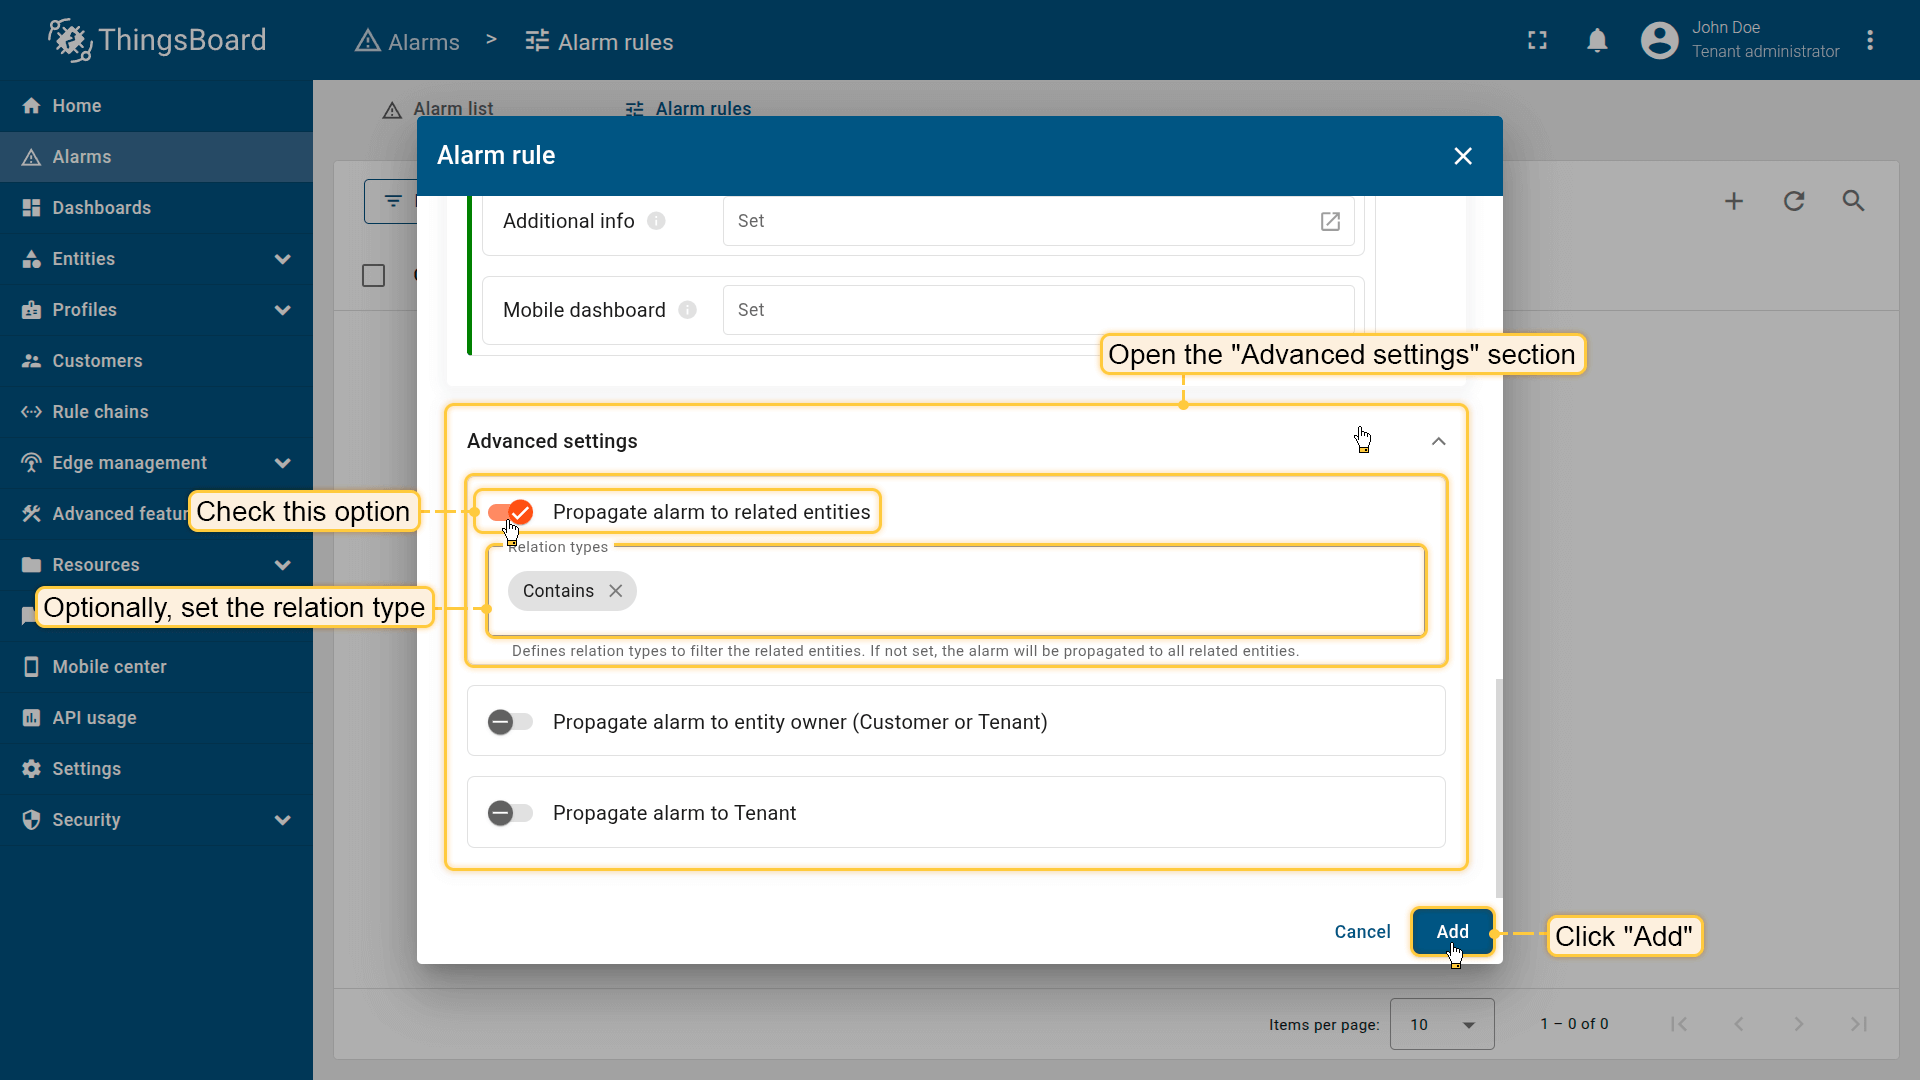
When enabled, the alarm becomes visible to all entities related to the originator, regardless of the relation type.
Propagate alarm to the owner (Customer / Tenant)
Makes the alarm visible to the direct owner of the originator — either a Customer or the Tenant.
This allows owners to see alarms from all their managed devices/assets without needing to set up additional relations.
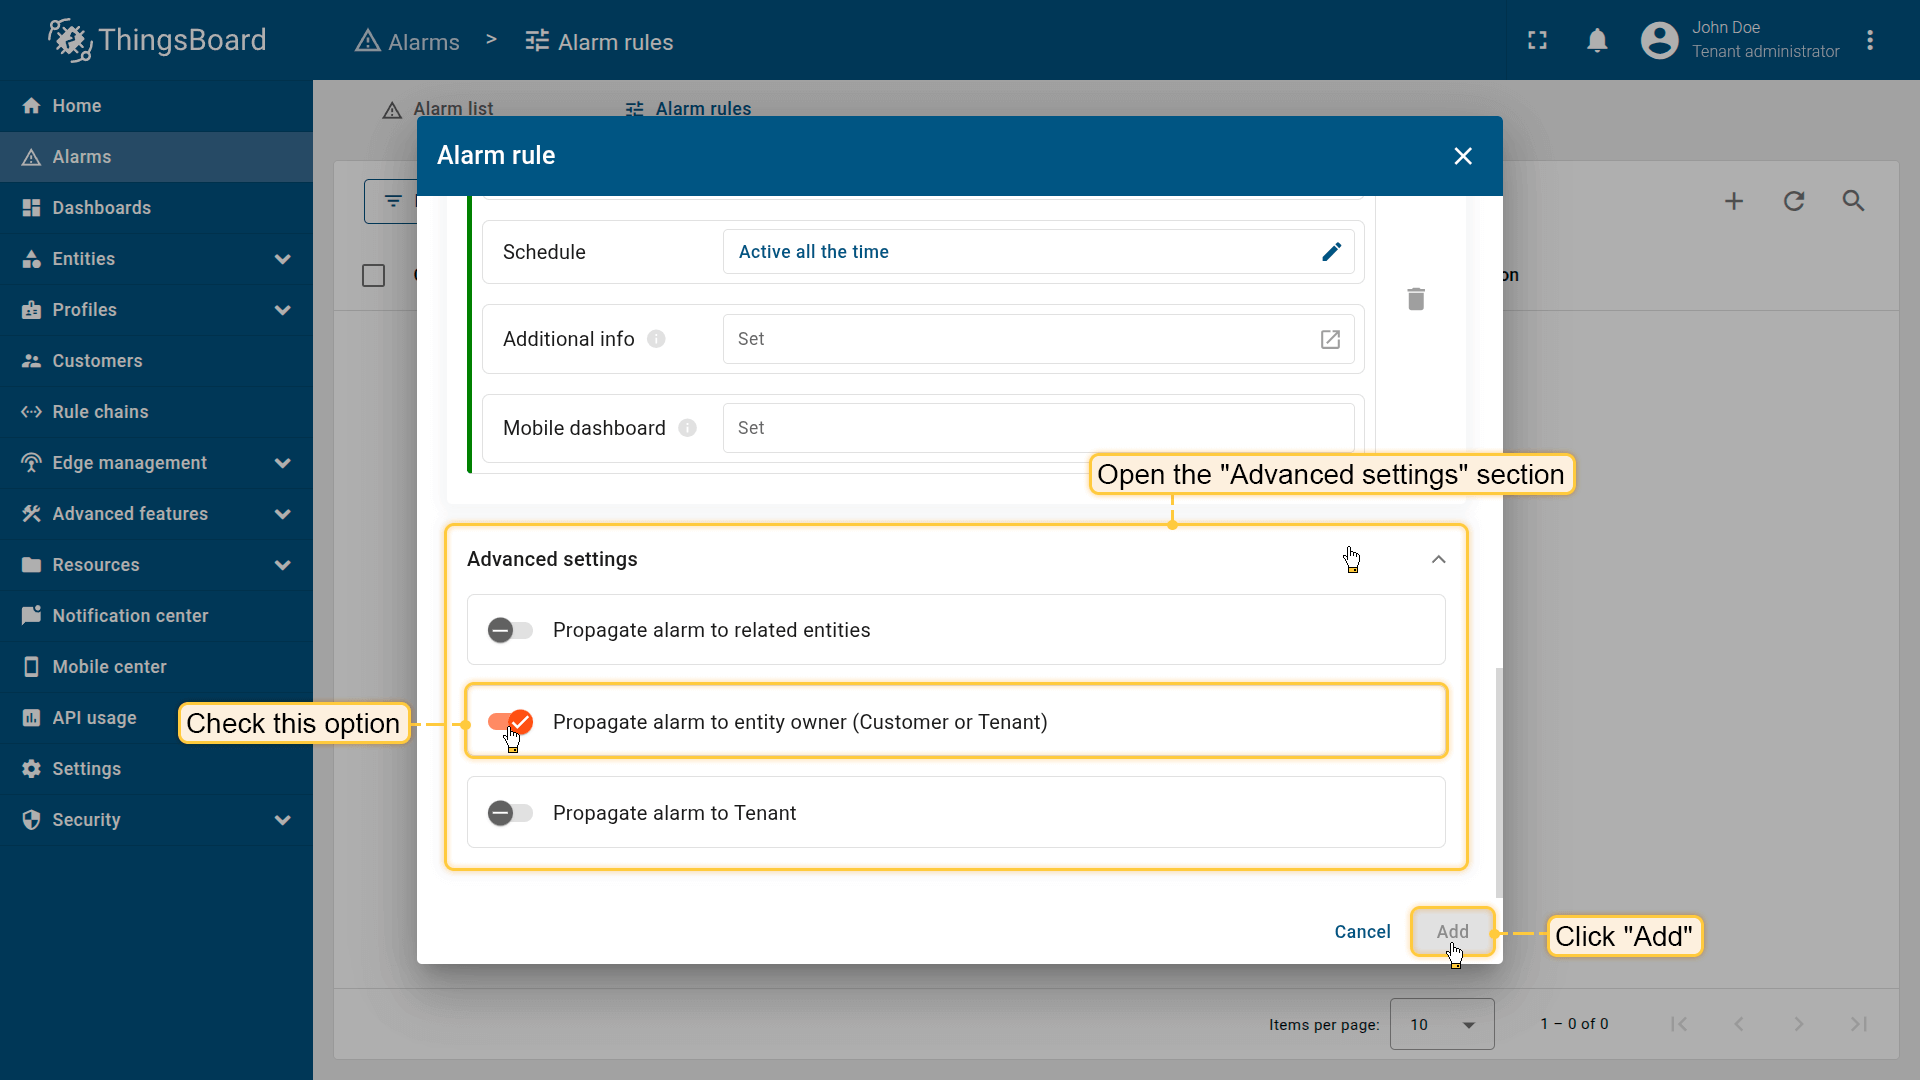
Makes the alarm visible to the direct owner of the originator — either a Customer or the Tenant.
Propagate alarm to Tenant
Makes the alarm visible at the Tenant level, regardless of ownership or relations.
Use this when:
- the Tenant Administrator needs visibility into all critical events
- a centralized overview of the entire infrastructure is required
This is the most global visibility option.
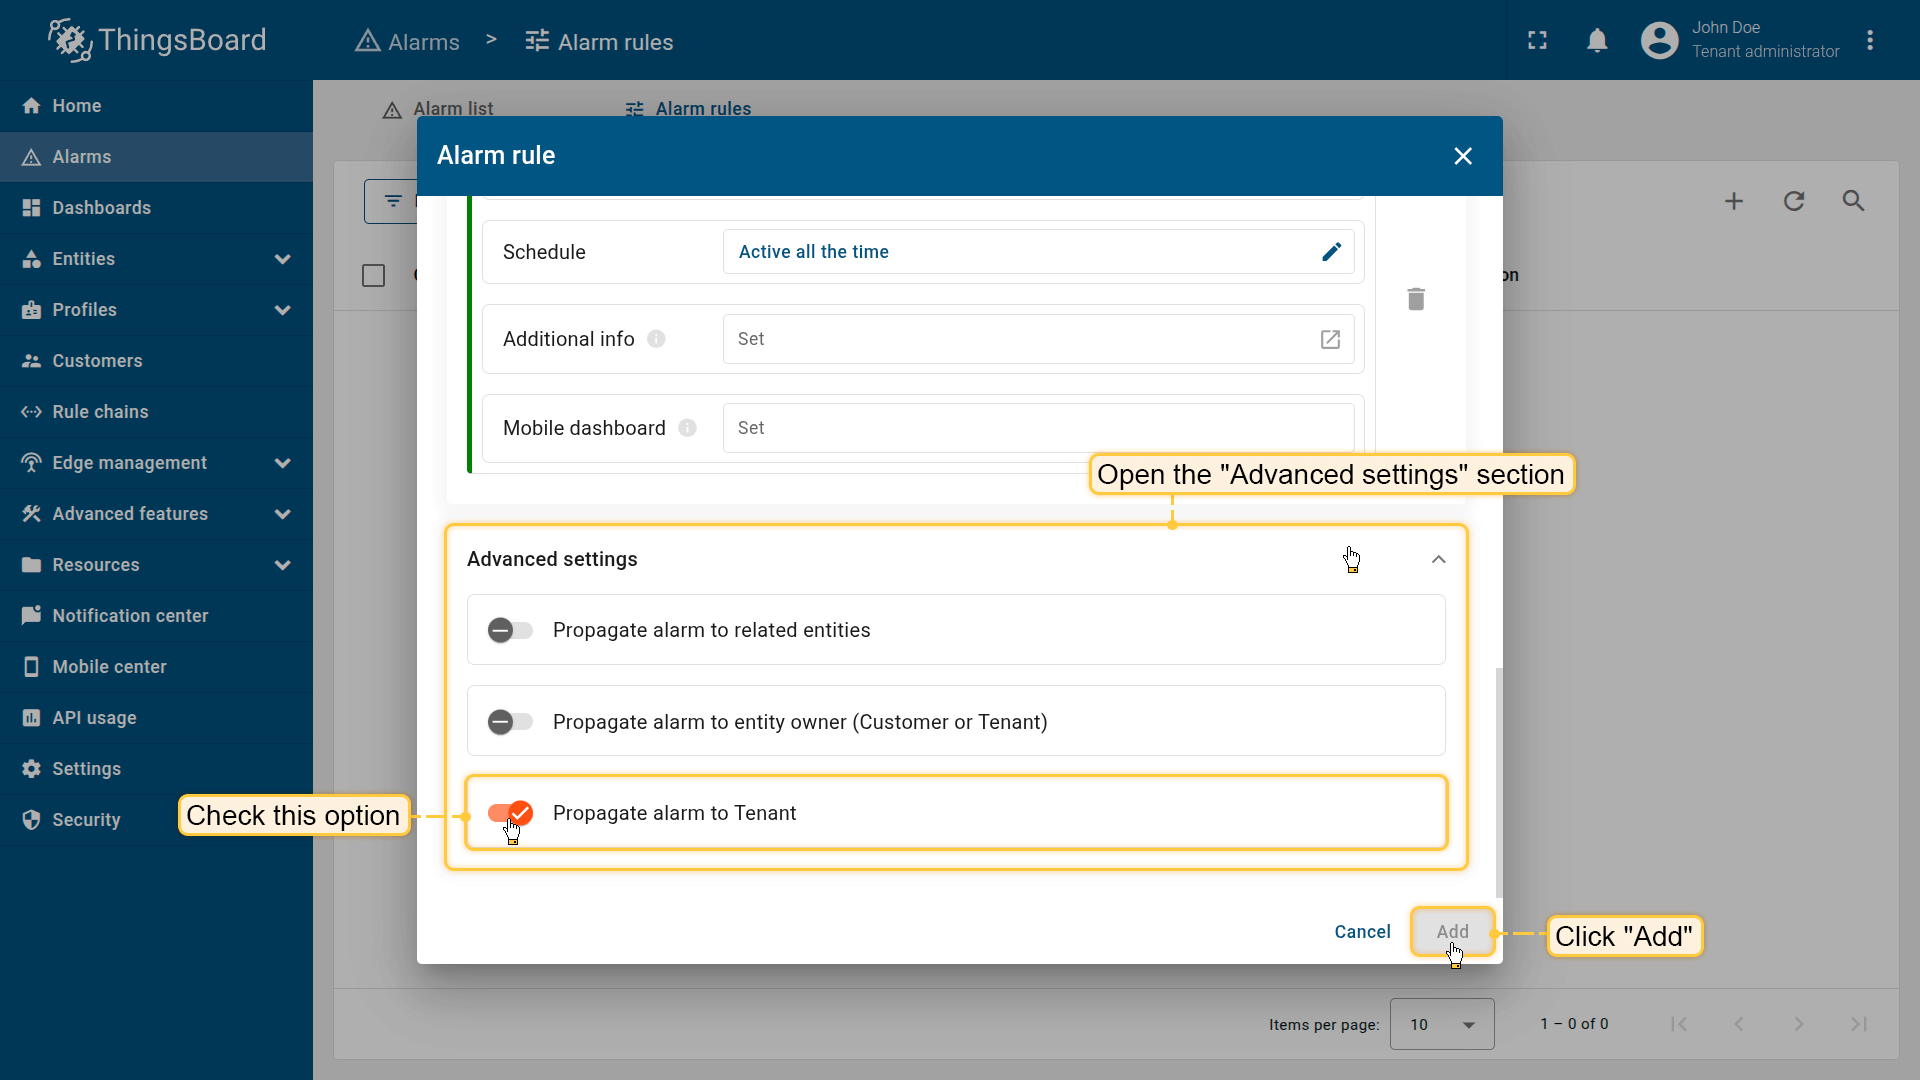
Makes the alarm visible at the Tenant level, regardless of ownership or relations.
Save the rule
Click Add to save the rule configuration.
After saving, ThingsBoard will automatically begin creating, updating, and processing alarms according to the conditions, schedule, and propagation settings you defined.

Managing alarm rules
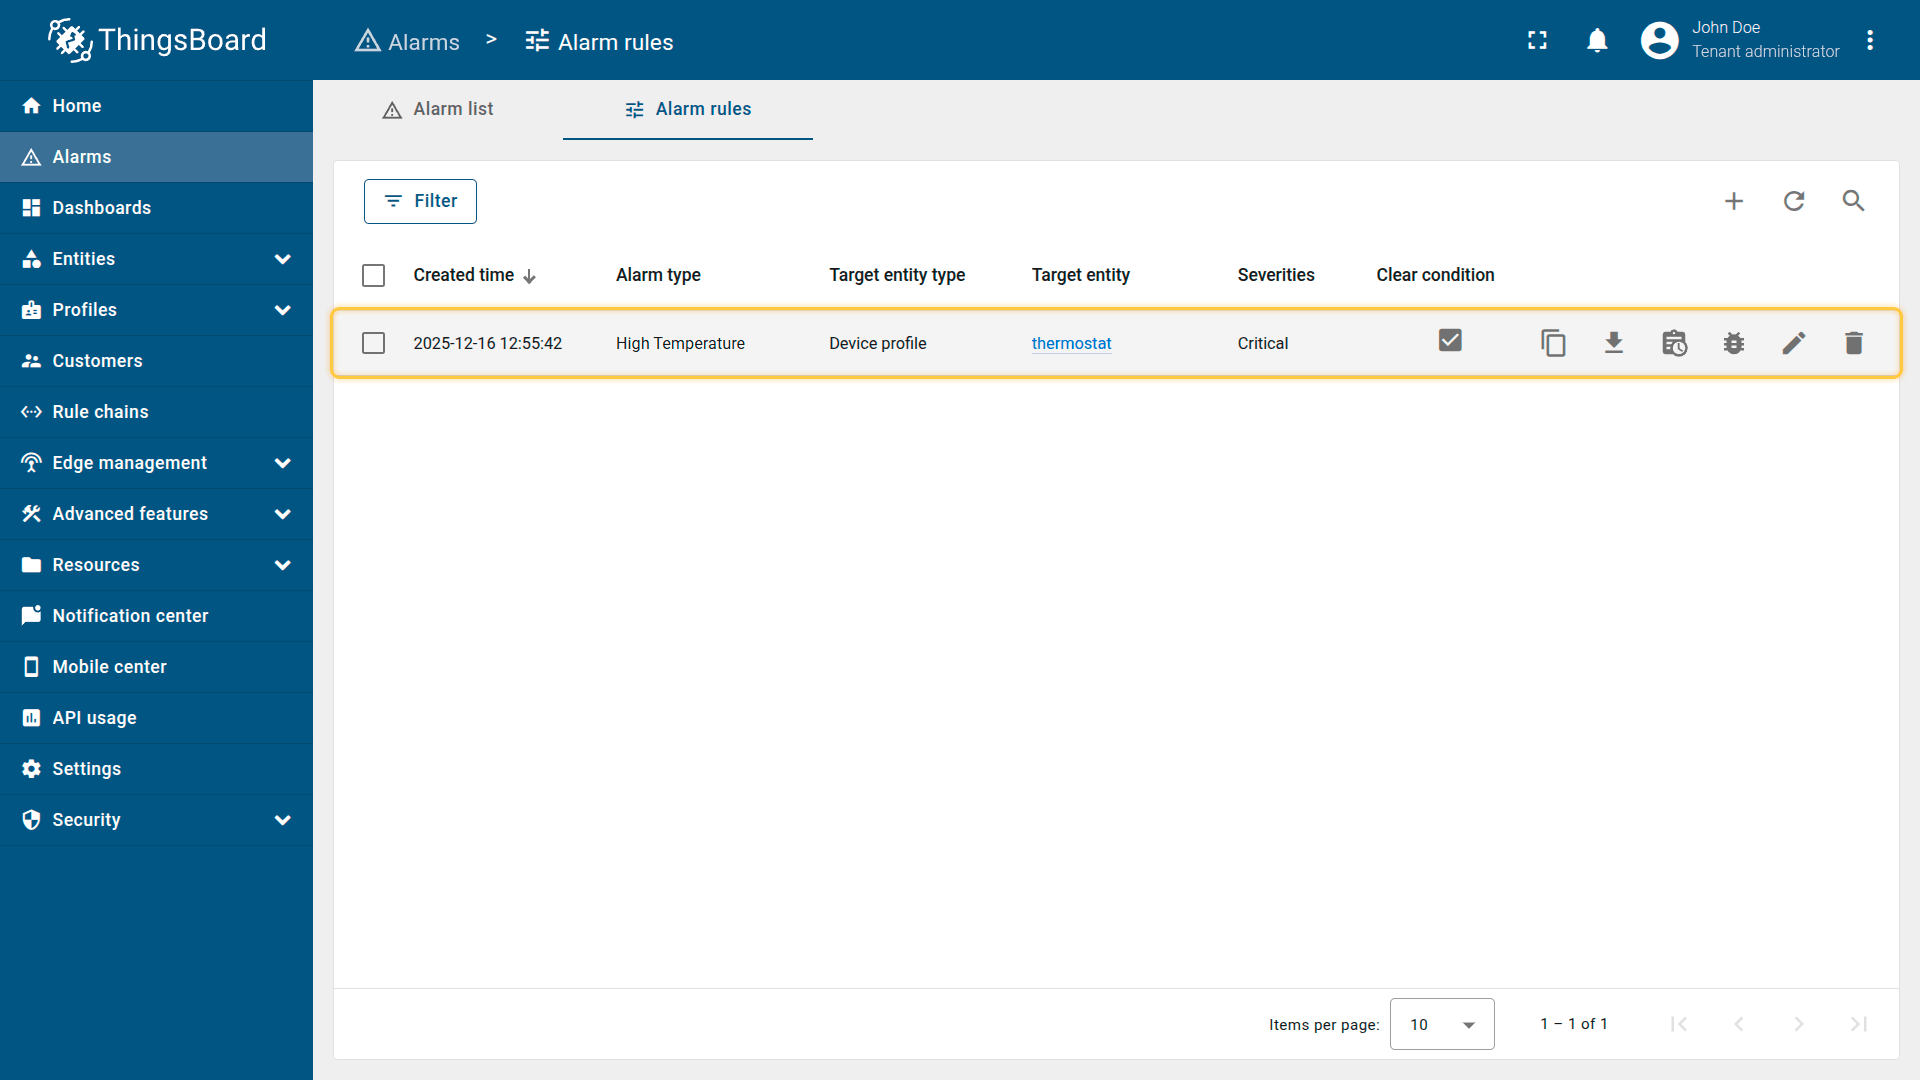
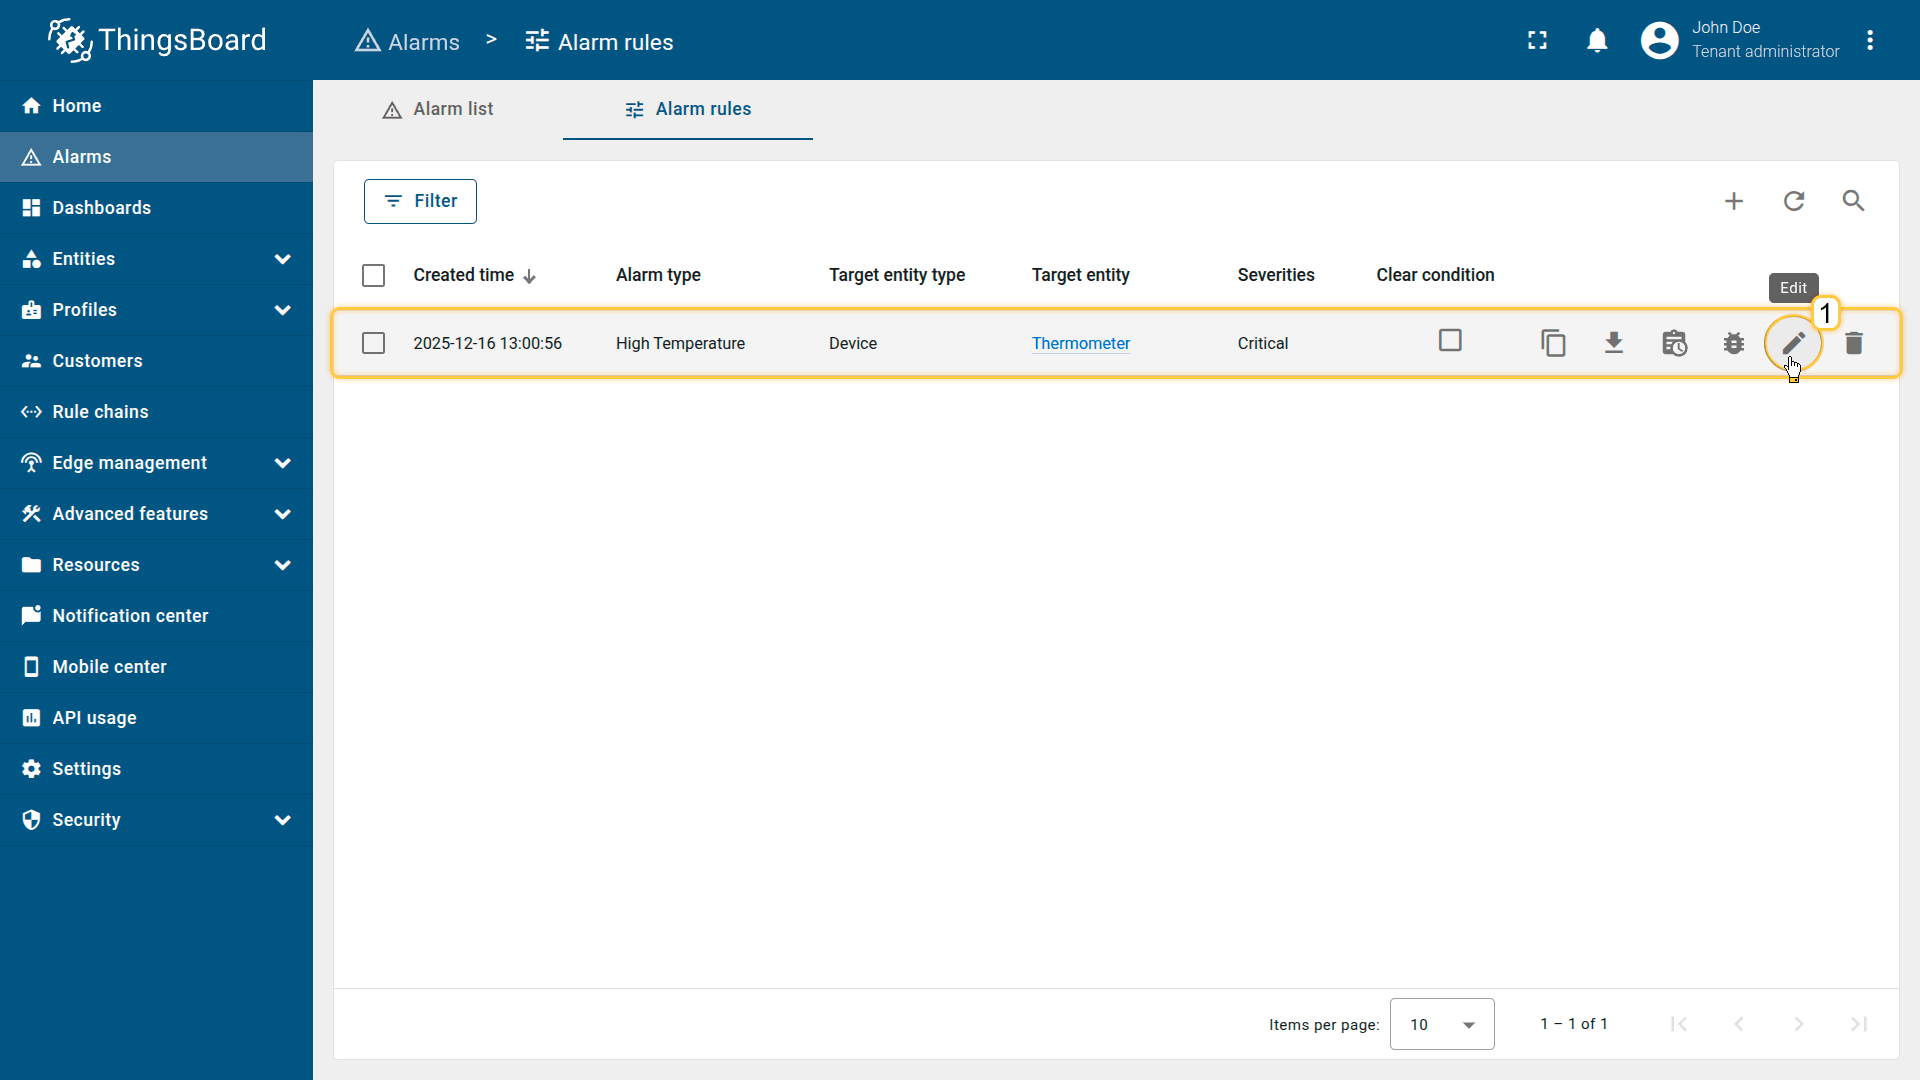
After you create an alarm rule, it appears in the table on the Alarms ⇾ Alarm rules page.
Here, you can quickly view the key parameters of each rule — alarm type, target entity, severity levels, and whether a clear condition is configured — and manage the rule using a set of available actions.
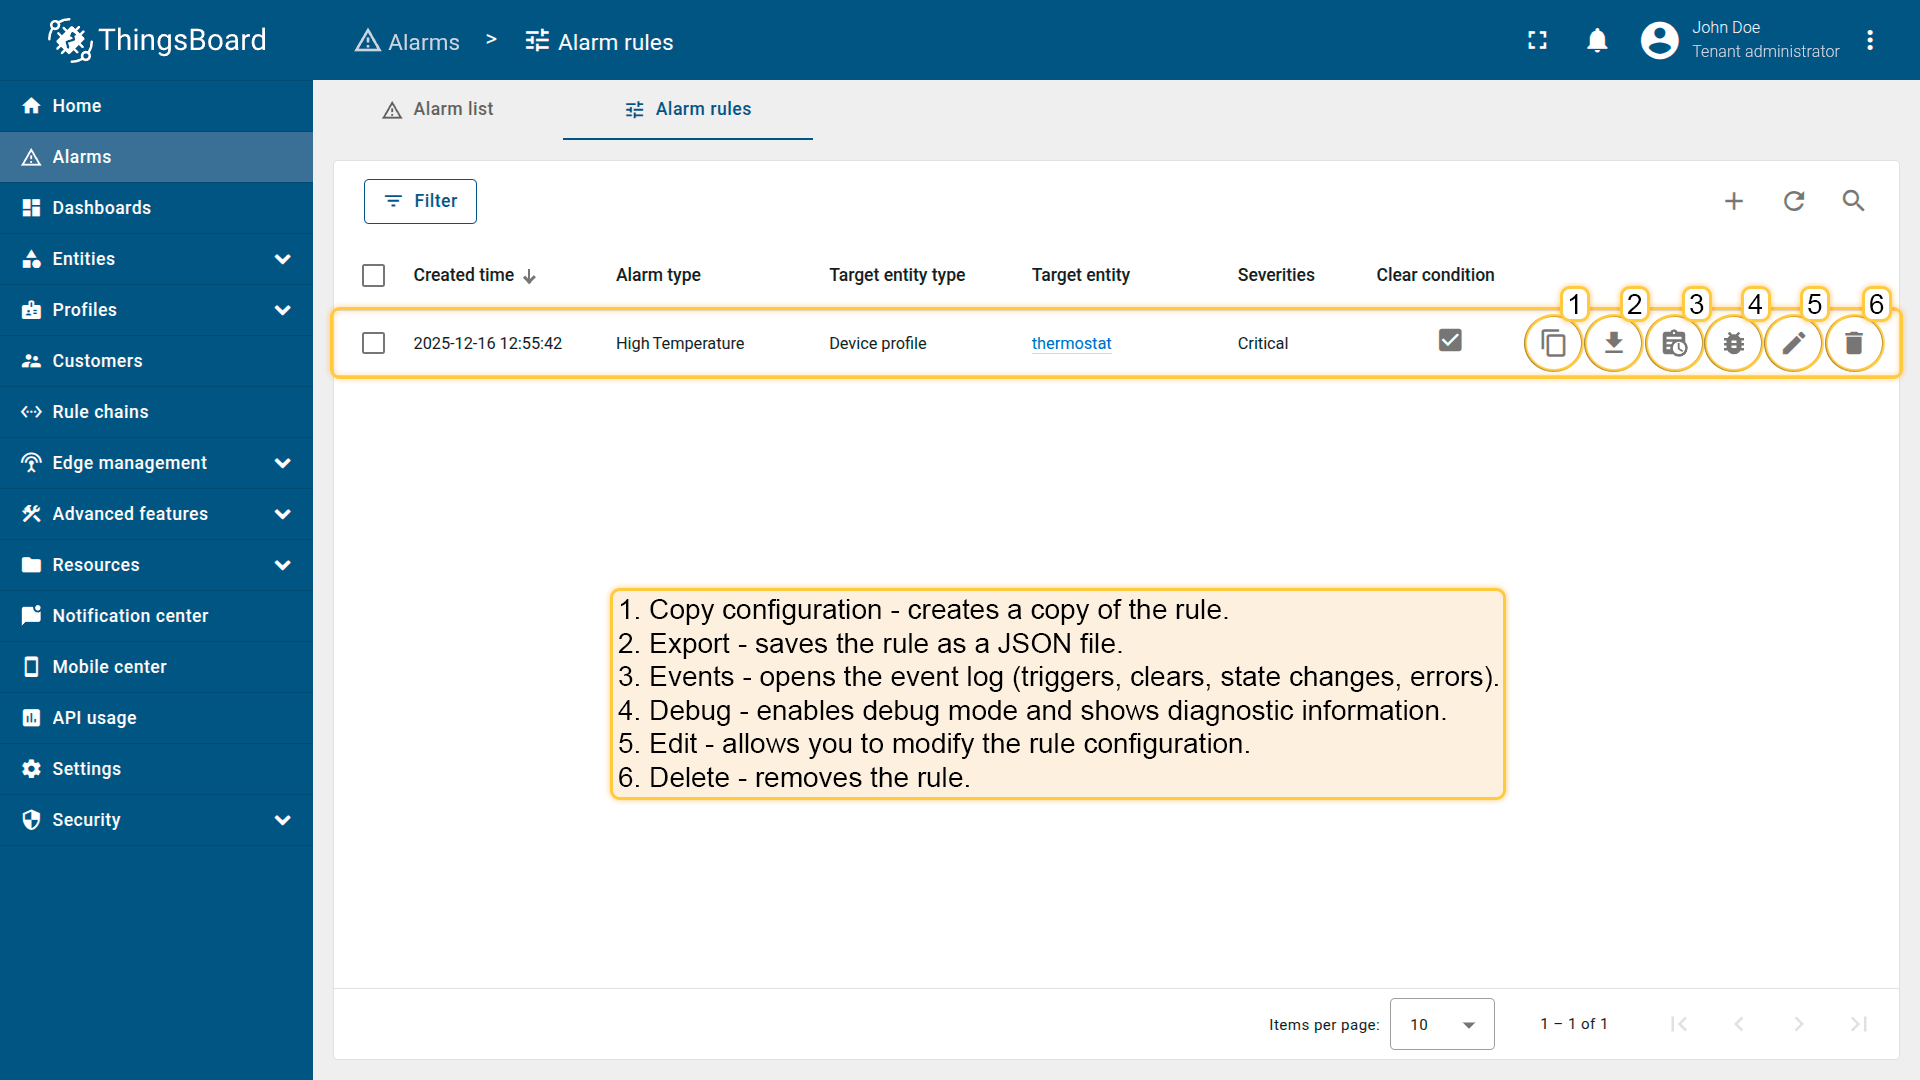
Each rule row includes an action panel that lets you copy, export, debug, edit, or delete the configuration.
Each alarm rule includes an action bar for managing it:
- Copy alarm rule configuration. Copies the rule configuration, allowing you to quickly create a new rule based on the existing one.
- Export. Exports the rule as a JSON file for backup or migration to another ThingsBoard instance.
- Events. Opens the event log associated with the rule, including triggers, clears, state changes, and errors.
- Debug configuration. Enables debug mode and provides access to detailed execution information for troubleshooting.
- Edit. Opens the rule editor where you can modify any configuration parameters.
- Delete. Removes the alarm rule from the system.
View alarm rule details
Click an alarm rule to view its detailed information.
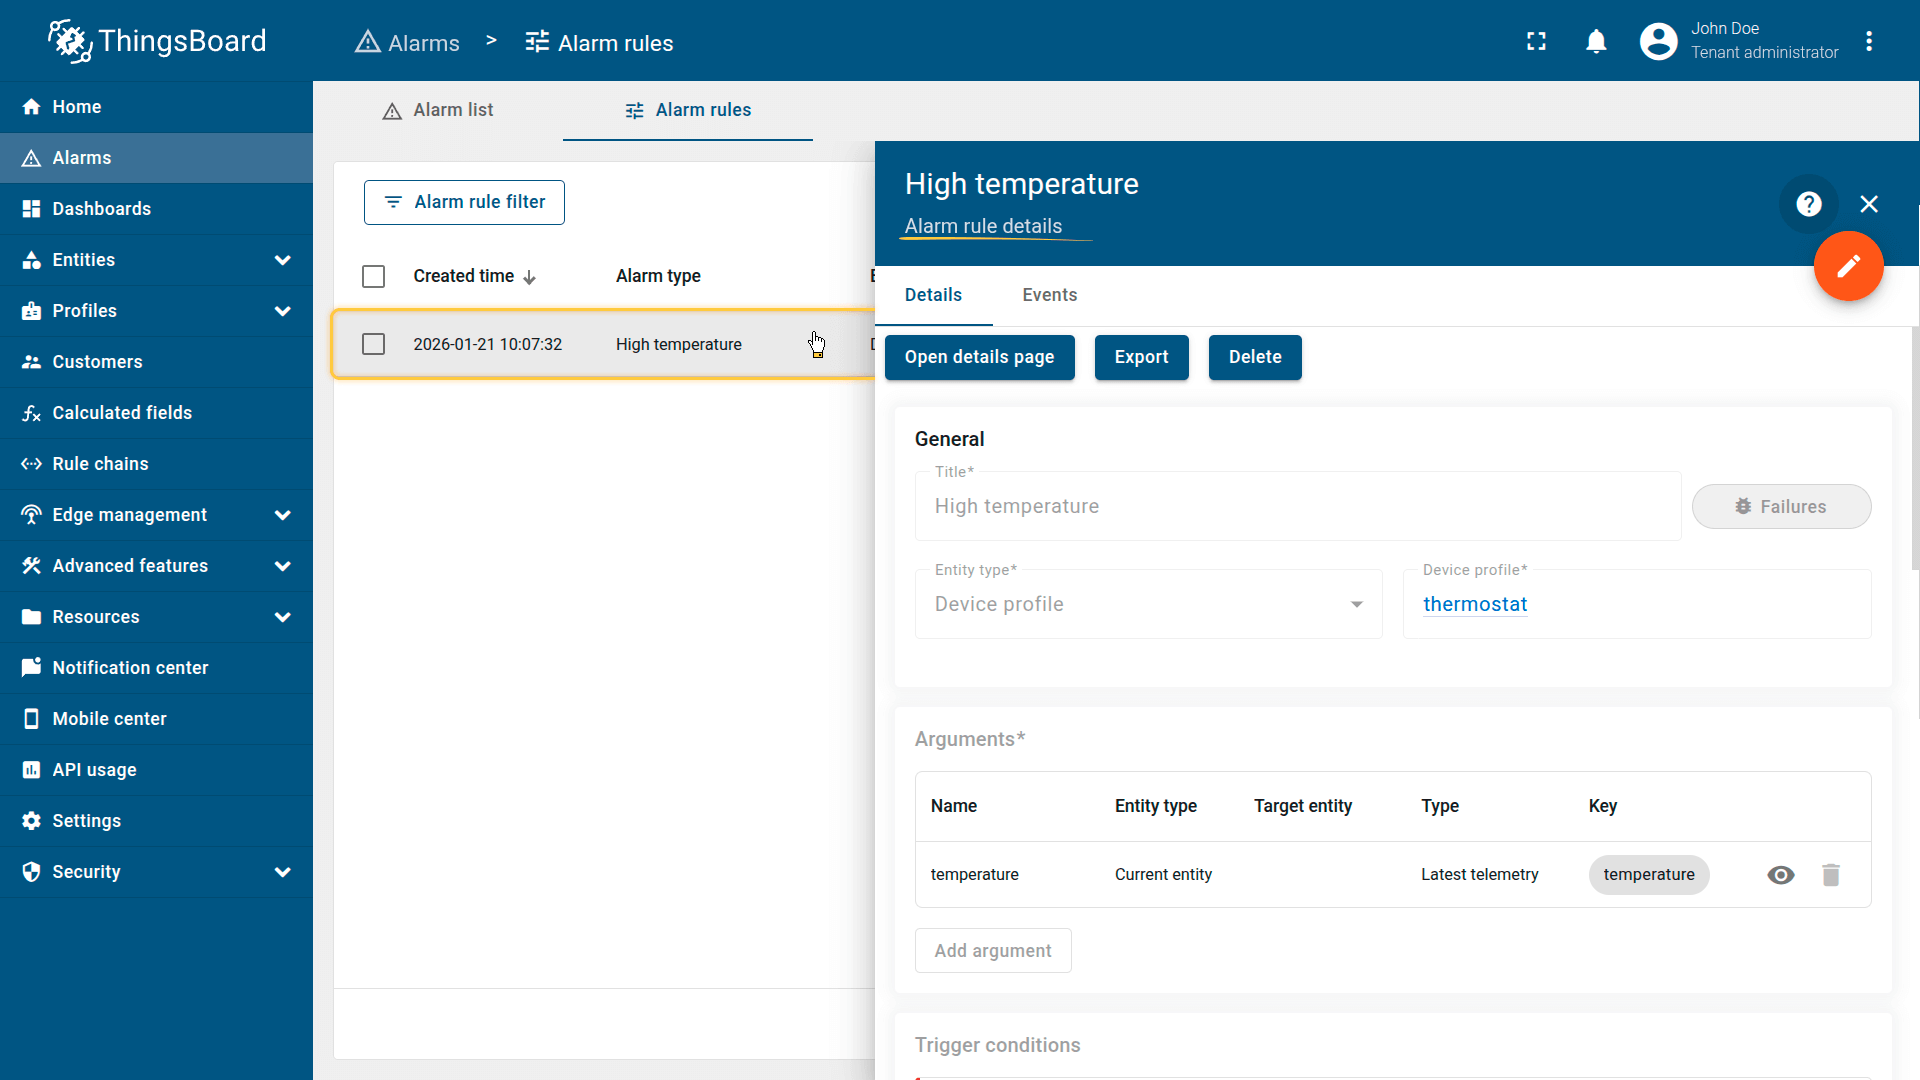
Edit the alarm rule
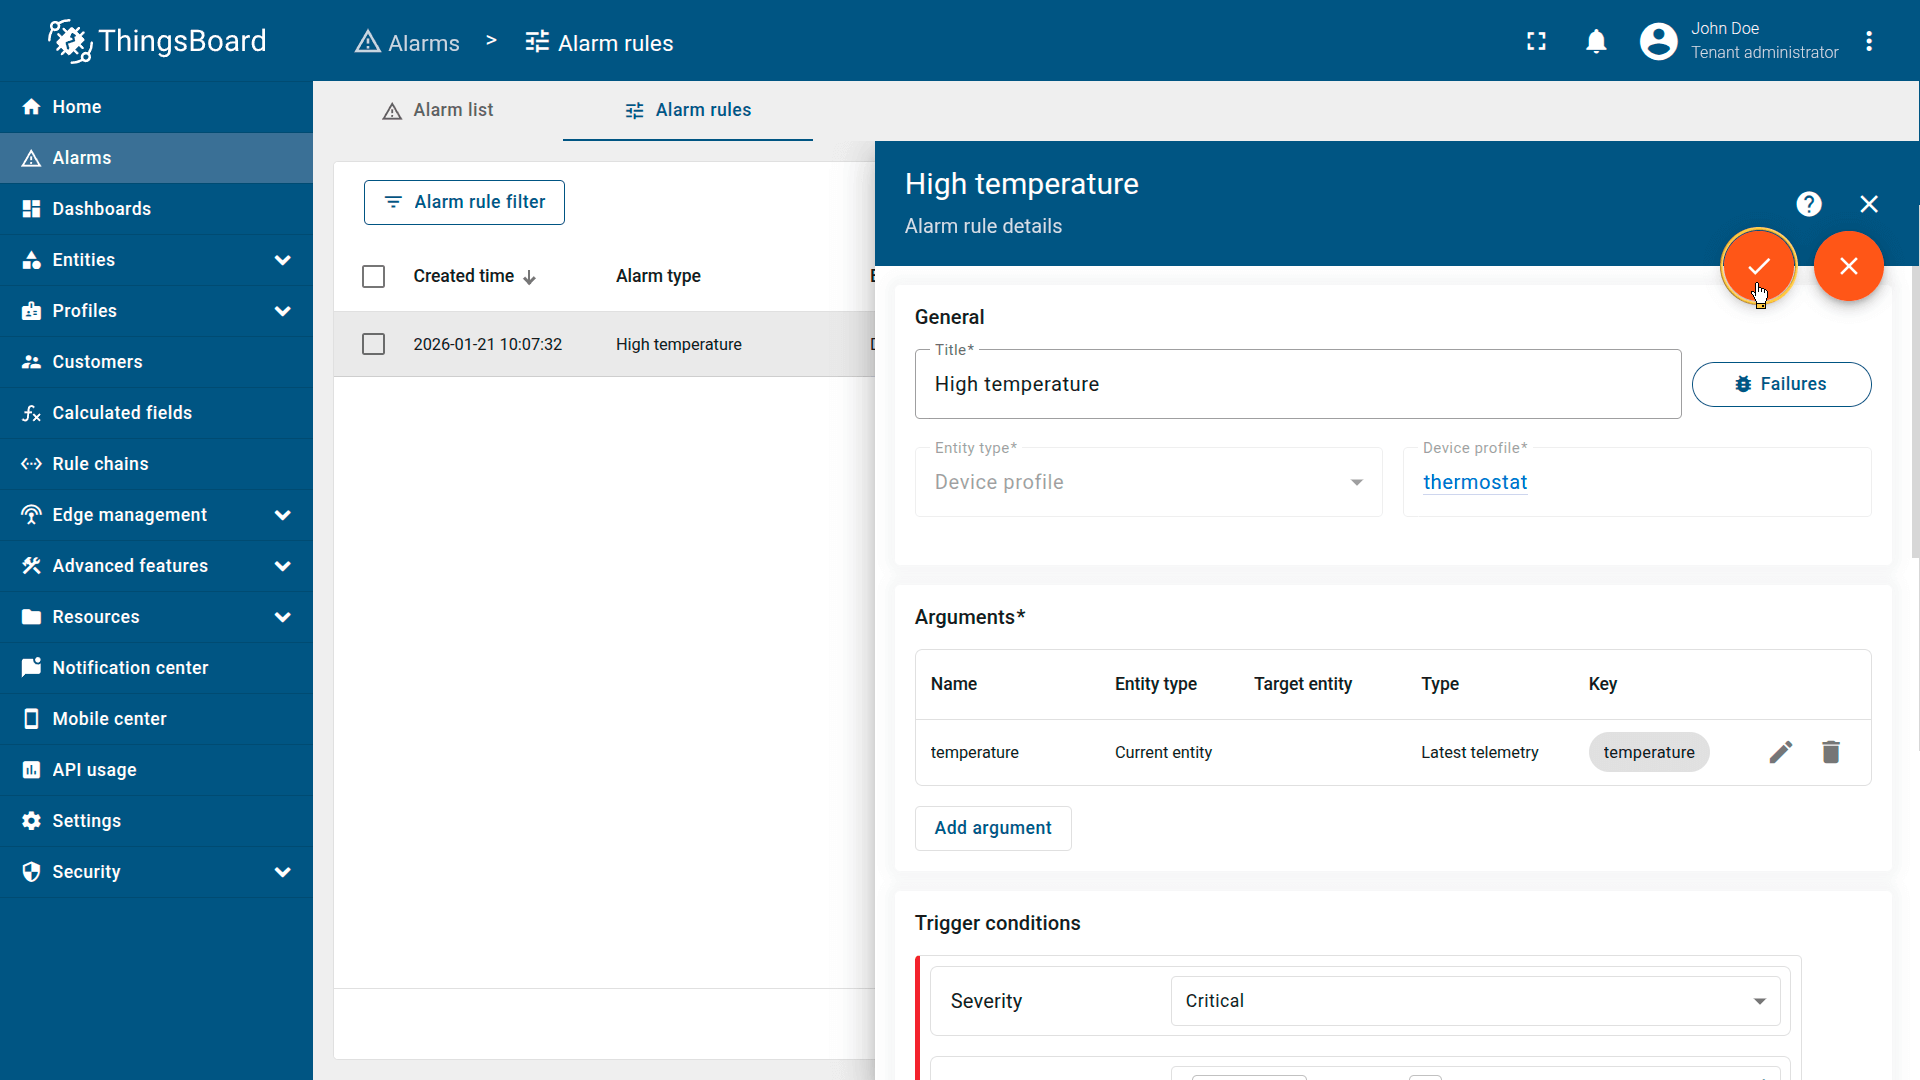
To modify the alarm rule, click the rule. The alarm rule details window will open. Click the orange pencil icon to switch to edit mode.
After making the required changes, click the orange checkmark icon to apply and save the changes.

Click the orange pencil icon to switch to edit mode.
Export / Import alarm rule
You can export the alarm rule to a JSON file and import it into the same or another ThingsBoard instance.
Export alarm rule
- Navigate to Alarms page ⇾ Alarm rules tab.
- Click the Export button located in the corresponding alarm rule row.
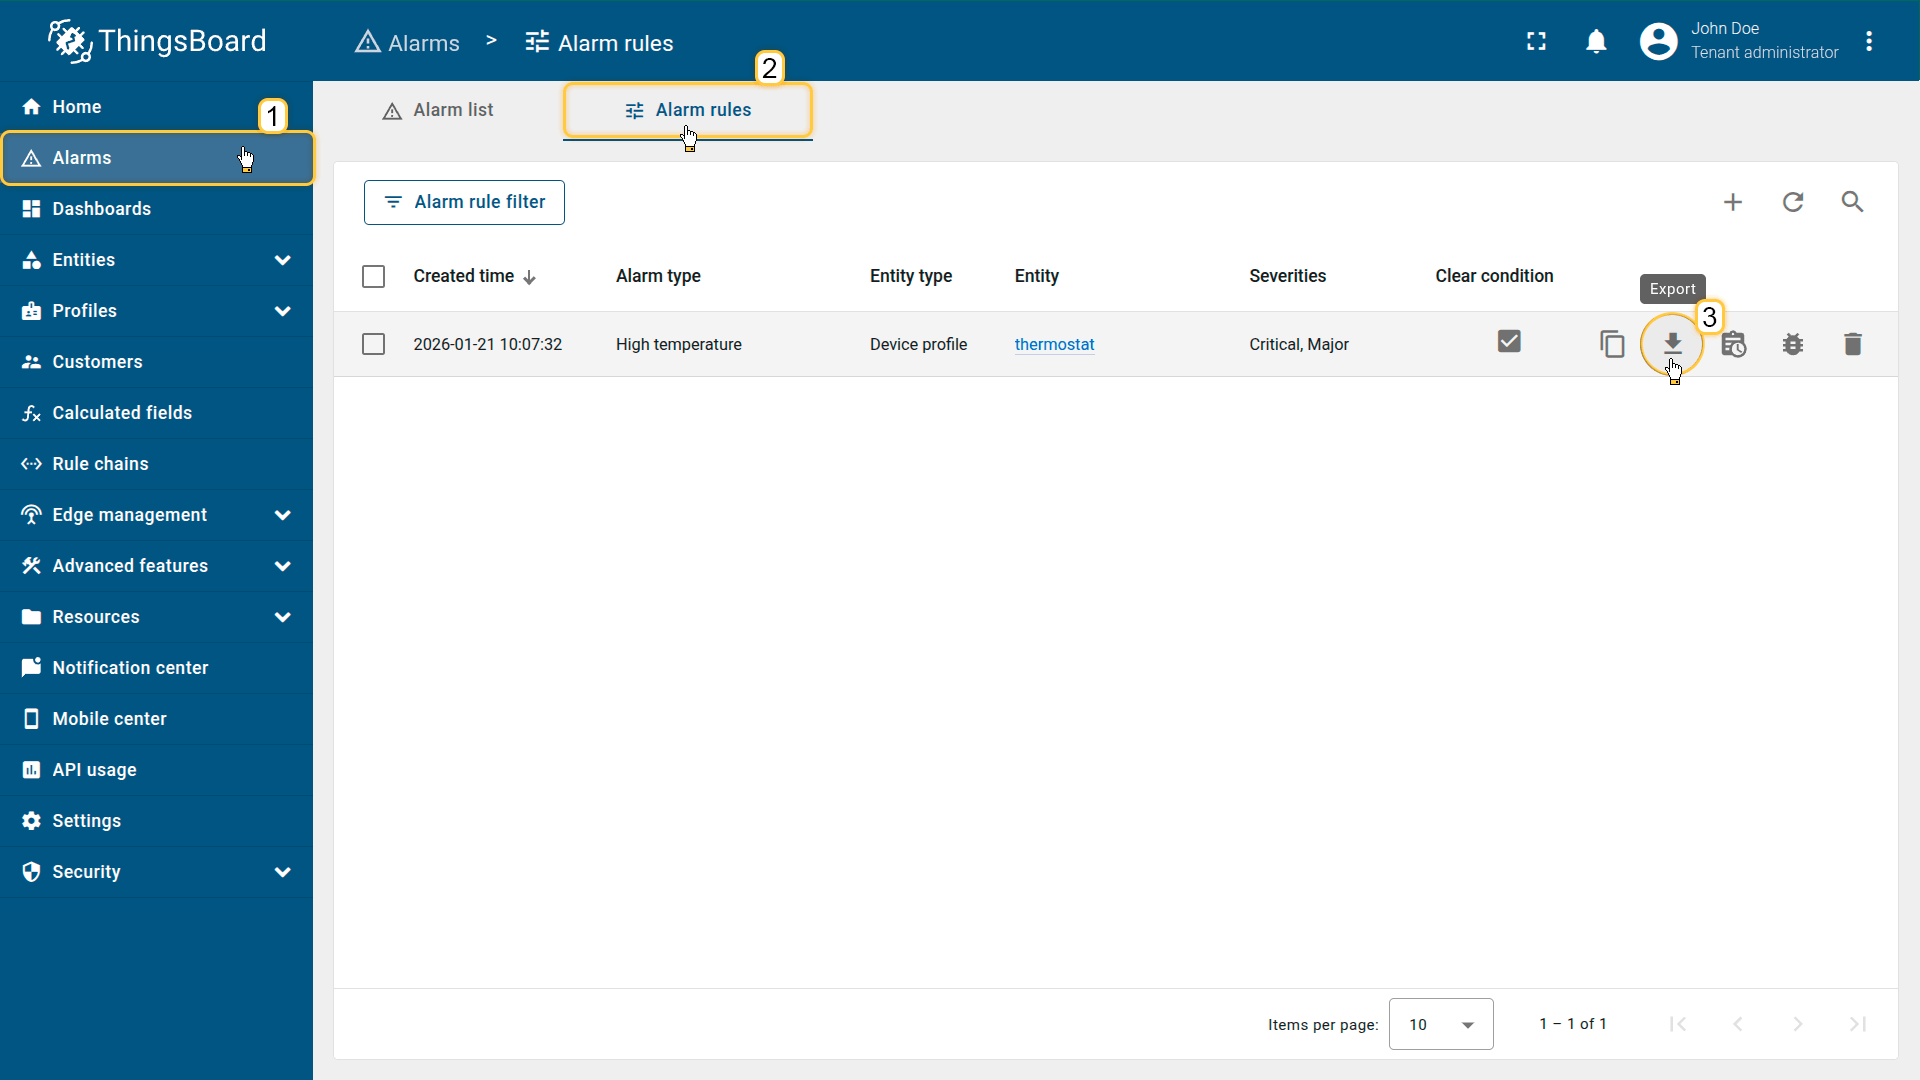
Click the Export button located in the row of the specific alarm rule.
Import alarm rule
ThingsBoard allows you to import previously exported alarm rules in JSON format. This simplifies configuration migration between instances, rapid deployment of standard alarm templates, and restoration from backups.
Steps to import:
- Navigate to Alarms page ⇾ Alarm rules tab.
- Click the “+” button in the upper-right corner and select Import alarm rule from the drop-down menu.
- In the import dialog, drag and drop the JSON file or choose it manually with the alarm rule configuration.
- Click Import to upload the configuration.
- In the dialog that opens, specify the entity or profile to which the alarm rule will be applied.
- Click Add to save the rule.
After saving, the rule becomes active immediately and ThingsBoard starts applying it according to its configured logic.
- Click the "+" button in the top-right corner, and select Import alarm rule from the dropdown menu.

- Click Import to upload the configuration.
- Finally, click Add to save the rule.
Examples of alarm rule configurations
To better understand how alarm rules work, let's review several practical examples. Each example demonstrates a specific scenario, condition type, or alarm rule feature that can be used in real-world projects.
In the scenarios below, we will create alarm rules directly on a device.
Recommendation: If the same rule should apply to multiple devices, create it at the Device Profile level.
This ensures centralized alarm logic, reduces duplication, and simplifies ongoing maintenance.
Preparation
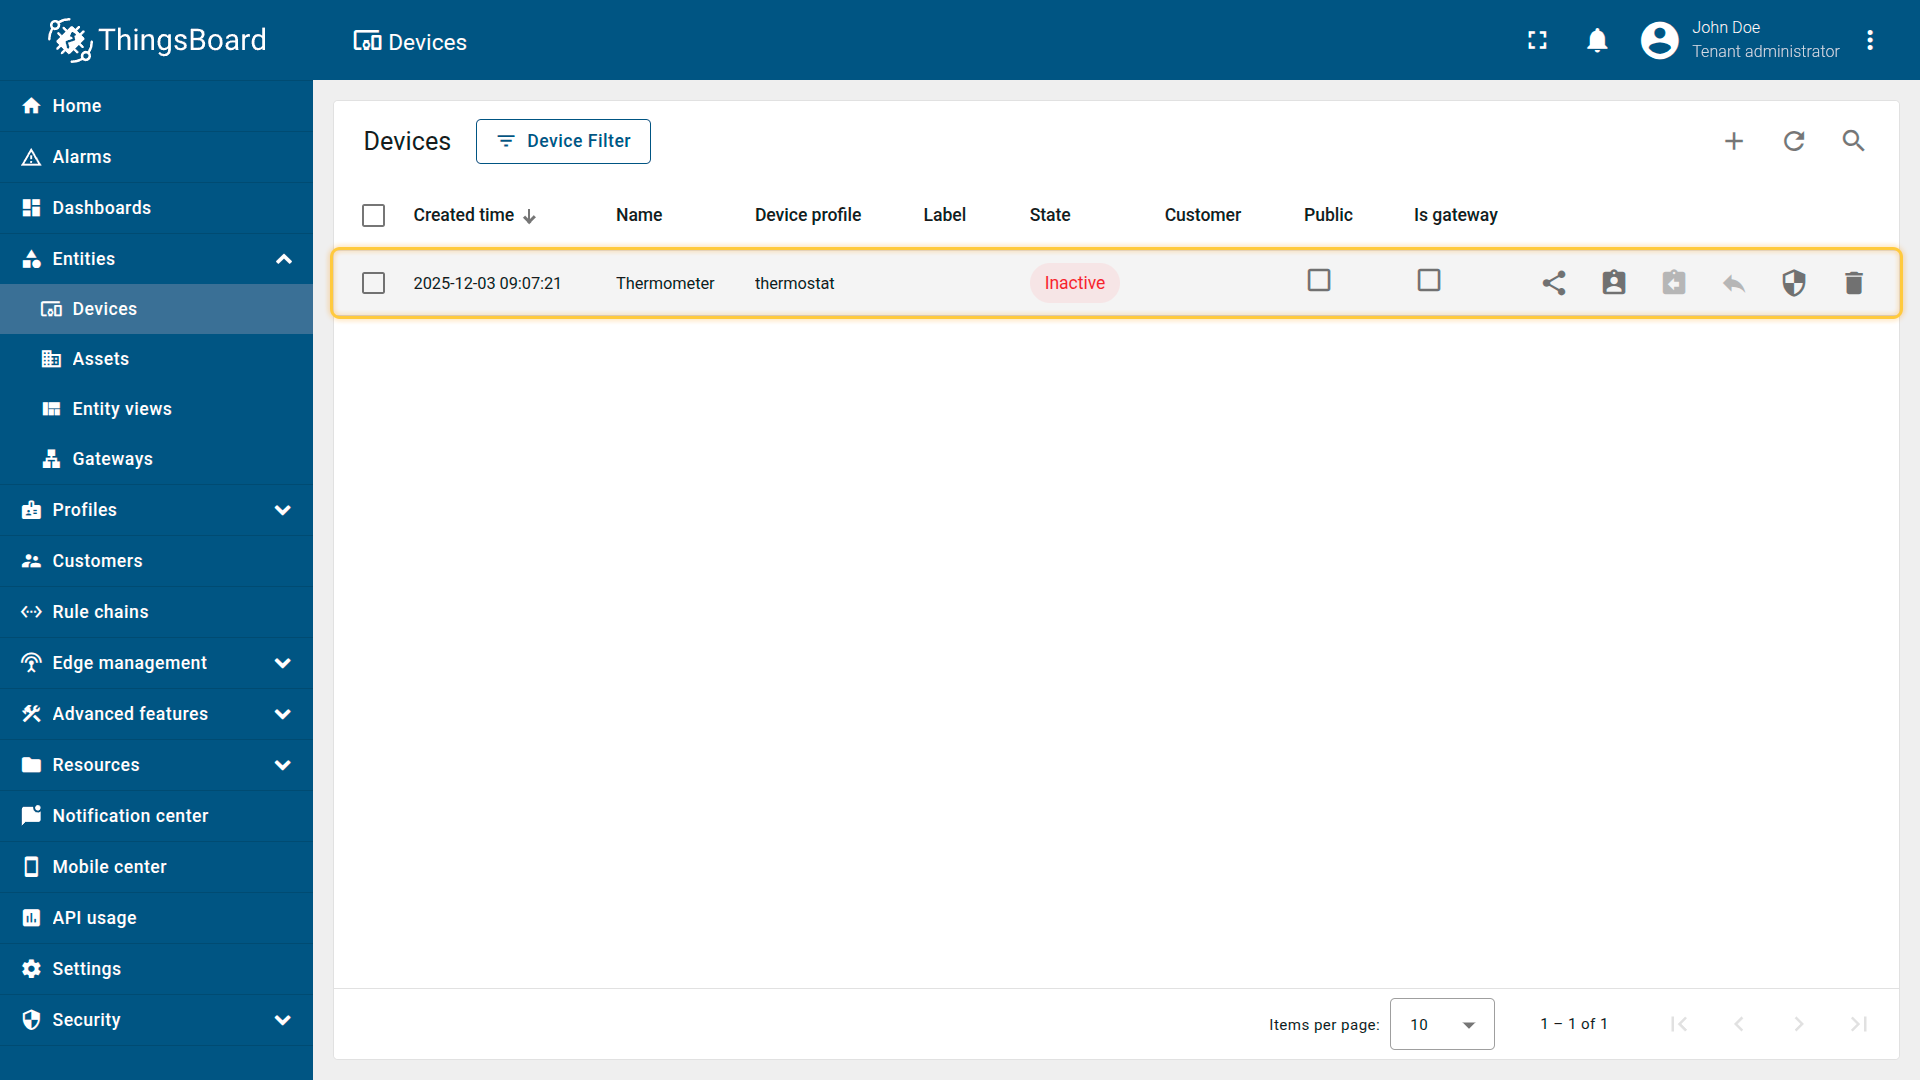
For the following examples, you need a device named Thermometer that sends temperature telemetry.
- Download the CSV file: thermometer-device-data.csv
- Go to the “Devices” and import the CSV file.
CSV includes:
- Name: Thermometer
- Type: thermostat
- Time series: temperature
Important note about the CSV: the column type for the temperature key must be set to “Time series”.
Example 1. Simple alarm condition: temperature monitoring
Scenario:
A refrigeration chamber is used to store perishable goods.
The temperature inside must be continuously monitored to prevent product loss and maintain proper storage conditions.
Goal:
Create a critical alarm when the temperature exceeds 10°C.
Step 1. Create the alarm rule
- Open the Alarms page from the left-hand menu.
- Go to the Alarm rules tab.
- Click the “+” button in the top-right corner.
- Select Create new alarm rule from the dropdown menu.
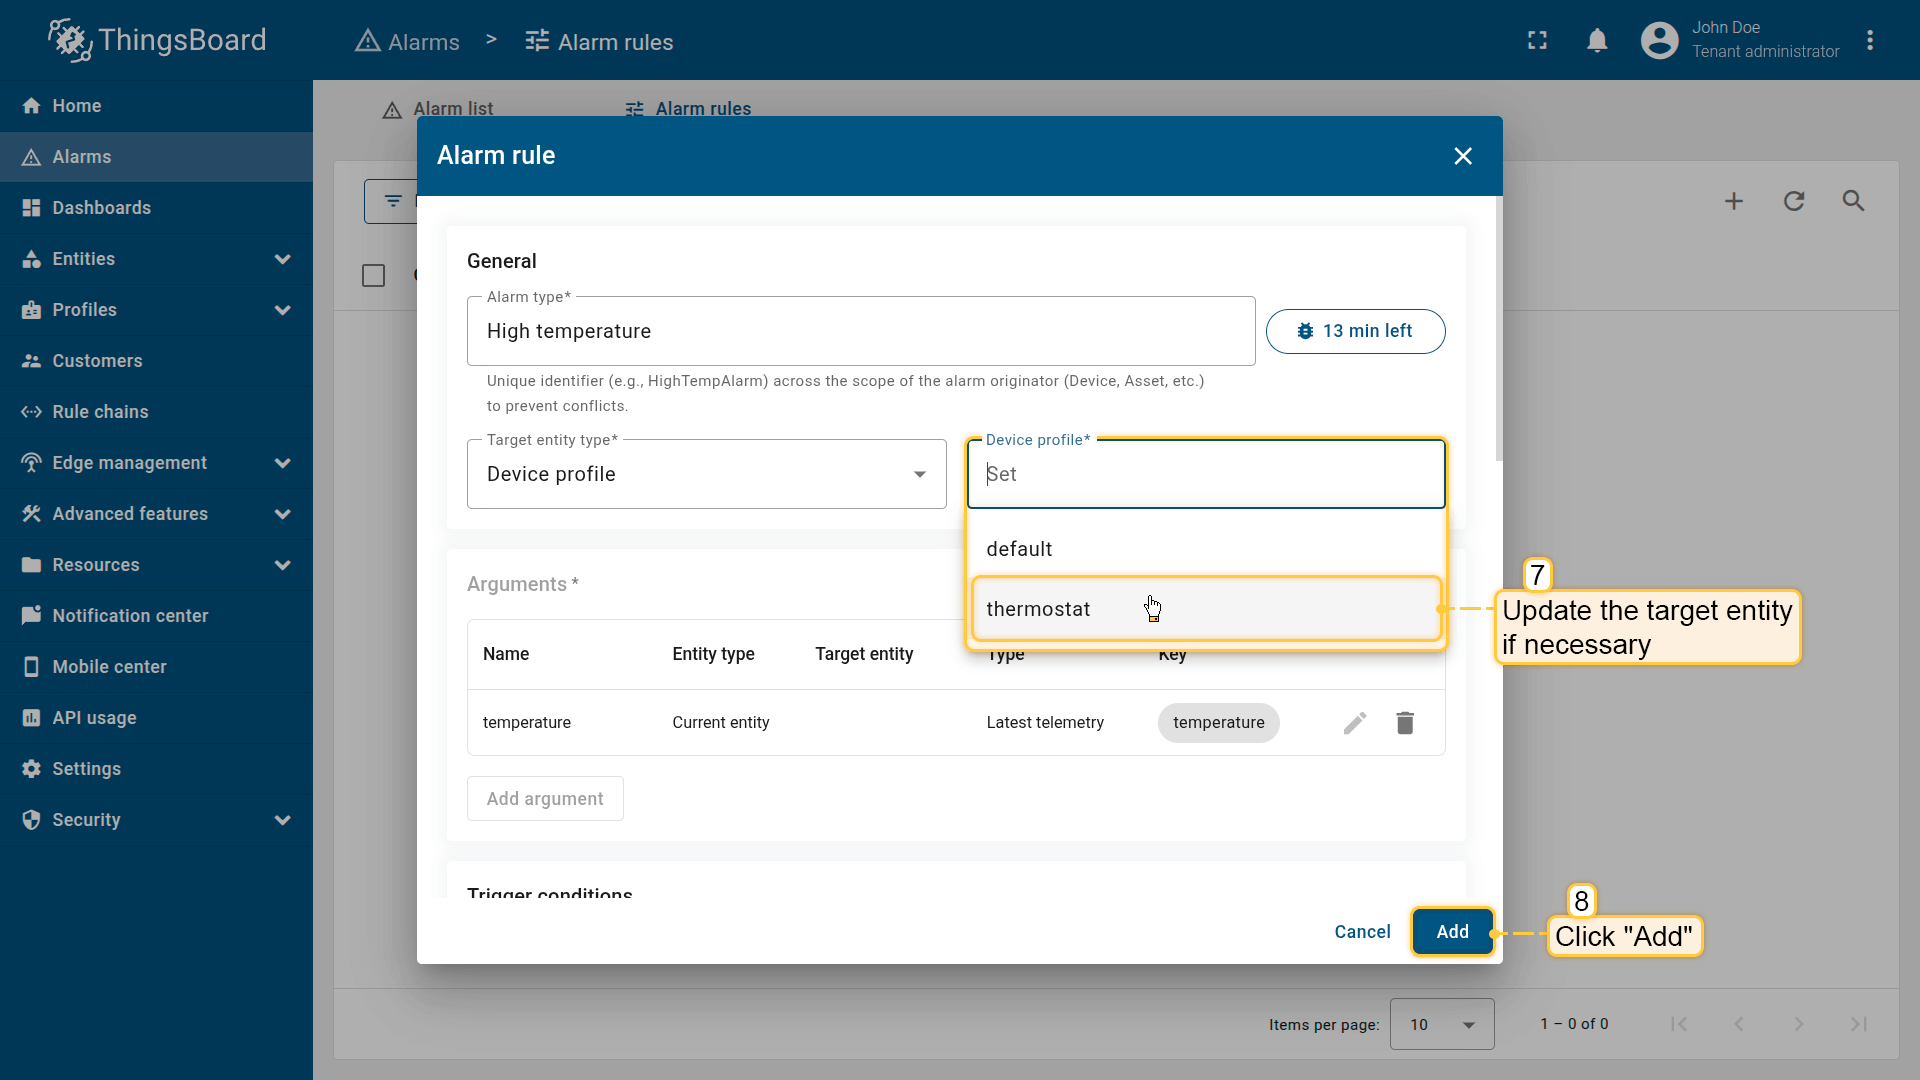
Step 2. General section
In the General section, specify:
- Alarm type: High Temperature
- Select the Target entity type - Device
- Specify the specific entity that the rule should apply to - Thermometer
Step 3. Add argument
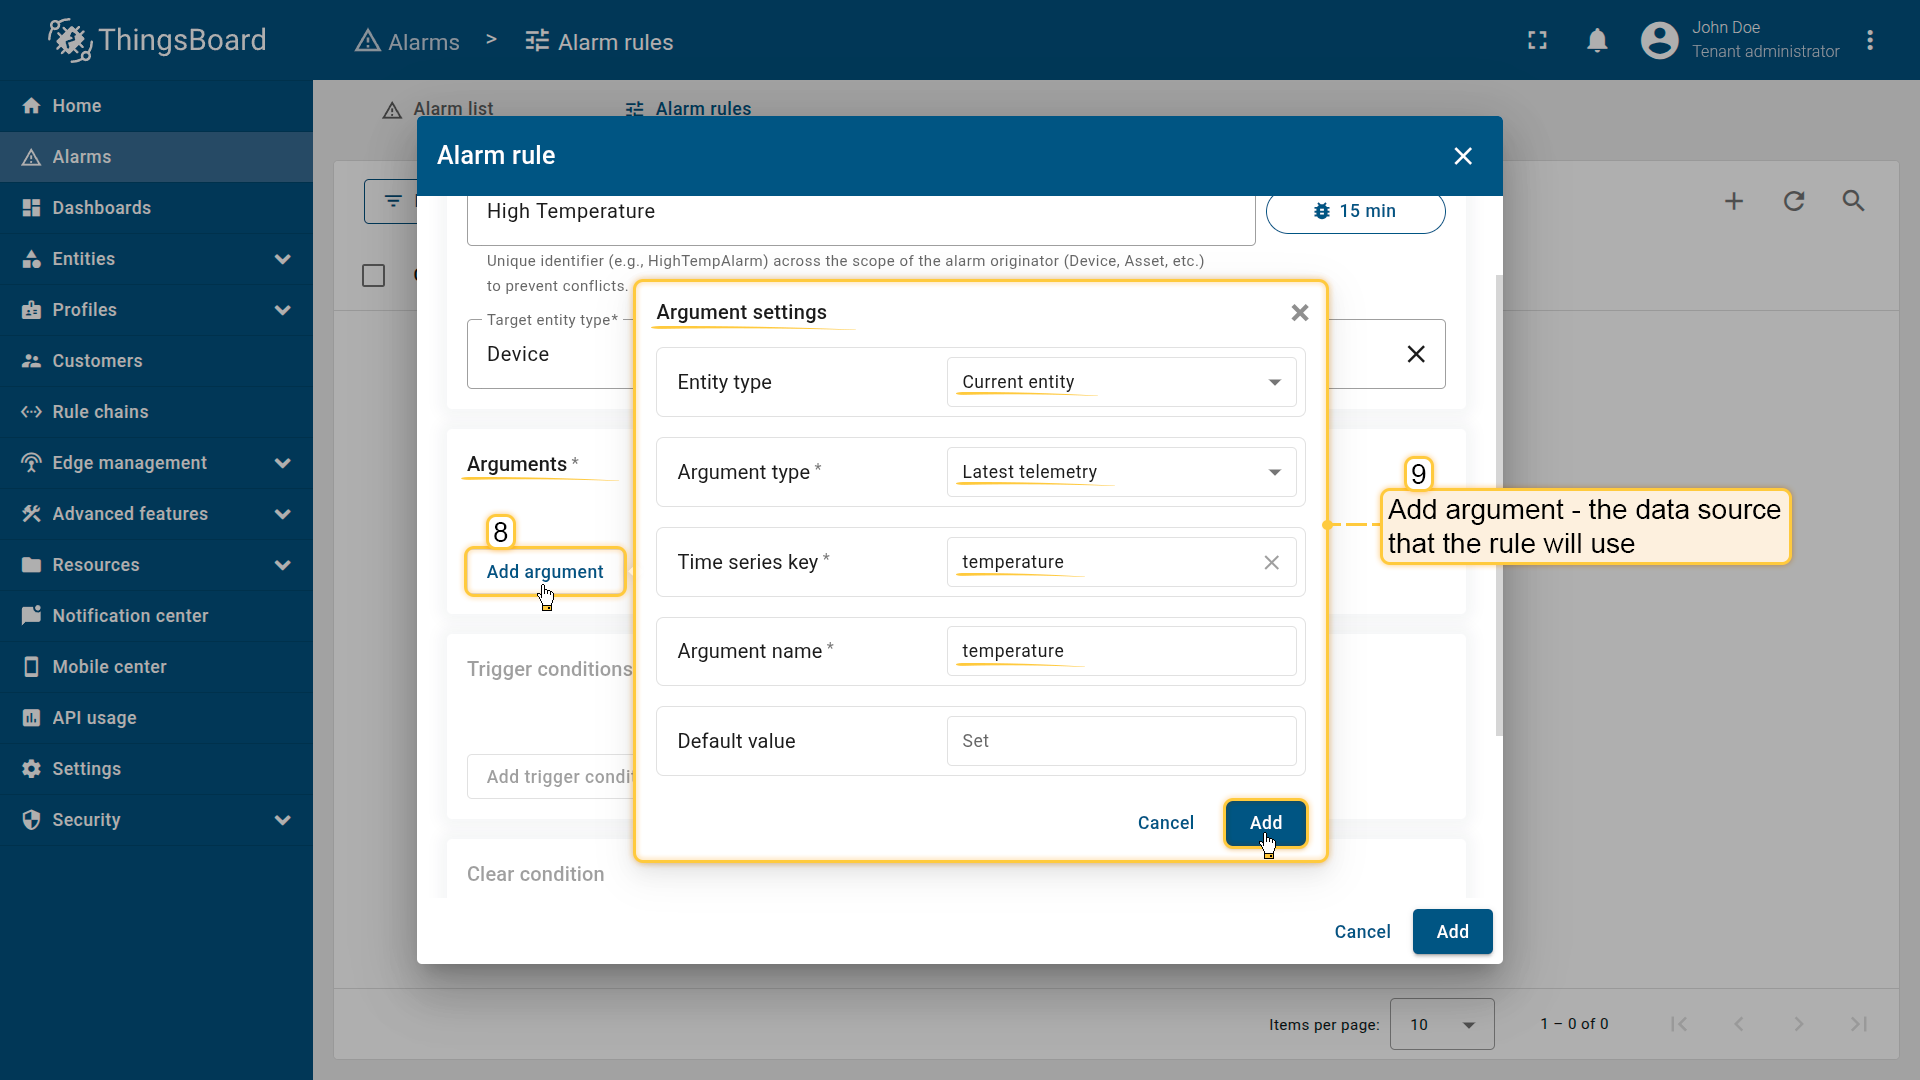
- In the Arguments section, click Add argument and fill in:
- Argument name: temperature
- Entity type: Current entity
- Argument type: Latest telemetry
- Time series key: temperature
- Click Add when finished.
This creates a temperature variable that you will use in the rule's logical condition.
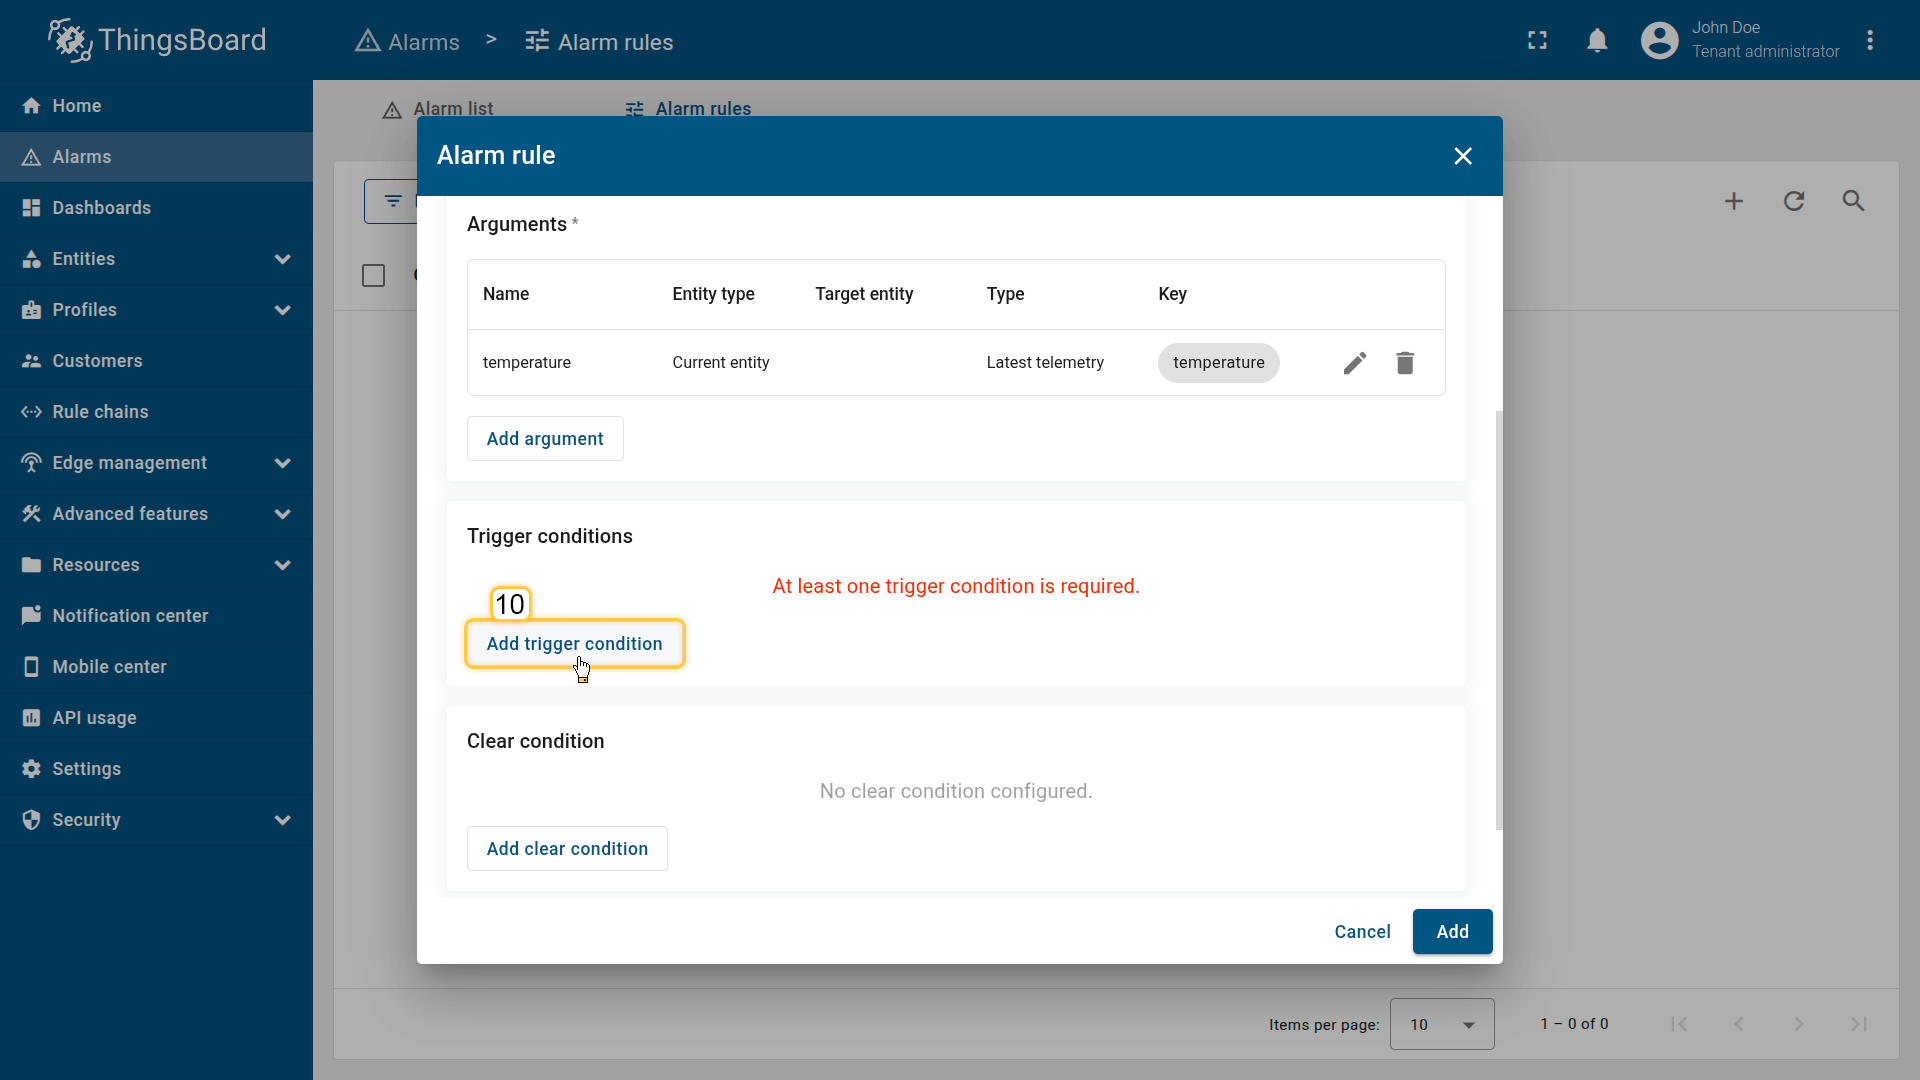
Step 4. Configure the trigger condition
In the Trigger condition section, click Add trigger condition.
Step 4.1 Severity
- Severity: Critical
Step 4.2 Condition
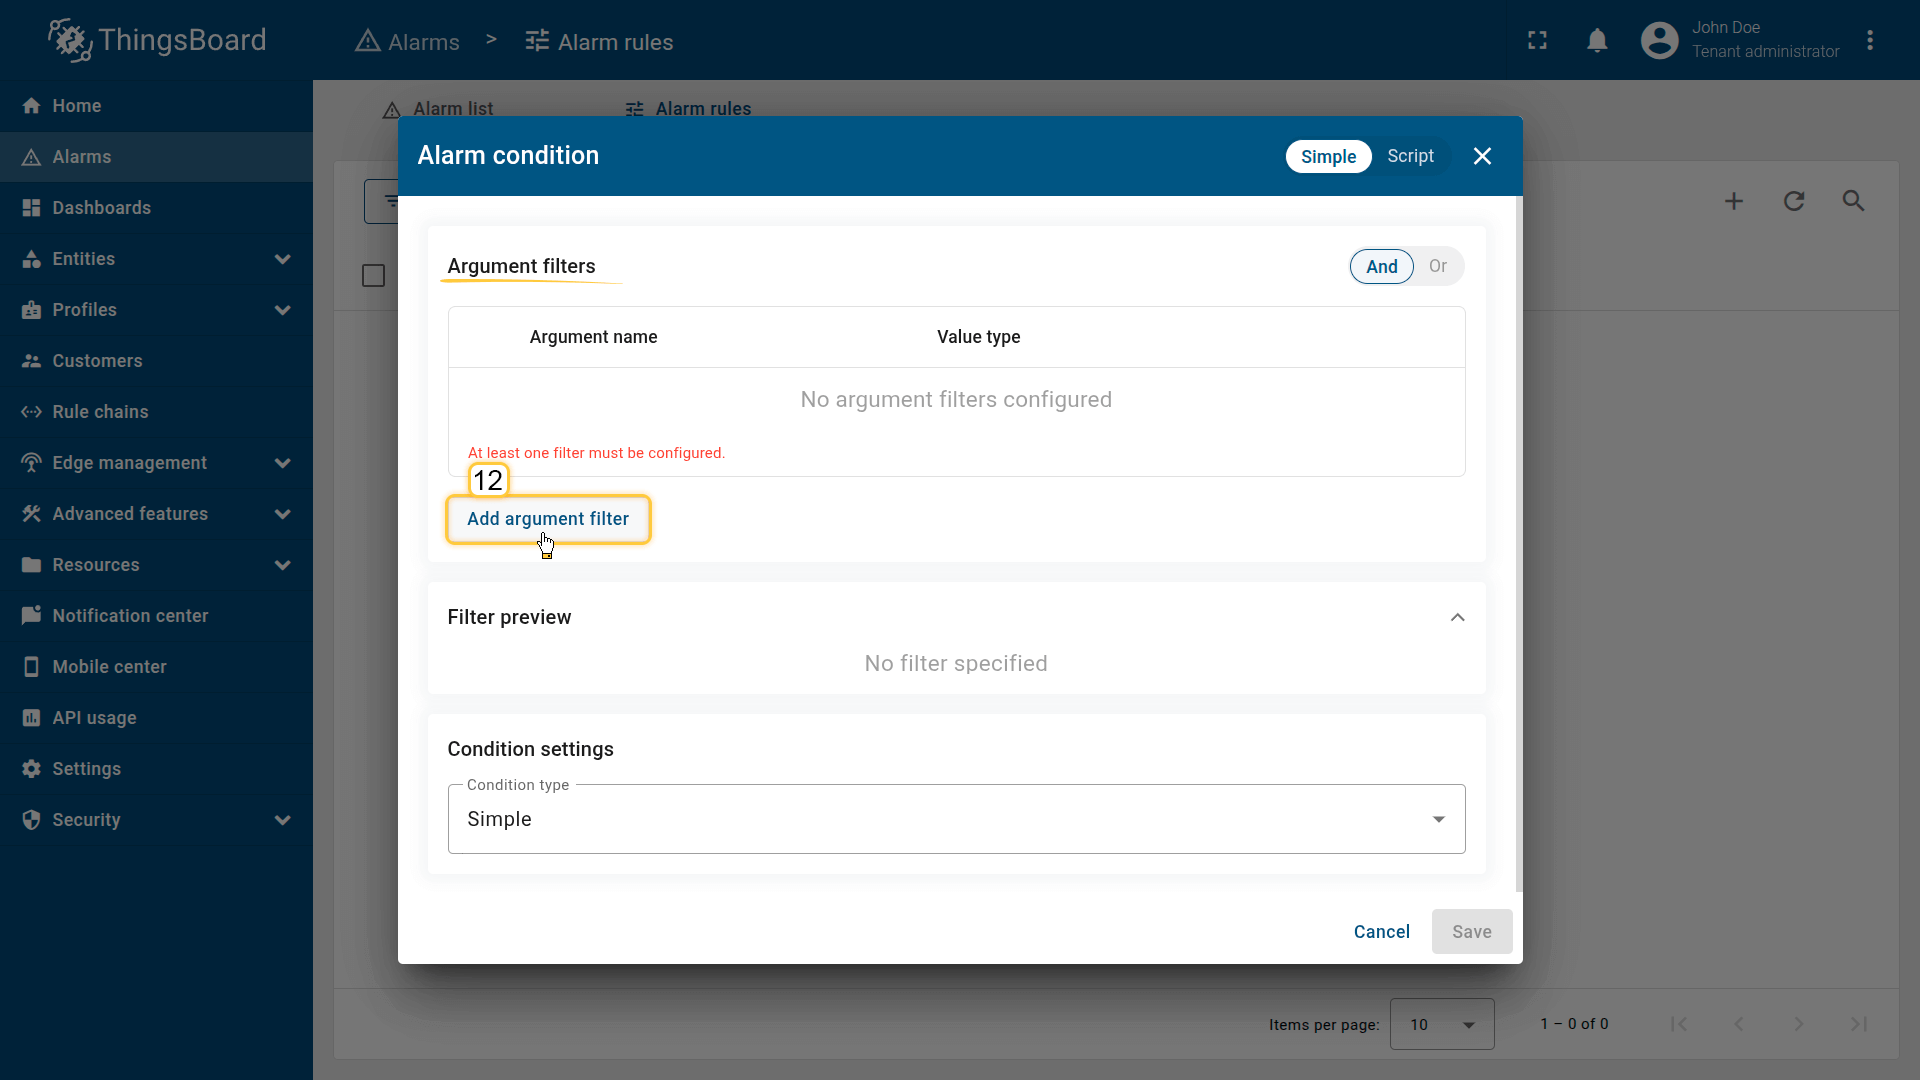
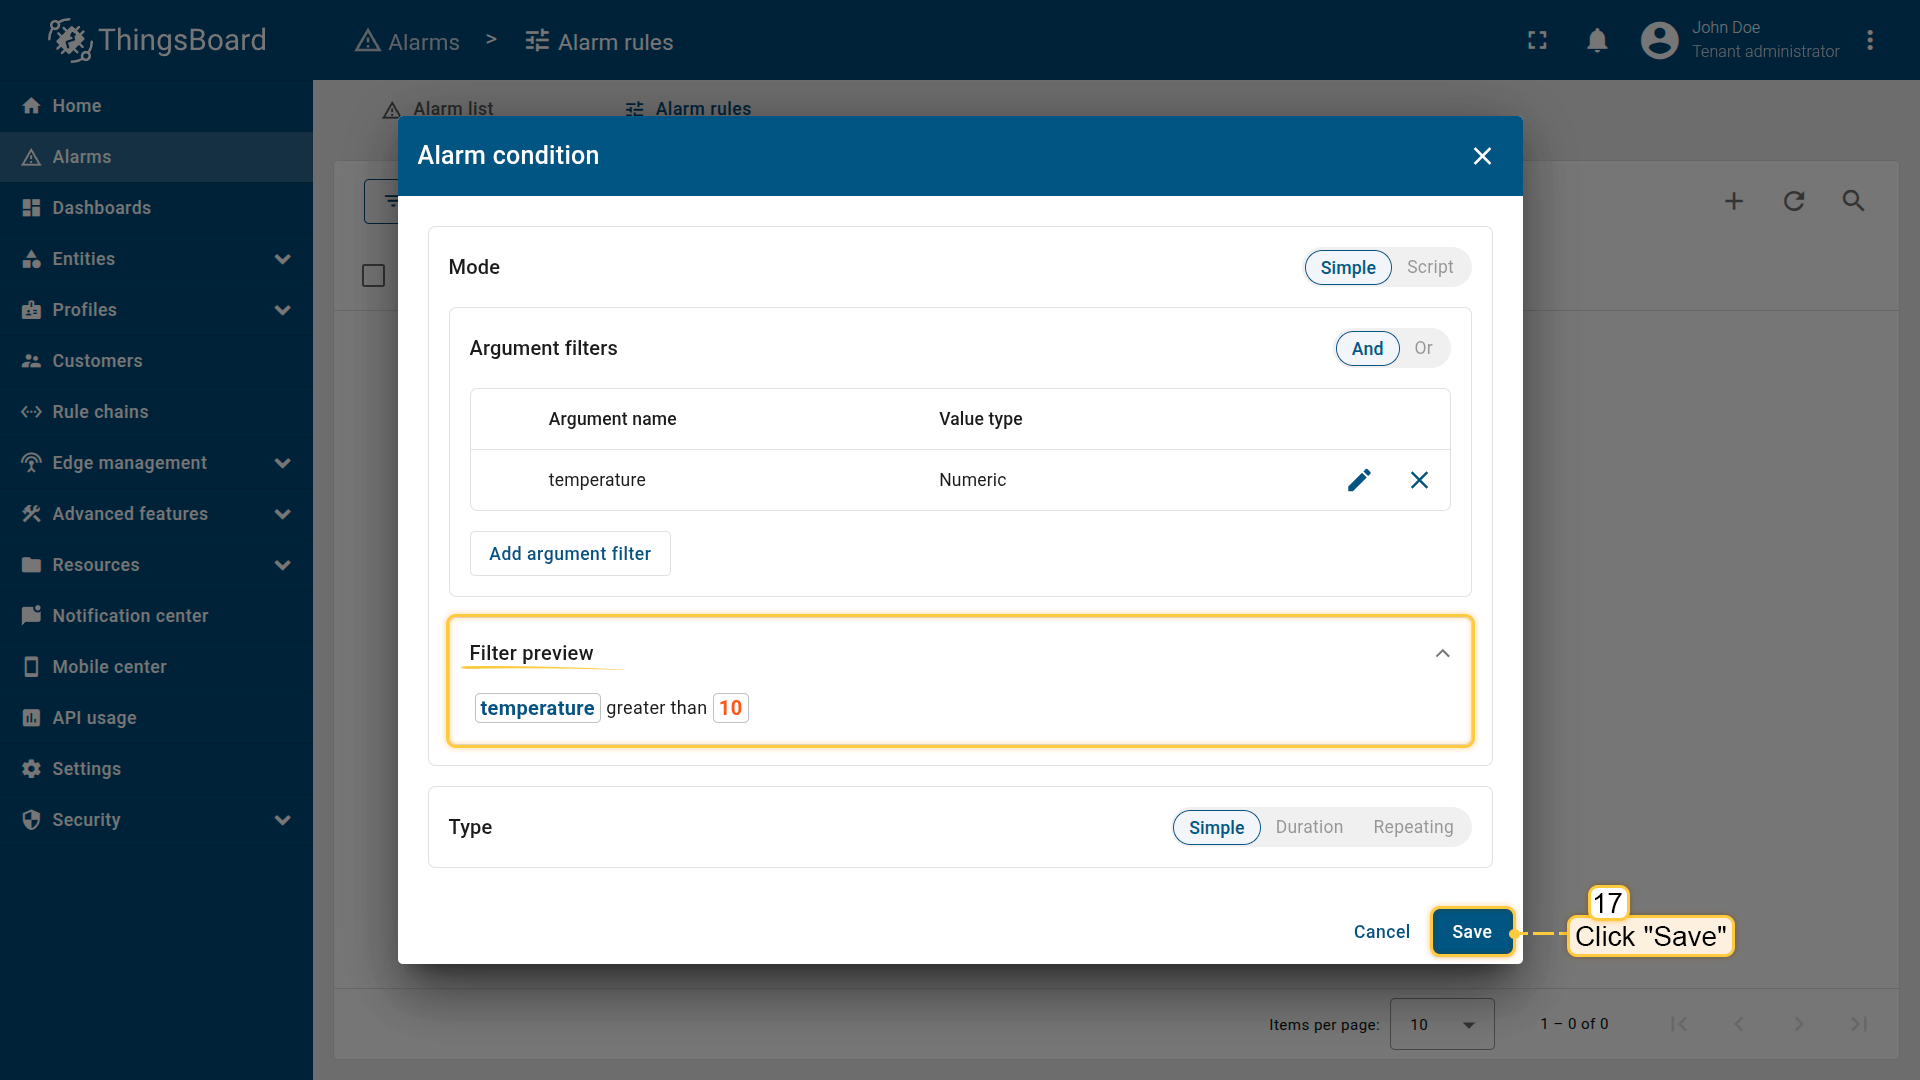
Click “Add condition”.
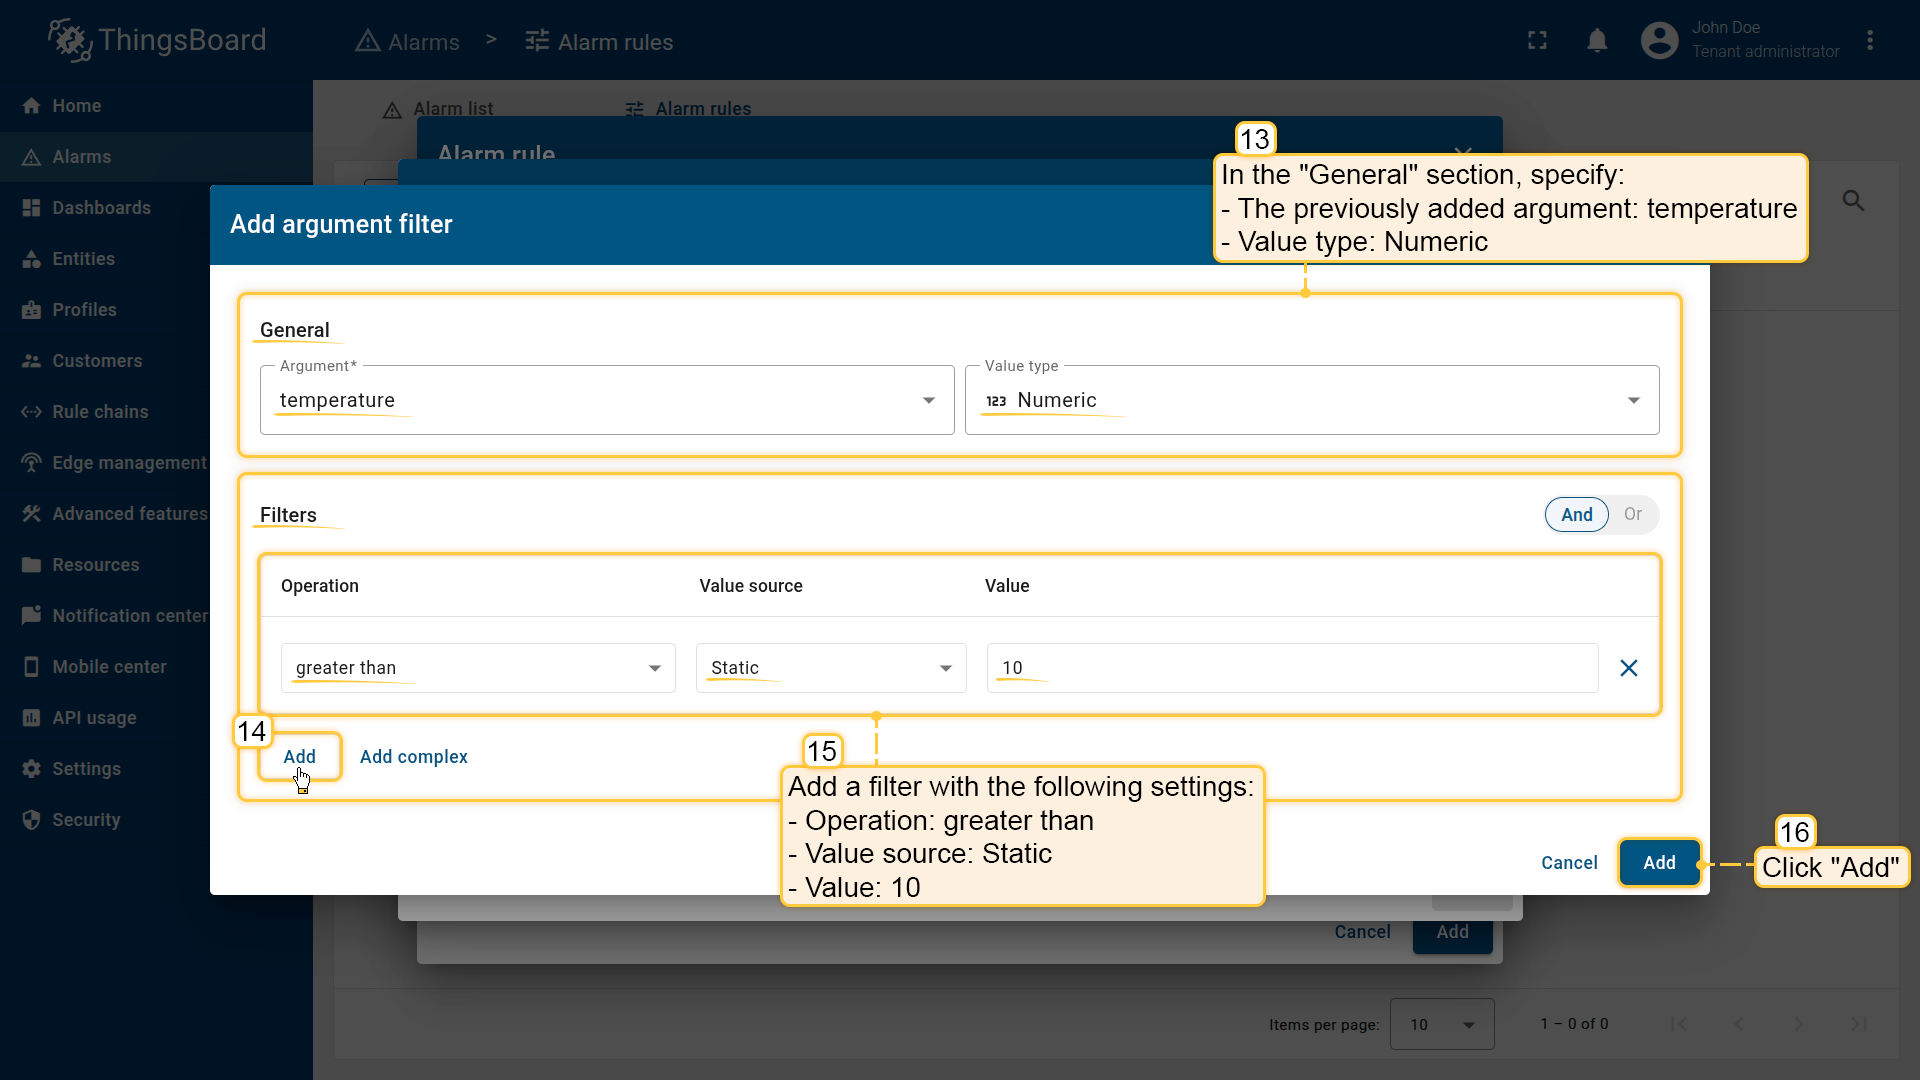
In the filter configuration window, click Add argument filter and specify:
- Argument: temperature
- Value type: Numeric
- Operation: greater than
- Value: 10
- Click Add
Type: Simple
- Click Save
As a result, the alarm will be created immediately once the temperature exceeds 10°C.
Step 5. Save the rule
Click Add to save the rule.
Result
After saving, ThingsBoard will automatically create a critical alarm whenever the temperature value exceeds 10°C.

Click the "+" button in the top-right corner. Select Create new alarm rule from the dropdown menu.
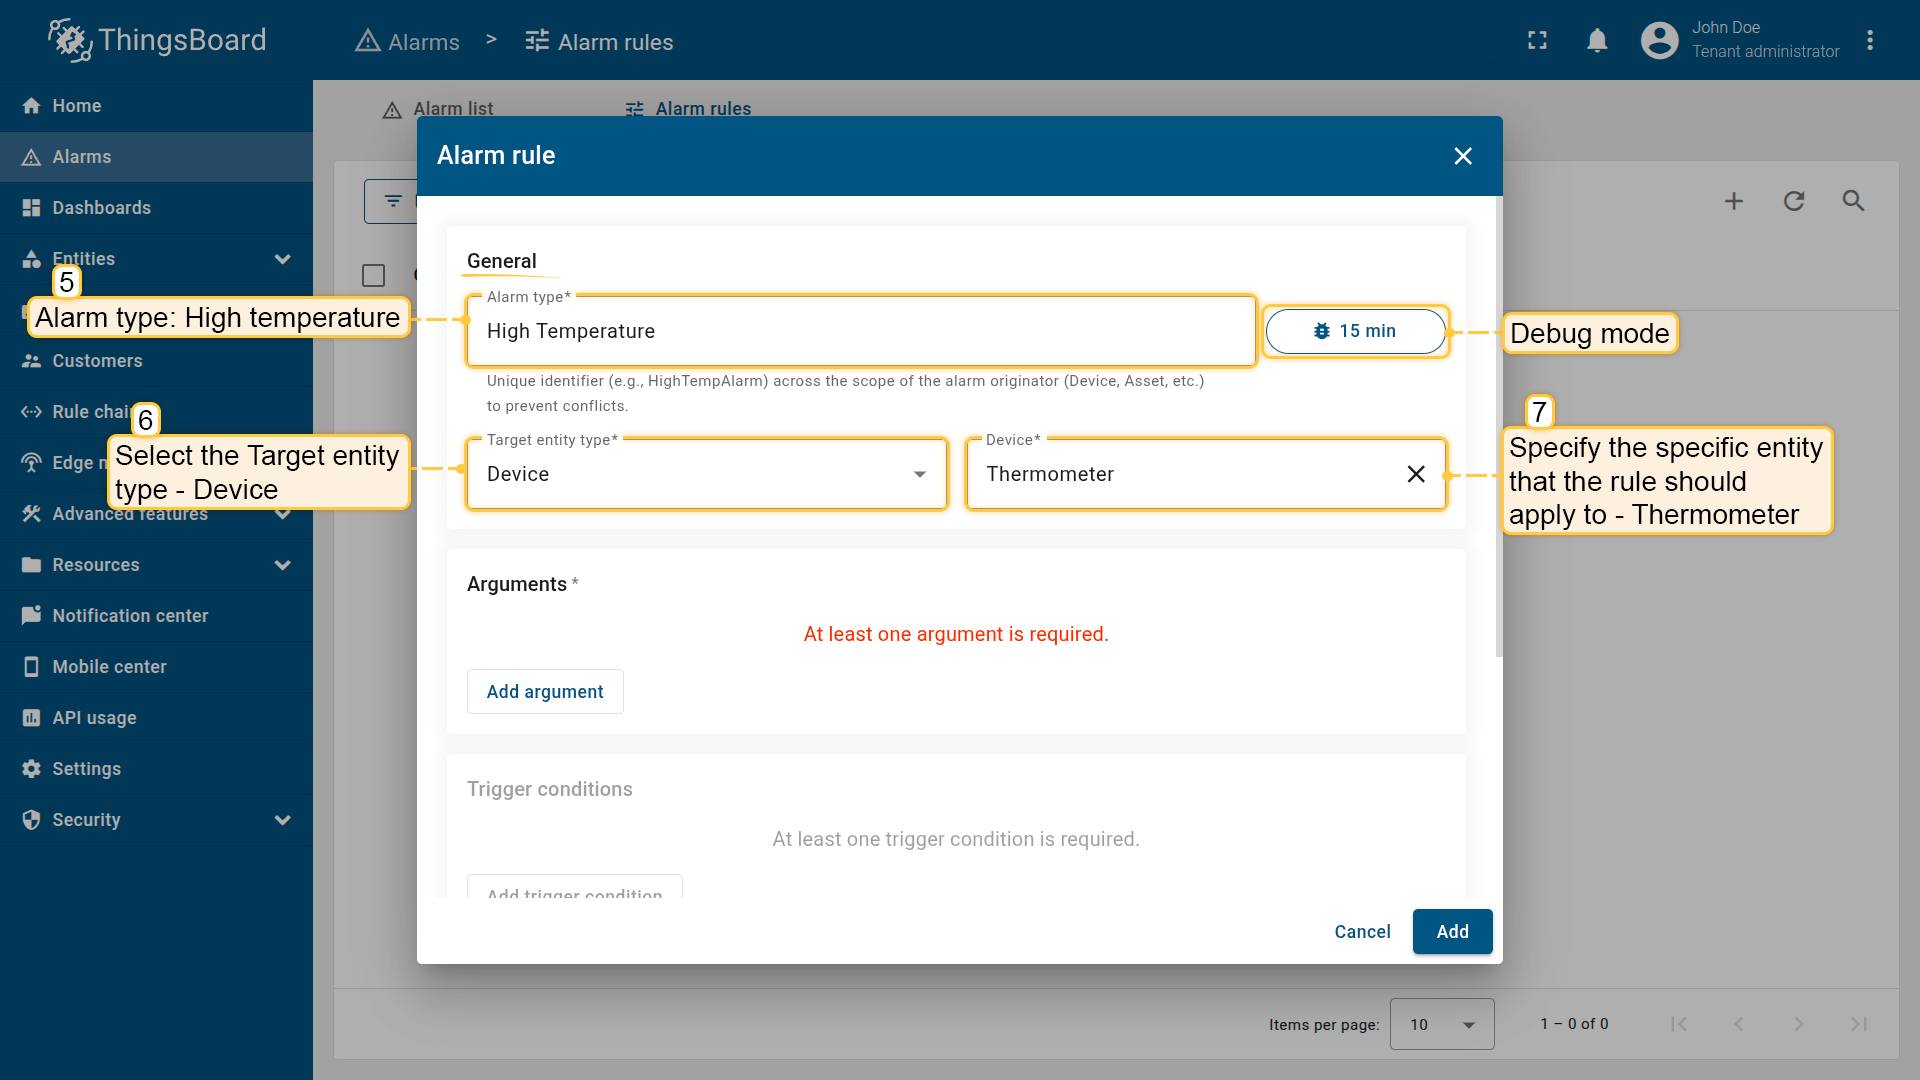
- Set Alarm type to High temperature.
- Select Target entity type: Device.
- Specify the target device: Thermometer.

- Click Add condition.


Example 2. Alarm clear condition
Continuation of the example “Simple alarm condition: temperature monitoring”
Scenario
A refrigerator is used to store perishable products. After the critical High Temperature alarm is triggered, it must be cleared automatically once the temperature returns to a safe level.
Goal
Update the existing High Temperature rule by adding a clear condition that sets the alarm to Cleared when the temperature is ≤ 4°C.
Step 1. Open the High Temperature rule
- In the side menu, go to Alarm ⇾ Alarm rules.
- Find the High Temperature rule in the list.
- Click the Edit icon (pencil) to open the rule editor.
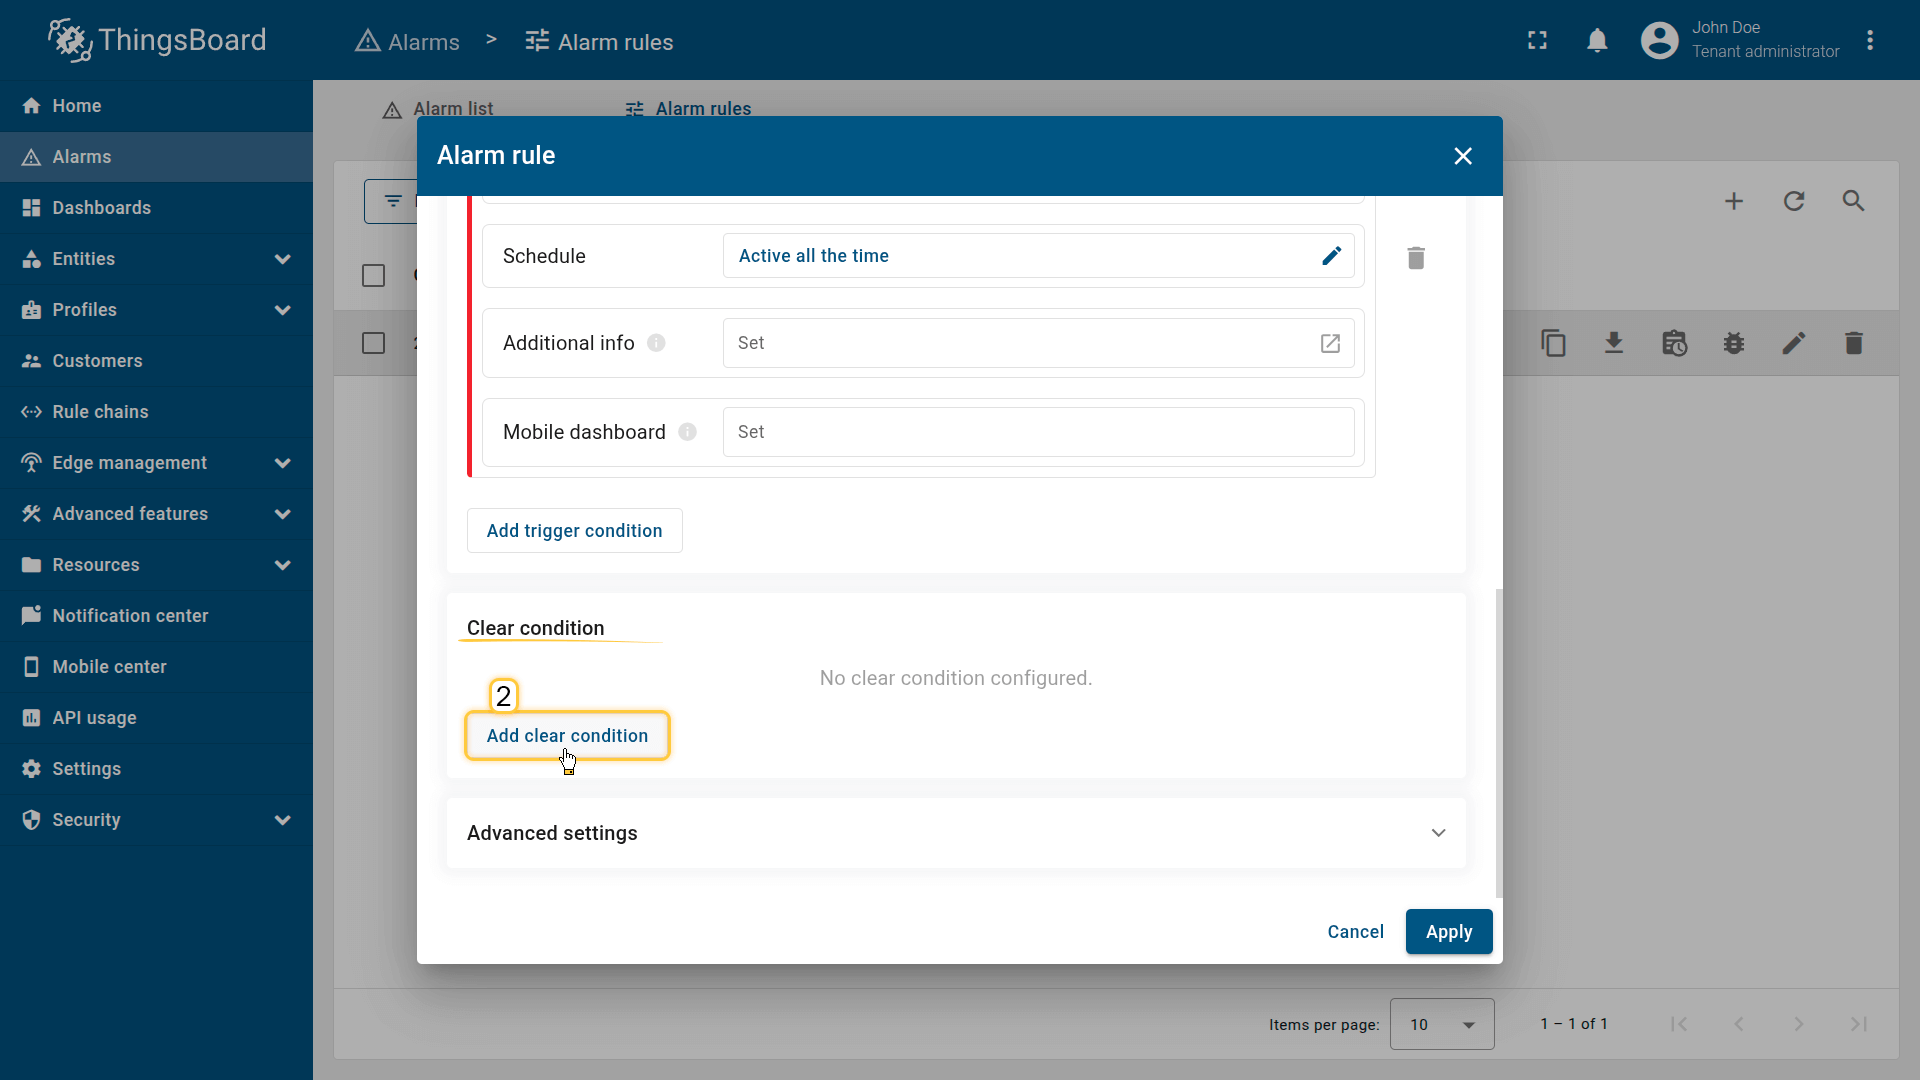
Step 2. Configure clear condition
Scroll down to the Clear condition section:
- Click Add clear condition.
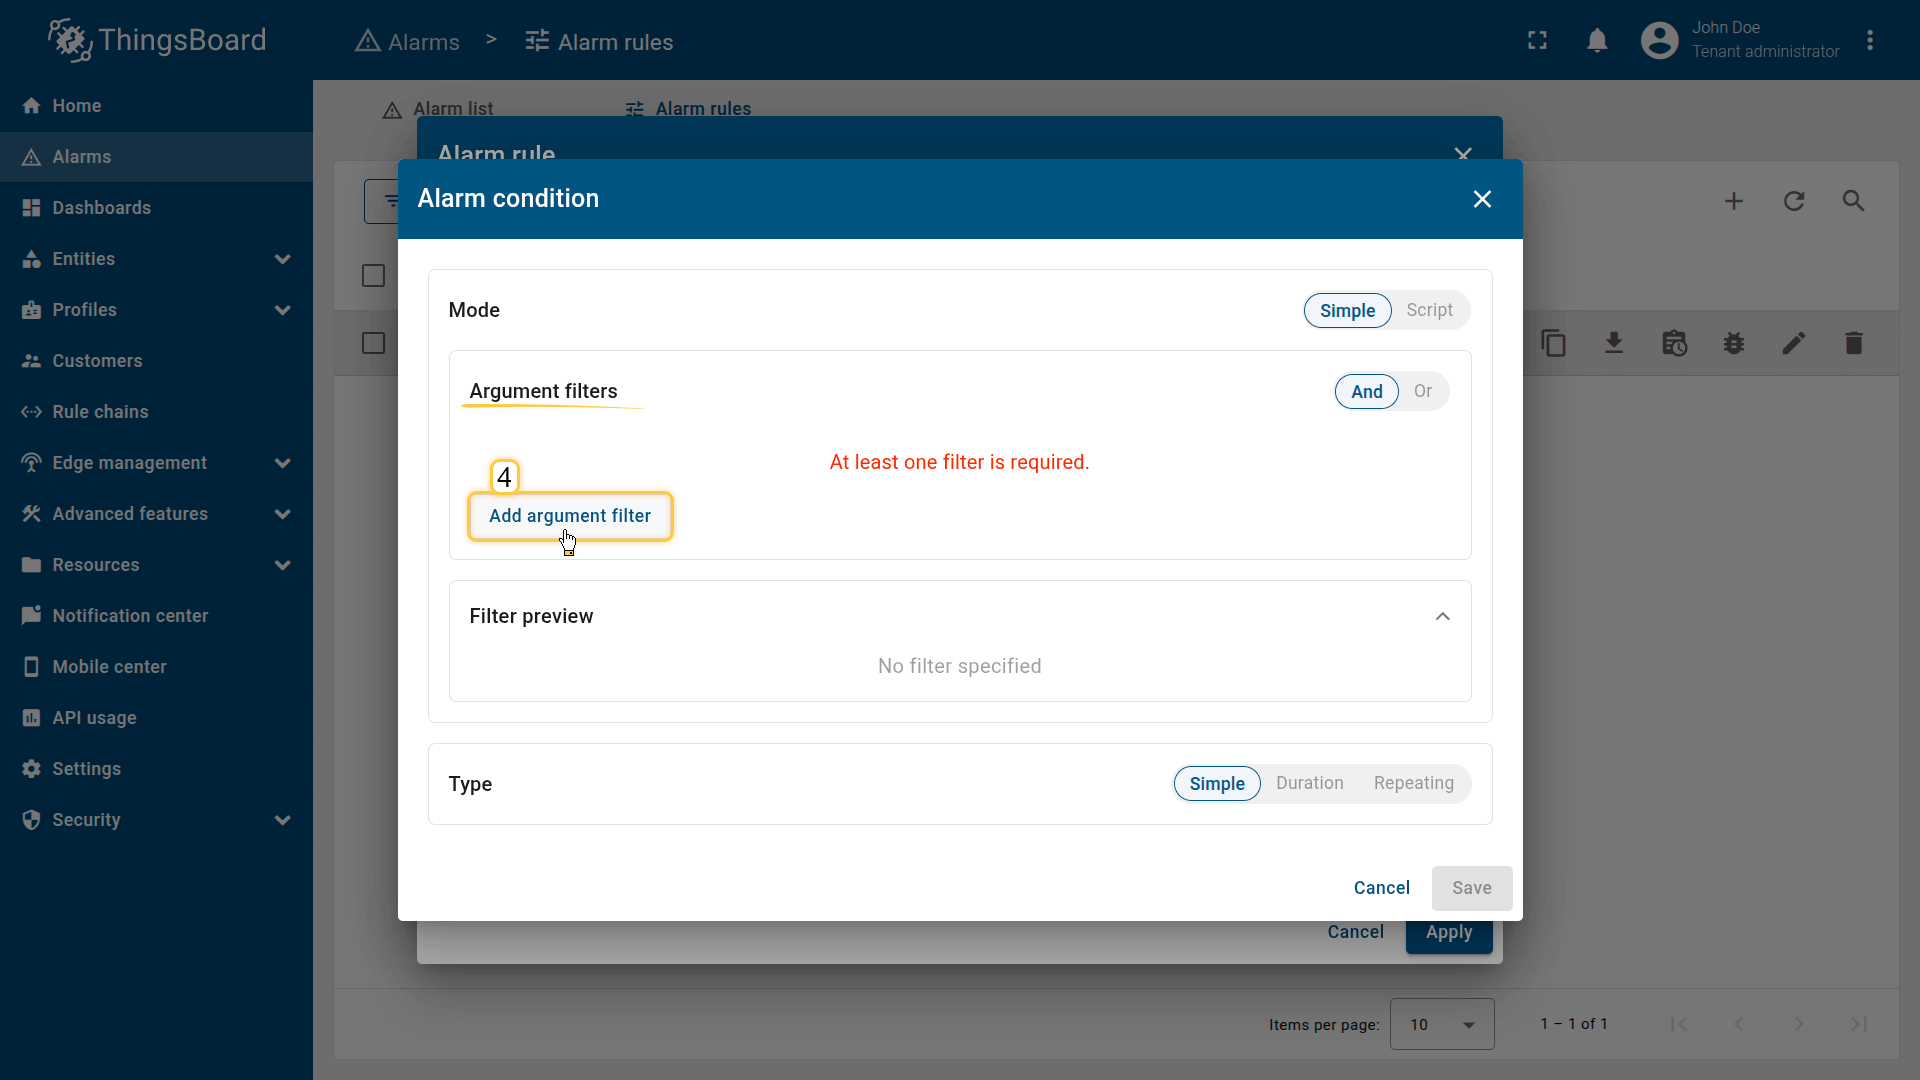
- Click “Add condition” to open the configuration window.
Step 2.1 Add a filter
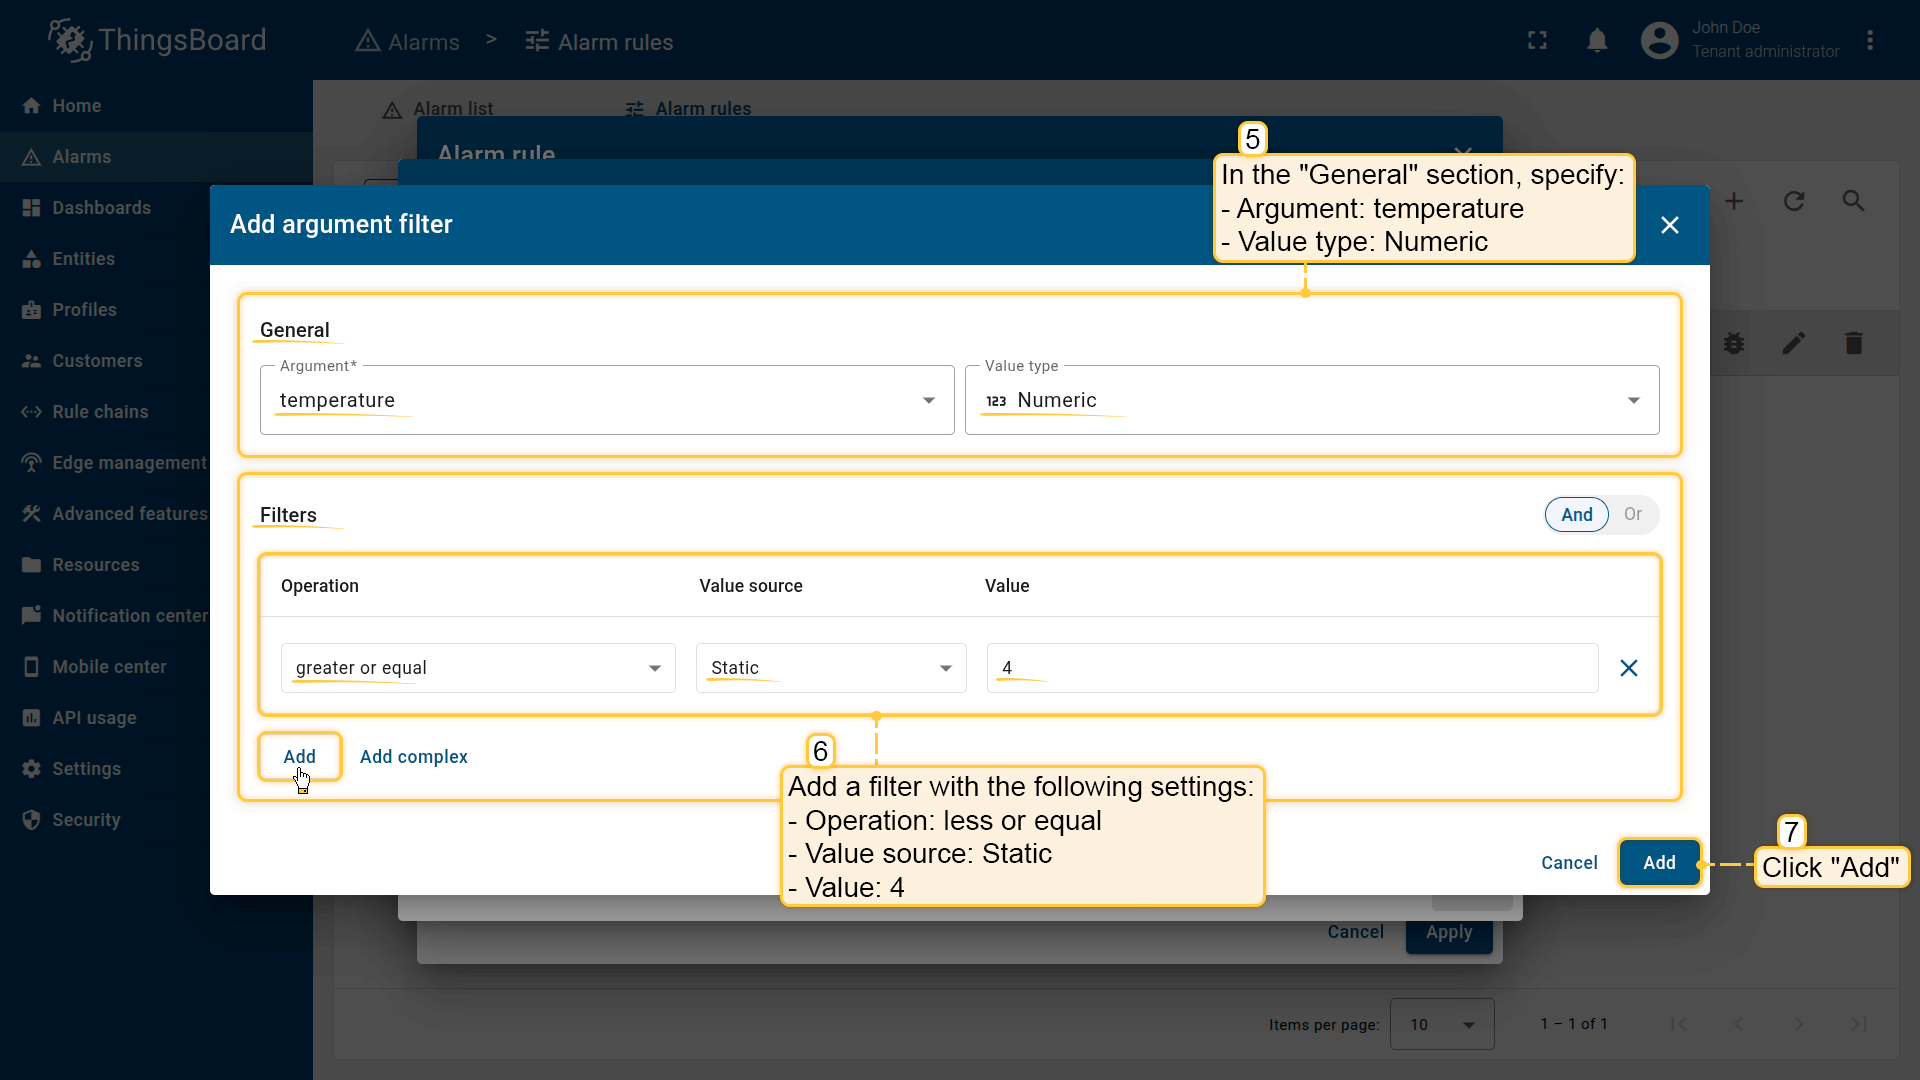
In the configuration window, click Add argument filter and specify:
- Argument: temperature
- Value type: Numeric
- Operation: less or equal
- Value: 4
This condition defines the moment when the temperature returns to a safe level. Click Add
Type: Simple
- Click Save
After this, the alarm will be cleared as soon as the temperature drops to 4°C or below.
Step 3. Save the rule
Click Apply to save the updated rule.
Result
After saving, ThingsBoard will:
- create a Critical — High Temperature alarm when the temperature exceeds 10°C
- automatically clear the alarm when the temperature is ≤ 4°C
This configuration forms a complete alarm lifecycle, keeps the system state accurate, and eliminates the need for manual intervention.


Click Add.


Example 3. Alarm condition with a duration
Continuation of the example “Simple alarm condition: temperature monitoring”.
Goal:
Update the existing High Temperature rule so that it triggers only when the temperature exceeds the threshold for a specified duration — for example, 1 minute.
This mechanism helps avoid false alarms caused by short-term temperature spikes.
Step 1. Open the High Temperature rule
- In the side menu, go to Alarm ⇾ Alarm rules.
- Find the High Temperature rule in the list.
- Click the Edit icon (pencil) to open the rule editor.
Step 2. Configure trigger condition
Scroll down to the Trigger condition section and edit the existing condition:
- Condition type: change Simple ⇾ Duration
- Duration value: 1
- Time unit: Minutes
- Click Save to apply the updated alarm condition settings.
The alarm will now be triggered only if the temperature exceeds the threshold continuously for 60 seconds.
Step 3. Save the updated rule
Click Apply to save the updated rule configuration.
Result
After saving, ThingsBoard will:
- create the High Temperature alarm only when the temperature exceeds the threshold for 1 full minute
- ignore short, random temperature spikes
- provide a more stable alarm system with fewer false alerts


Click Save.

Example 4. Alarm with dynamic duration (based on an attribute value)
Continuation of the example “Alarm condition with a duration”.
Scenario
You already have a High Temperature alarm configured to trigger when the temperature exceeds the threshold for 1 minute.
In this example, we extend that logic by making the duration dynamic — meaning the duration required to trigger the alarm will be defined by a server attribute on the device.
Goal
Update the High Temperature rule so that:
- the alarm is created only when the temperature stays above the critical threshold for the duration specified in the device's highTemperatureDurationThreshold server attribute
- the duration can be changed without editing the alarm rule — simply by updating the device’s attribute value
Preparation
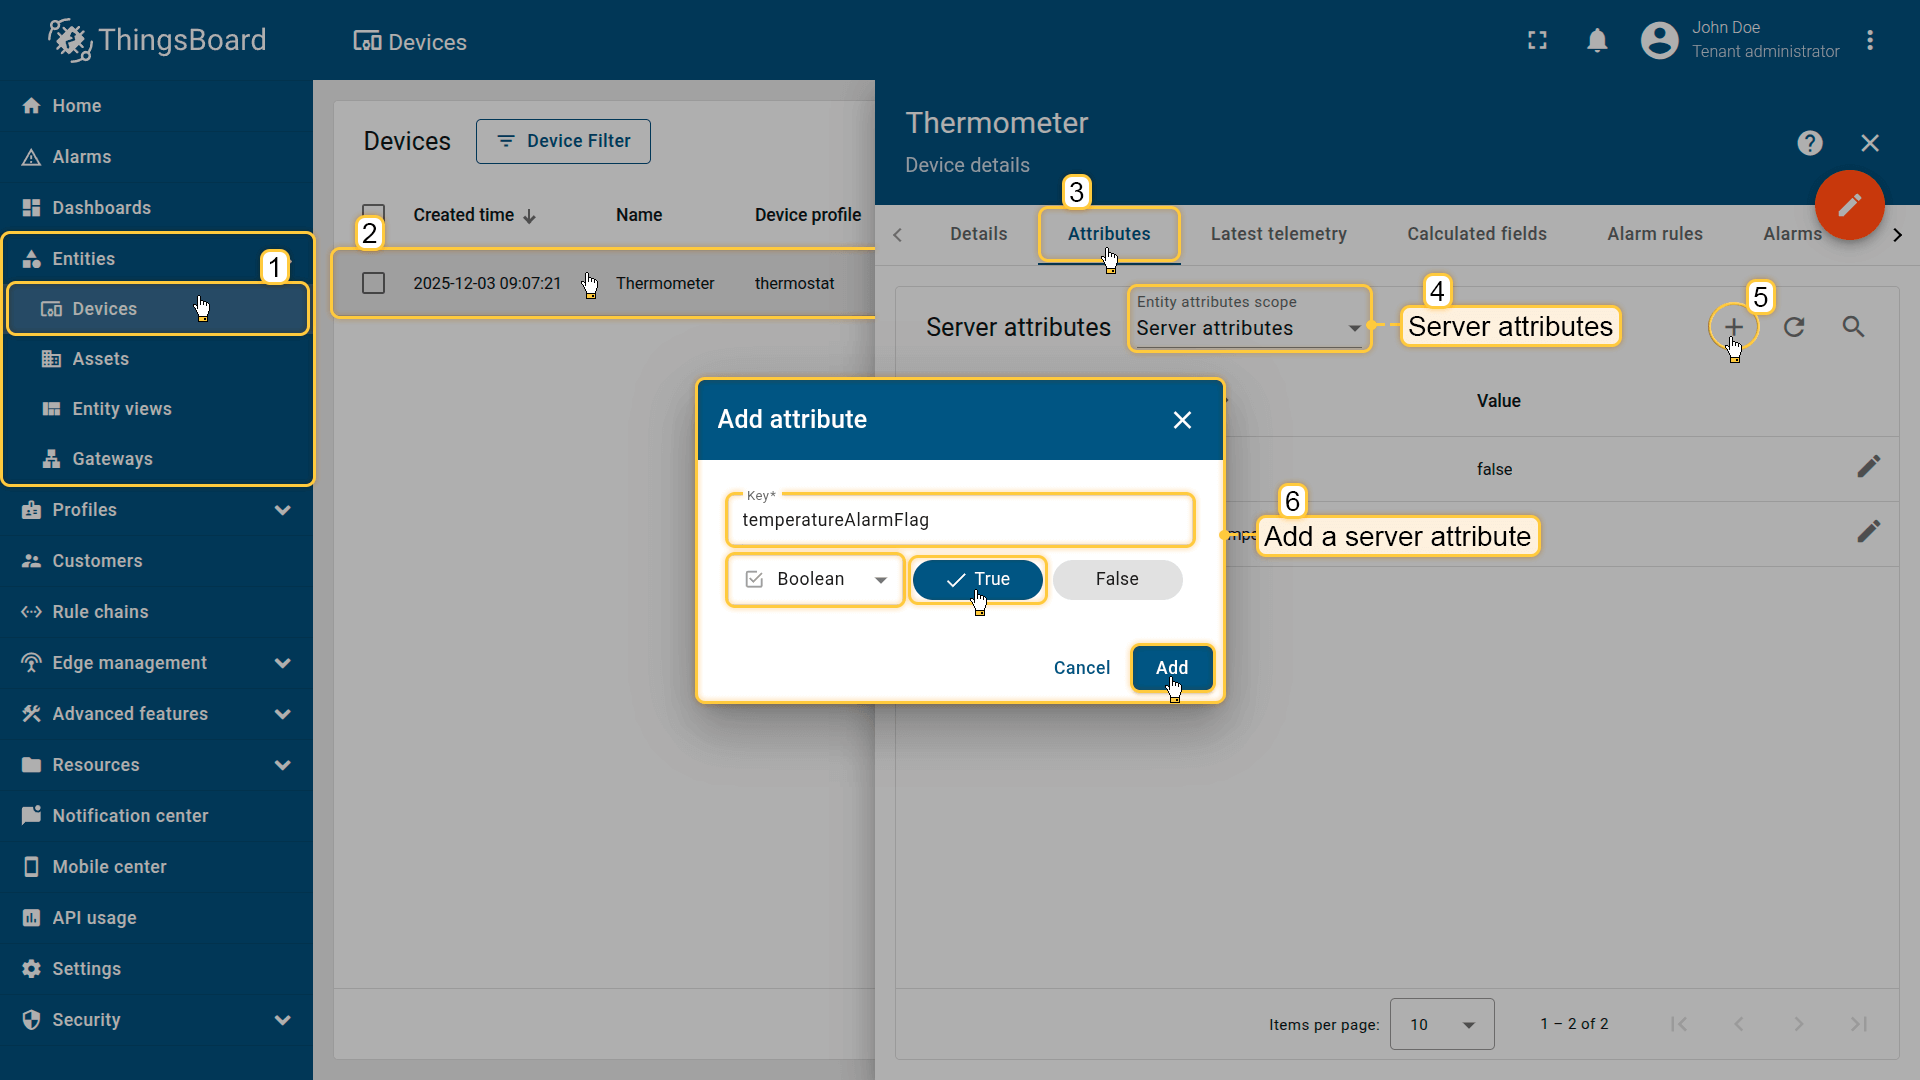
Add a server attribute to the Thermometer device:
- Key: highTemperatureDurationThreshold
- Value type Integer
- Value: 2

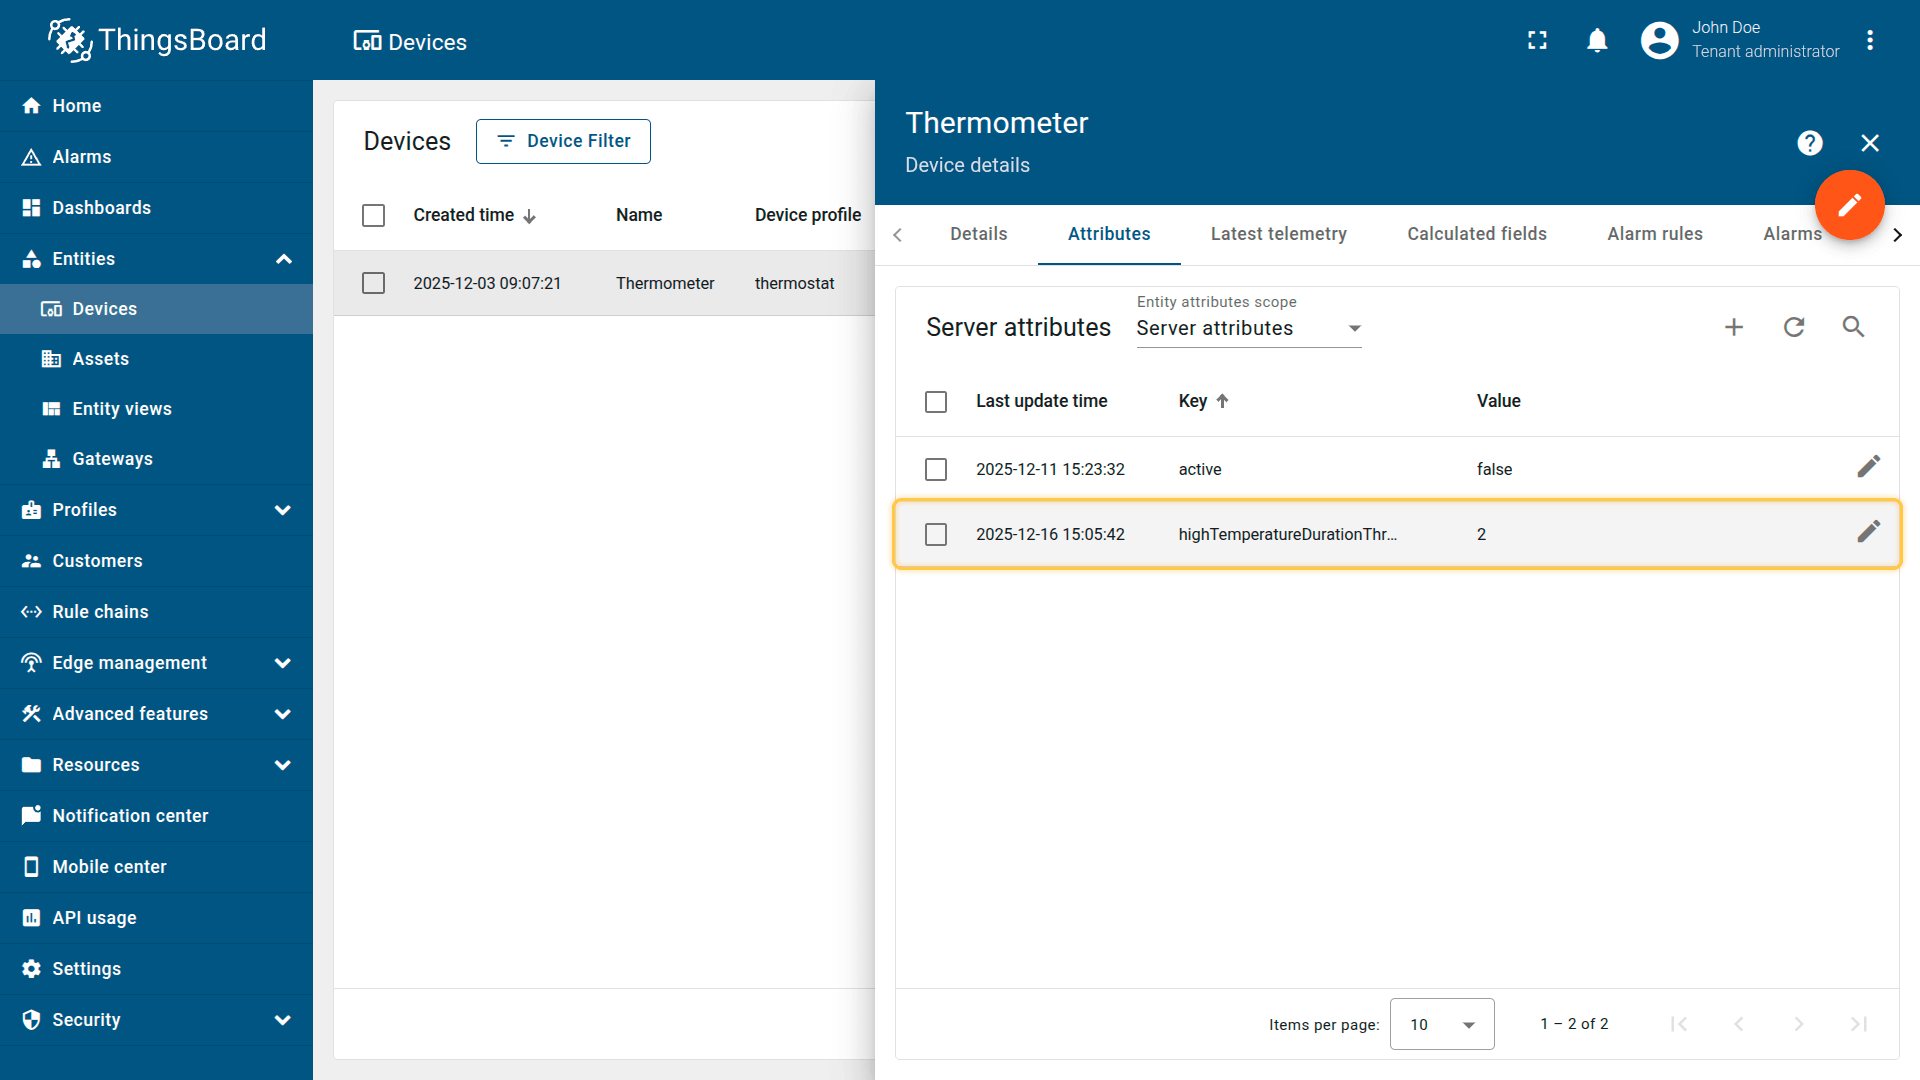
This value will be used by the alarm rule as the duration requirement.
Step 1. Open the High Temperature rule
- In the side menu, go to Alarm ⇾ Alarm rules.
- Find the High Temperature rule in the list.
- Click the Edit icon (pencil) to open the rule editor.
Step 2. Add argument
In the Arguments section:
- Click Add argument
- Fill in the fields:
- Entity type: Current entity
- Argument type: Attribute
- Attribute scope: Server attributes
- Attribute key: highTemperatureDurationThreshold
- Argument name: highTemperatureDurationThreshold
- Click Add
You now have a dynamic variable that can be used in the Duration condition.
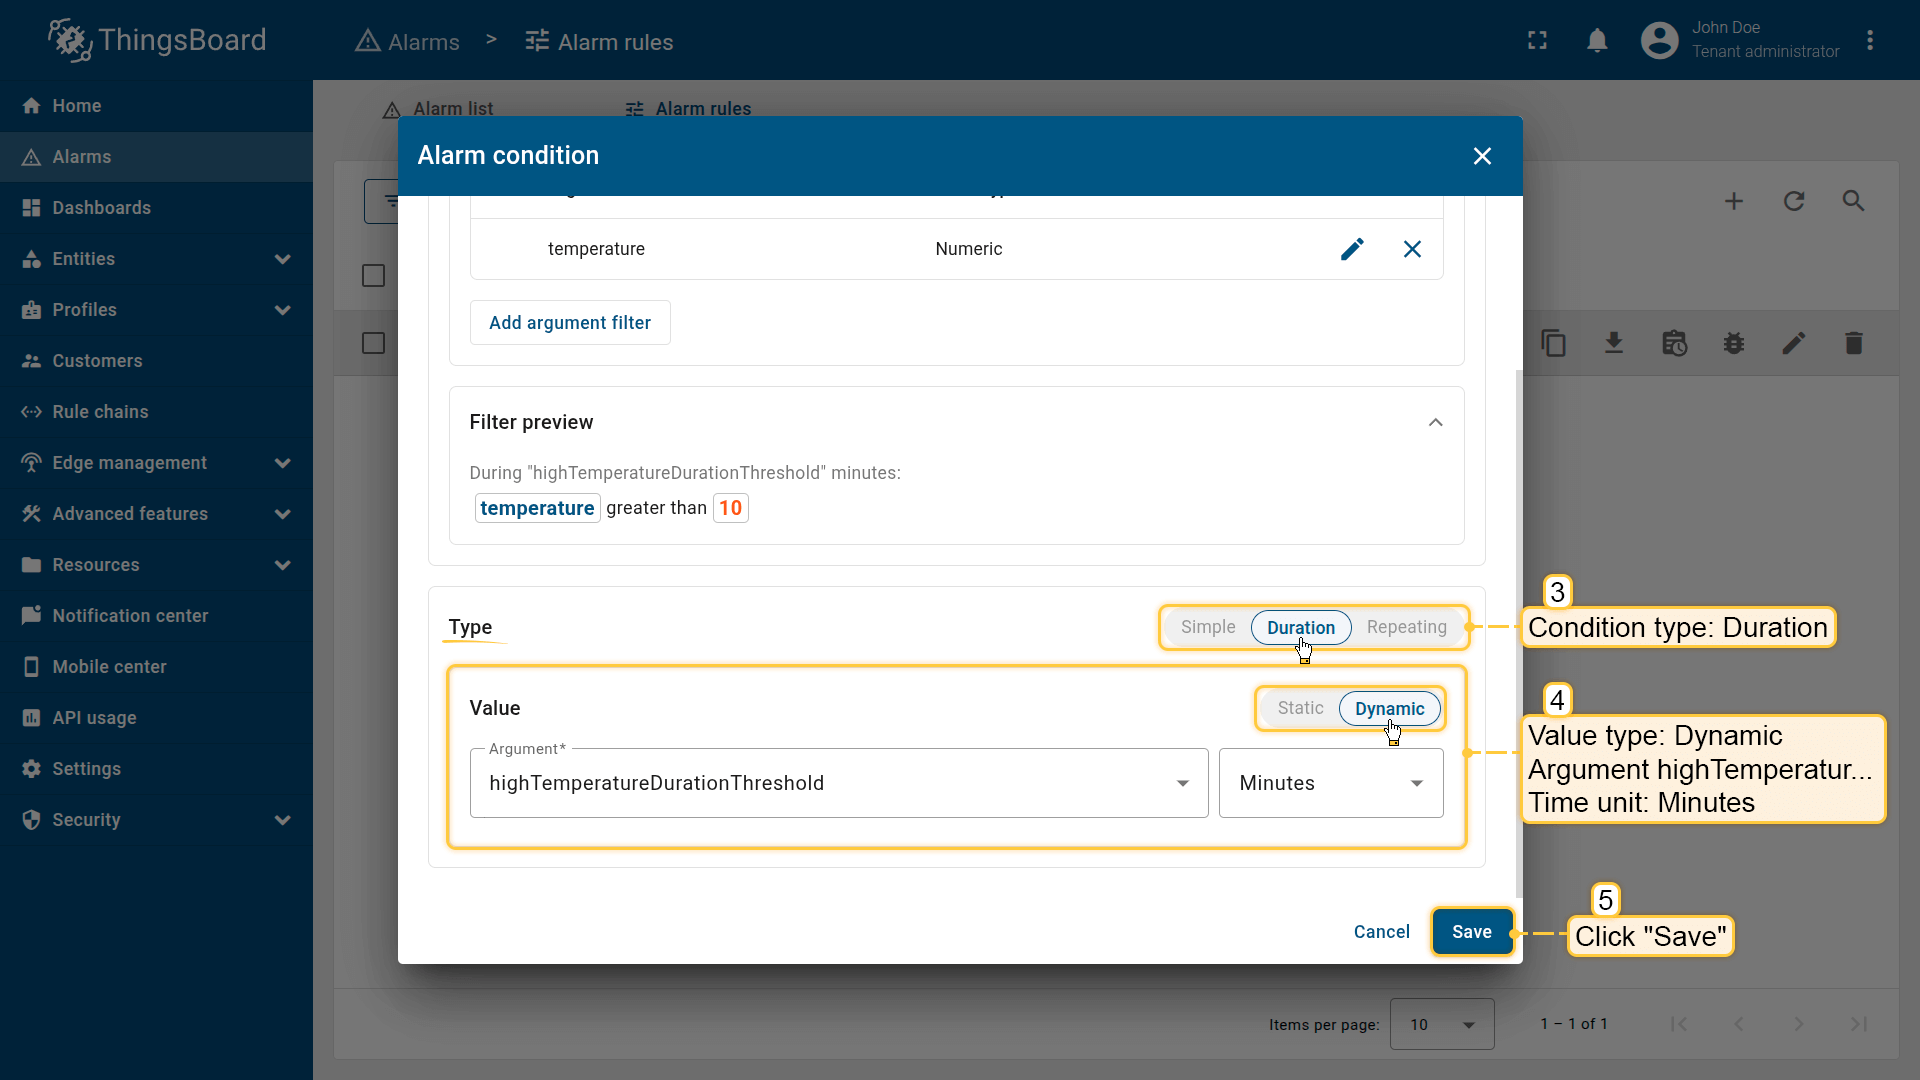
Step 3. Configure trigger condition
Scroll to the Trigger condition section and edit the existing condition:
- Condition type: Duration
- Value type: change Static to Dynamic
- Value: specify the argument highTemperatureDurationThreshold
- Unit: Minutes
- Click Save inside the condition block.
From now on, the duration required to trigger the alarm is determined by the device attribute rather than a fixed number.
Step 4. Save the rule
Click Apply to save the updated configuration.
Result
After saving, ThingsBoard will:
- create a High Temperature alarm if the temperature:
- exceeds the threshold (e.g., >10°C), and
- remains above it for the period defined in the highTemperatureDurationThreshold attribute (e.g., 2 minutes)
This ensures the alarm responds only to sustained deviations, not to short-term sensor spikes.


Click Save.

Example 5. Alarm with repeating condition
Continuation of the example “Simple alarm condition: temperature monitoring”.
Goal:
Update the High Temperature rule so that the alarm is created only when the threshold condition occurs a specified number of times in a row.
This helps filter out random sensor spikes and react only to repeated or consistent deviations.
Step 1. Open the High Temperature rule
- In the side menu, go to Alarm ⇾ Alarm rules.
- Find the High Temperature rule in the list.
- Click the Edit icon (pencil) to open the rule editor.
Step 2. Edit the trigger condition
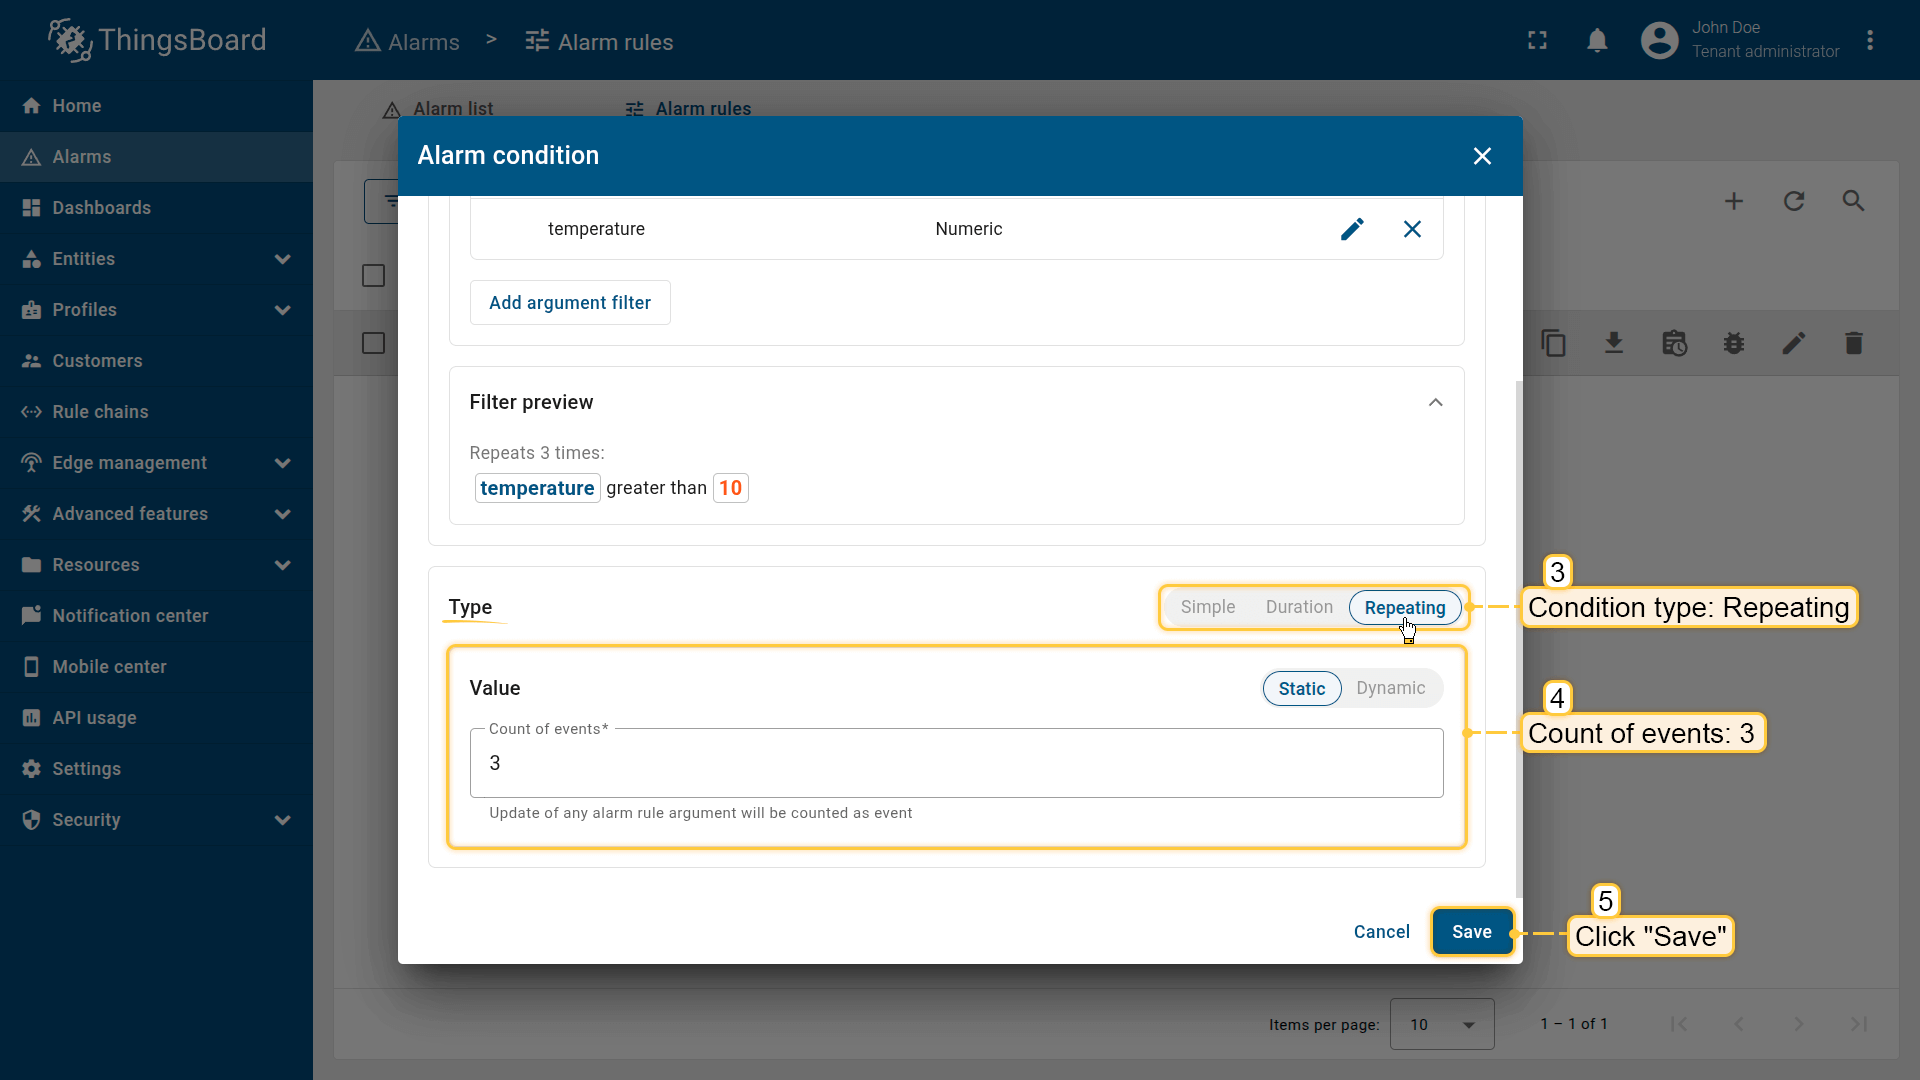
Update the existing trigger condition by changing the following parameters:
- Condition type: Repeating
- Count of events: 3
Click Save to apply the changes.
With this configuration, ThingsBoard will check whether the threshold condition occurs three times in a row before creating the alarm.
Step 3. Save the rule
Click Apply to save the updated configuration.
Result
After saving, ThingsBoard behaves as follows:
- create the High Temperature alarm only when the condition is met 3 times in a row
- Single or random temperature spikes will not trigger an alarm


Example 6. Define alarm rule schedule
Continuation of the example “Simple alarm condition: temperature monitoring”.
Goal:
Update the High Temperature rule so that the alarm triggers only during working hours.
This is useful when monitoring is required only at certain times—for example, during staff working hours.
Step 1. Open the High Temperature rule
- In the side menu, go to Alarm ⇾ Alarm rules.
- Find the High Temperature rule in the list.
- Click the Edit icon (pencil) to open the rule editor.
Step 2. Configure the alarm rule schedule
Scroll to the Trigger condition section and open the Schedule settings.
- Select the schedule type: Active at a specific time
- Configure the working hours:
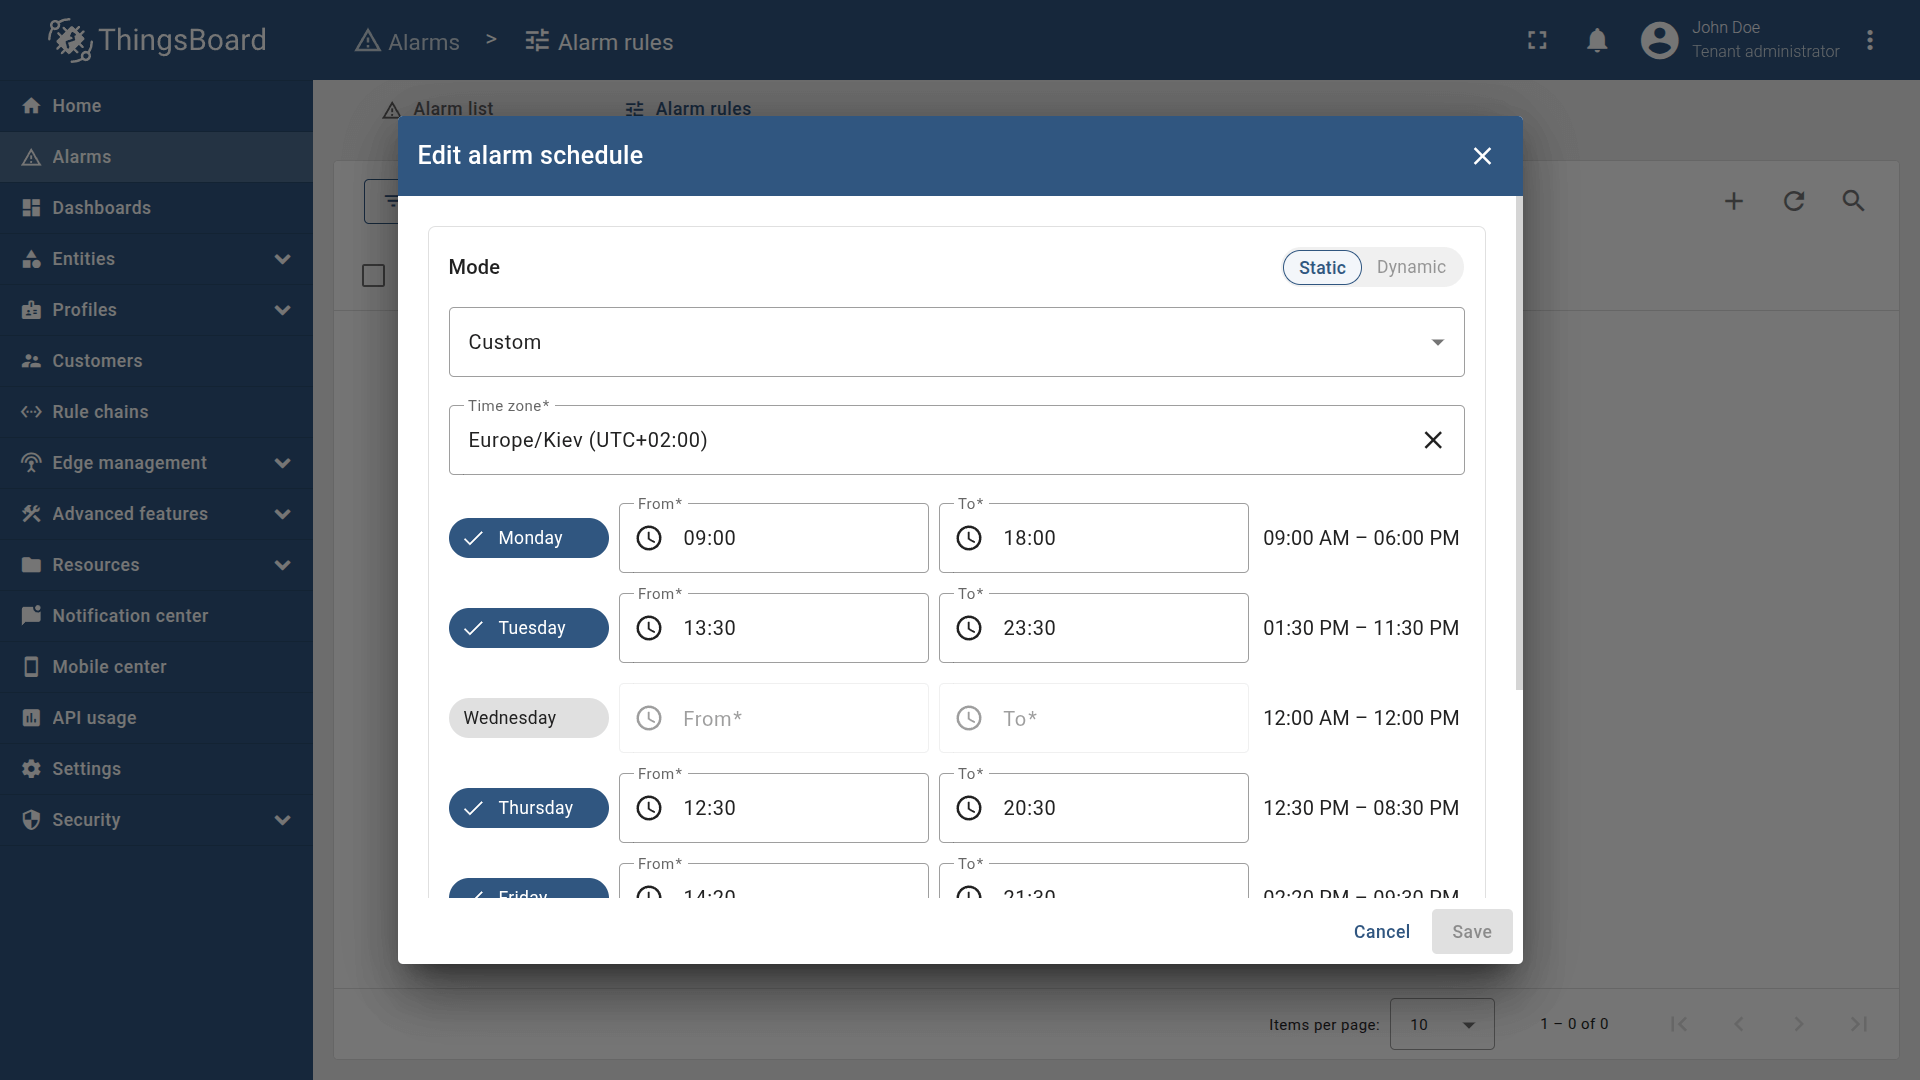
- Timezone: Europe/Kiev (UTC+02:00)
- Days: Monday, Tuesday, Wednesday, Thursday, Friday
- Time range:
- From: 10:00
- To: 19:00
- Click Save to apply the schedule configuration.
With this setup, the rule is active only on weekdays from 10:00 to 19:00. Outside this interval, the system will not create a High Temperature alarm, even if temperature > 10°C is true.
Step 3. Save the rule
Click Apply to save the updated configuration.
Result
After saving, ThingsBoard will:
- activate the High Temperature rule only on weekdays from 10:00 to 19:00
- ignore temperature threshold violations that occur outside this time window
- Go to the High Temperature rule and open it for editing.
- Open the schedule settings for the alarm's trigger condition.
- Select the schedule type: Active at a specific time.
Configure the rule to be active only on weekdays from 10:00 to 19:00. Click Save. - Apply changes.


Configure the rule to be active only on weekdays from 10:00 to 19:00. Click Save.

Example 7. Advanced thresholds
Continuation of the example “Simple alarm condition: temperature monitoring”.
Goal:
Update the High Temperature rule by adding the ability to enable or disable the alarm using a server attribute at the device level.
In this example, the alarm should trigger only when both conditions are true:
- temperatureAlarmFlag == true
- temperature > 10°C
This allows you to flexibly control whether the alarm should be active for a specific device — without editing the rule.
Preparation
Add a server attribute to the Thermometer device:
- Key: temperatureAlarmFlag
- Type: Boolean
- Value:
true
This attribute determines whether the alarm rule is active for the device.

Step 1. Open the High Temperature alarm rule
- In the side menu, go to Alarm ⇾ Alarm rules.
- Find the High Temperature rule in the list.
-
Click the Edit icon (pencil) to open the rule editor.
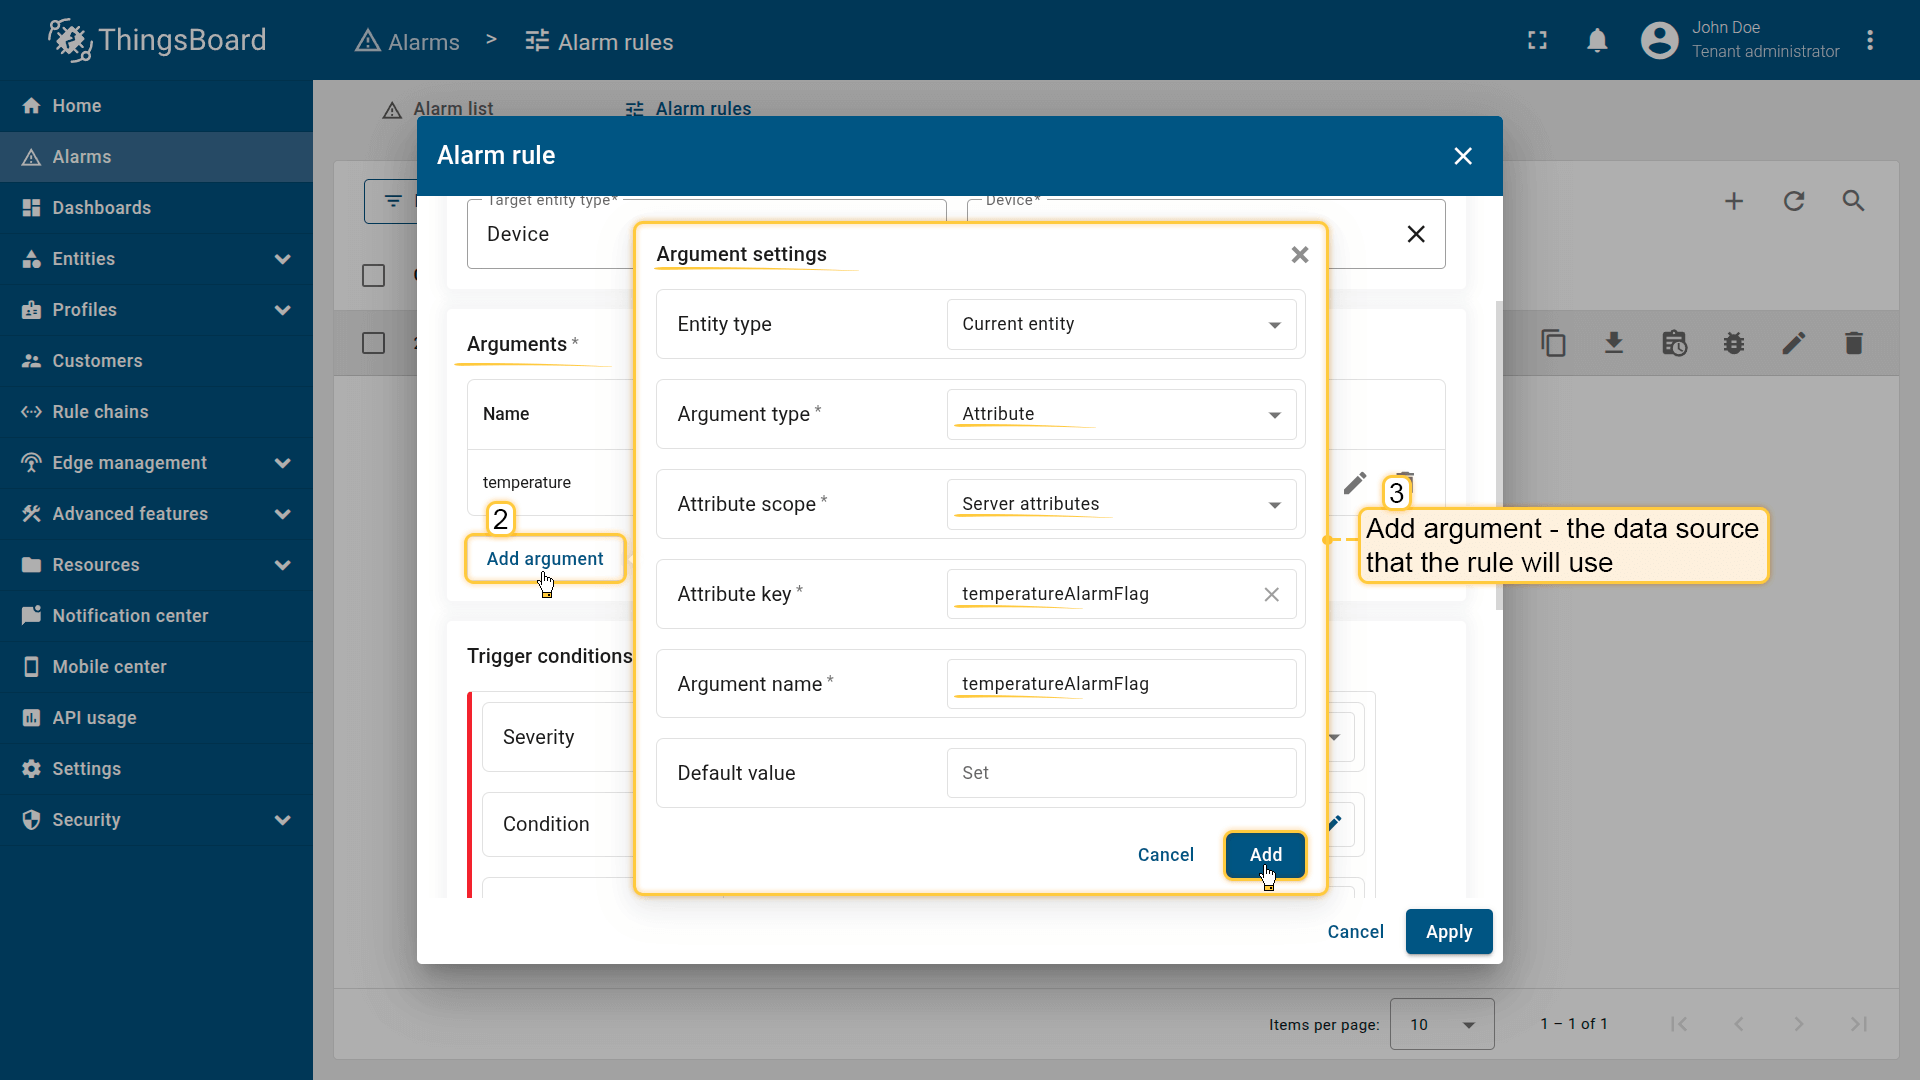
- Step 2. Add an argument
In the Arguments section:
- Click Add argument
- Fill in the fields:
- Entity type: Current entity
- Argument type: Attribute
- Attribute scope: Server attributes
- Attribute key: temperatureAlarmFlag
- Argument name: temperatureAlarmFlag
- Click Add
You now have a boolean variable that can be used in the alarm conditions.
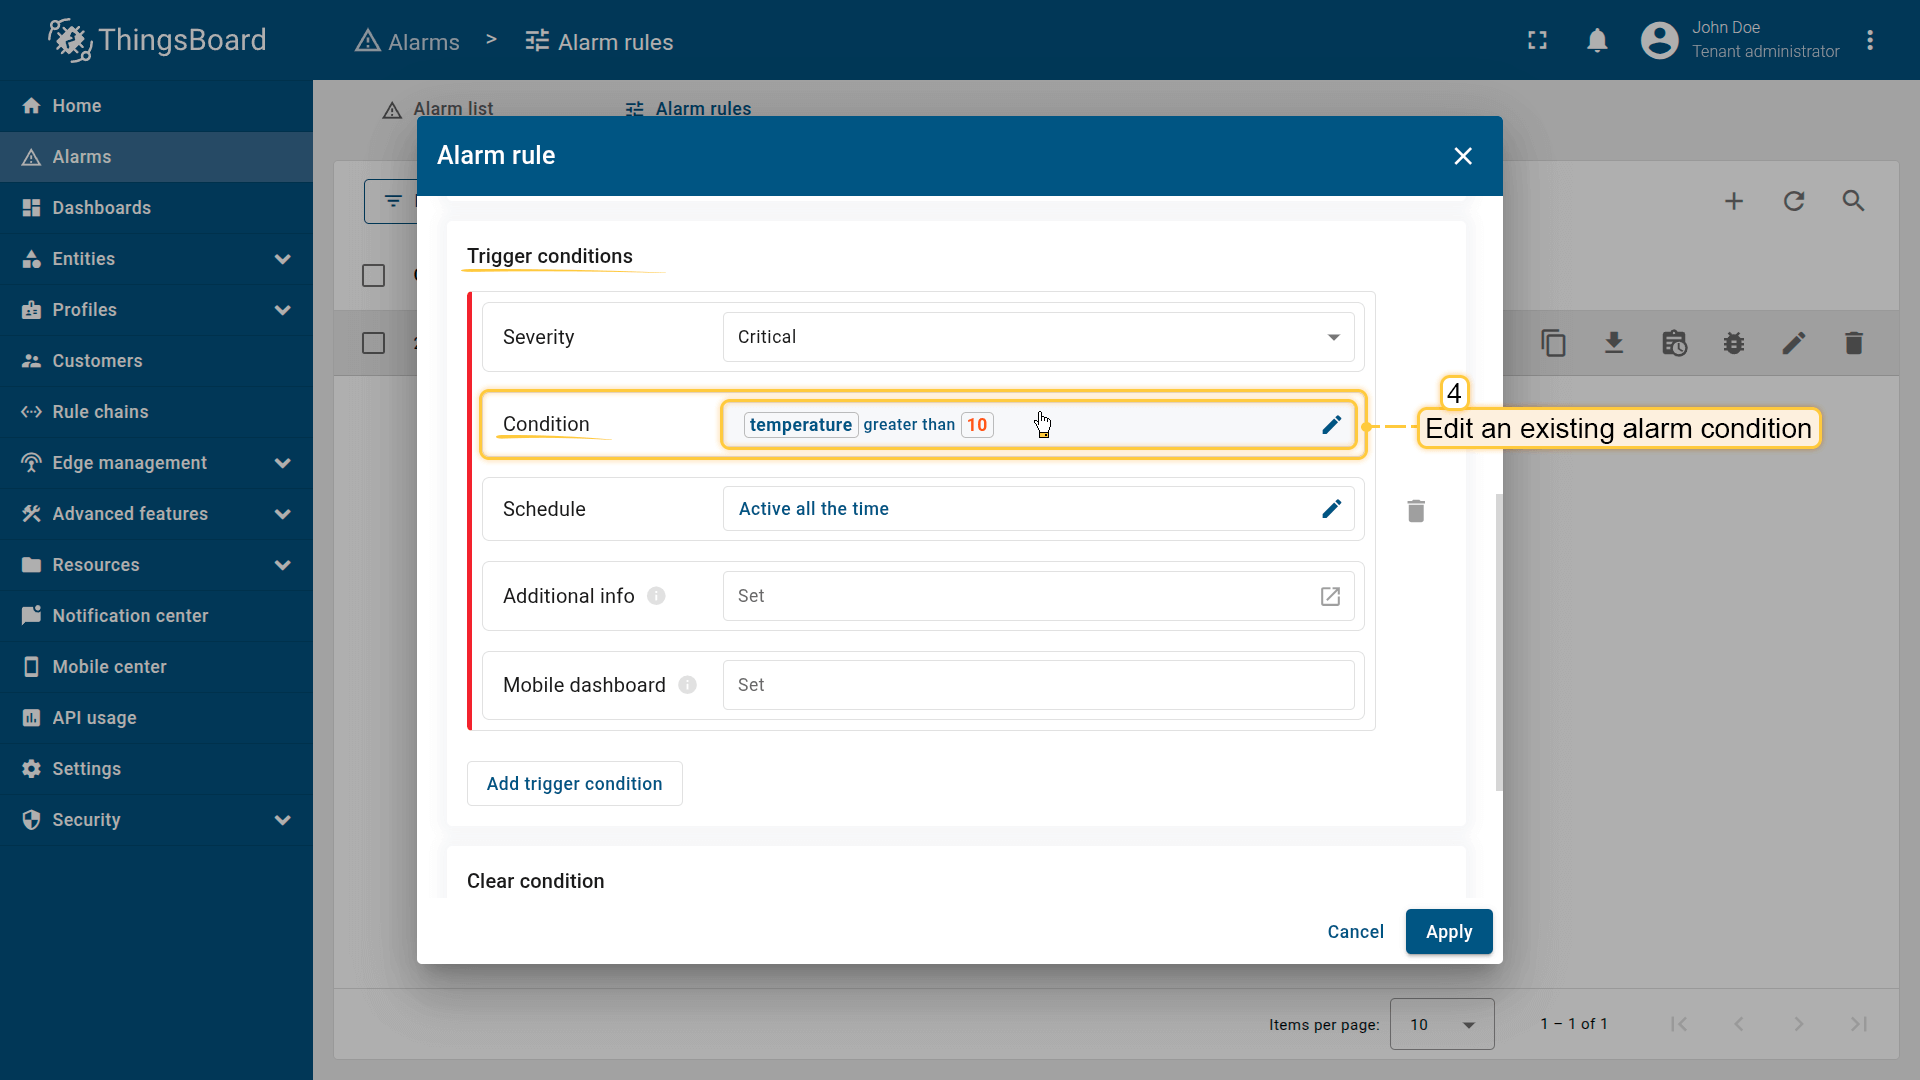
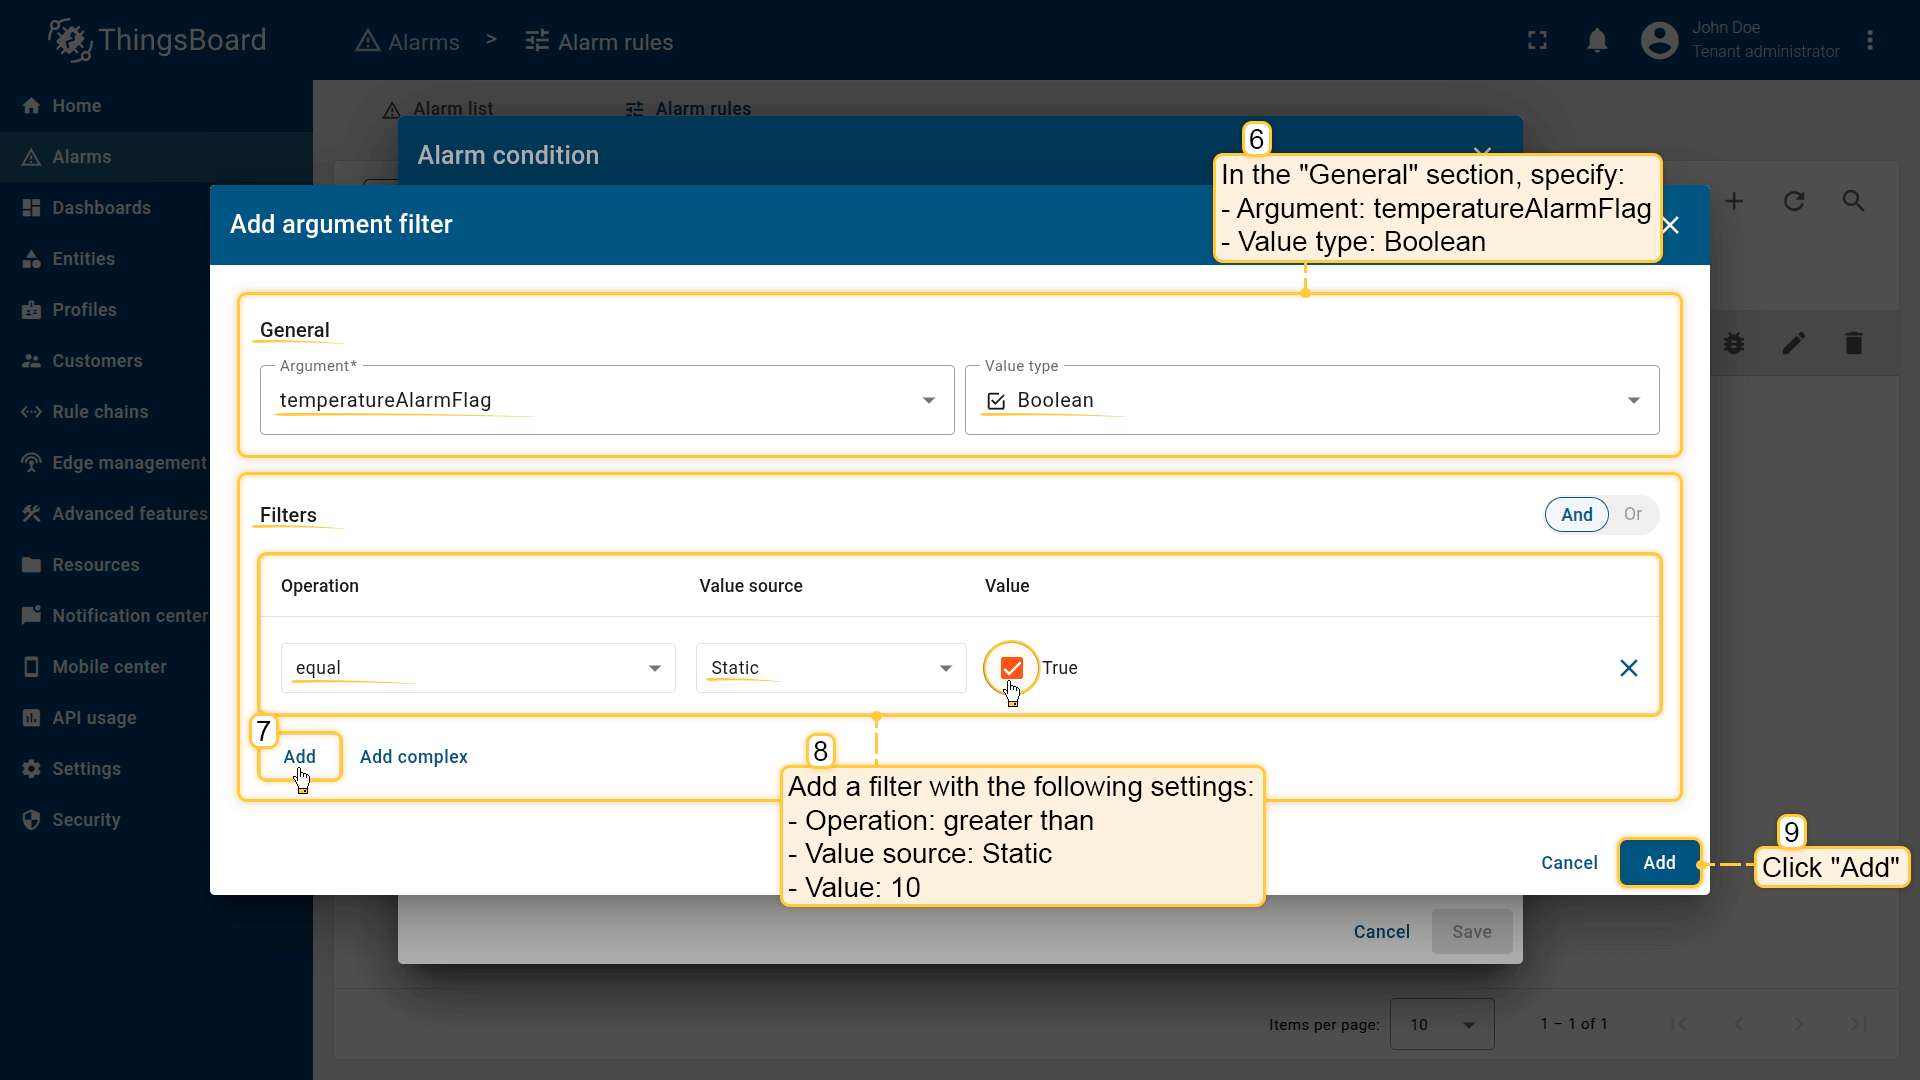
Step 3. Configure the trigger condition
Scroll to the Trigger condition section and edit the existing condition.
Add another condition:
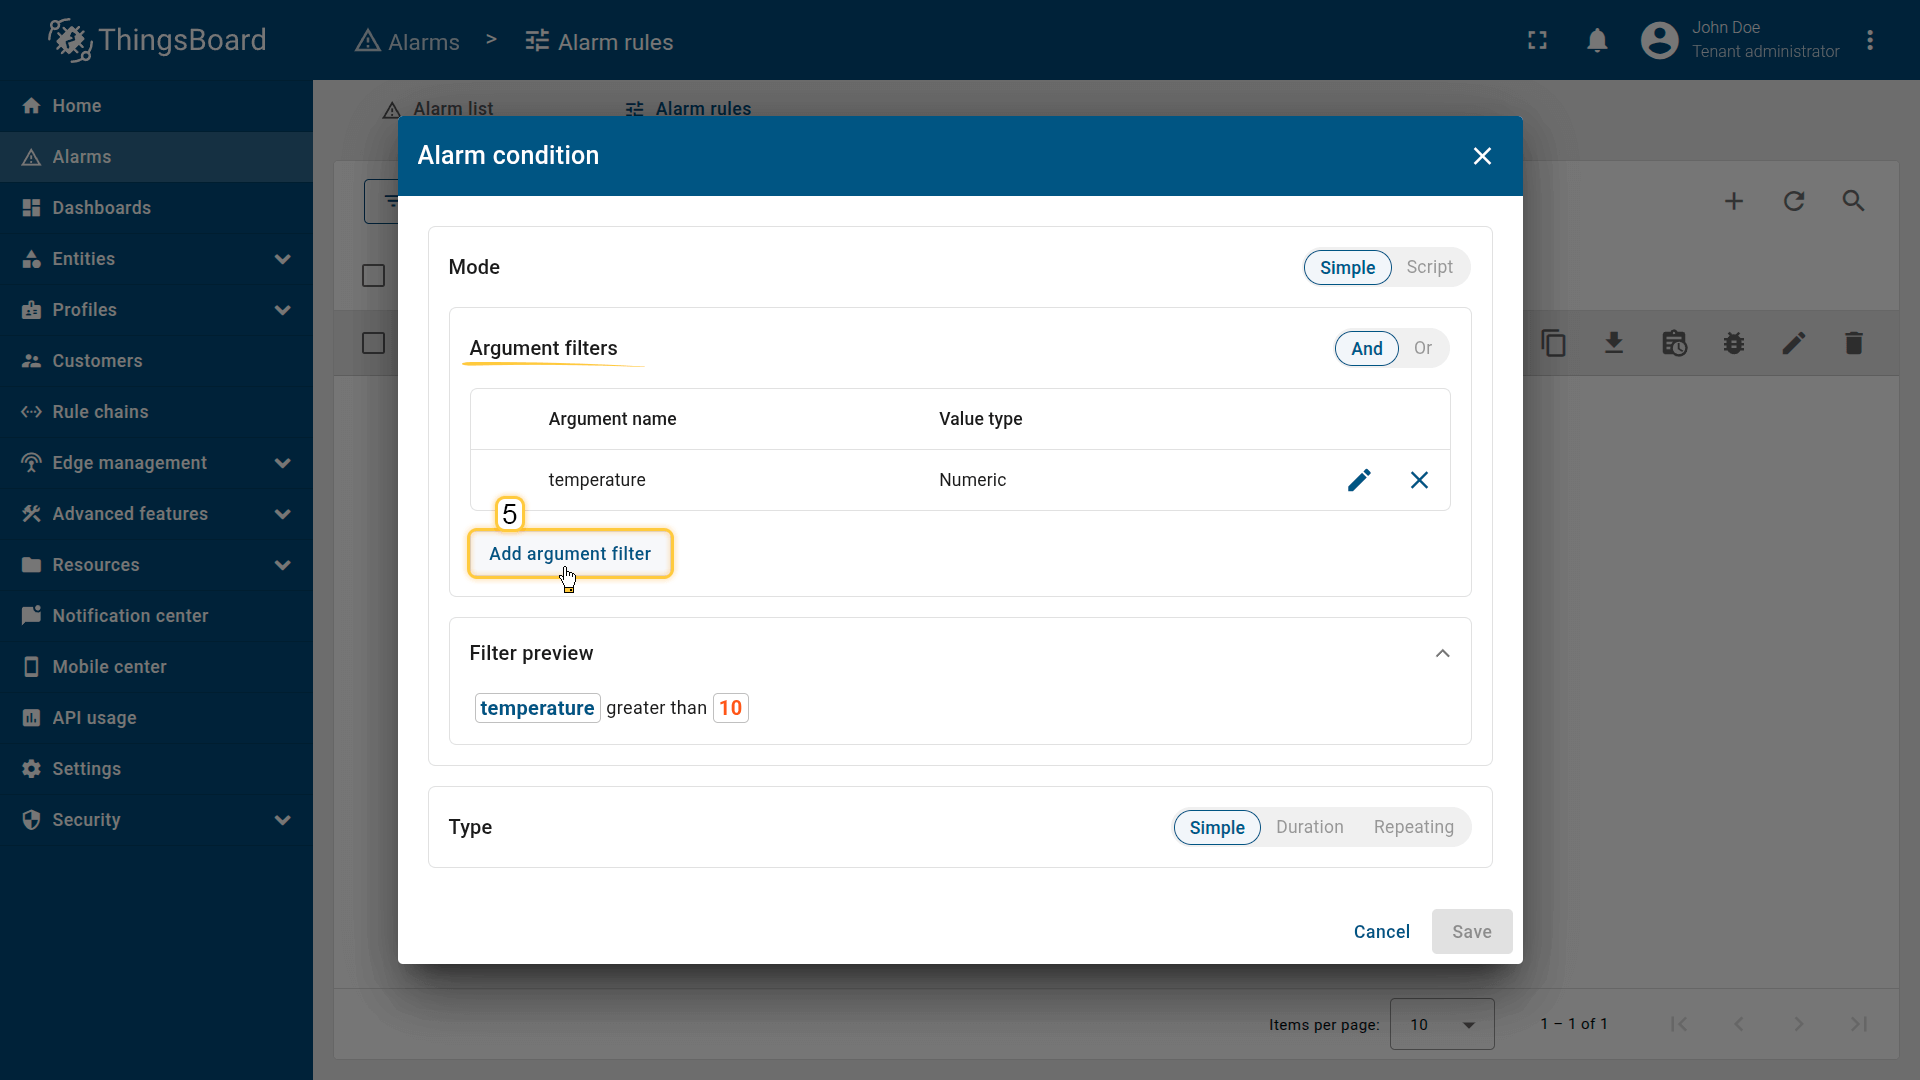
- Click Add argument filter and configure:
- Argument: temperatureAlarmFlag
- Value type: Boolean
- Operation: equal
- Value:
true
- Click Add.
This filter determines whether the alarm is allowed to trigger for the specific device.
Step 4. Save the rule
Click Apply to save the updated configuration.
Result
After saving, ThingsBoard will:
- create the High Temperature alarm only if:
- temperatureAlarmFlag == true, and
- the temperature exceeds 10°C
- ignore the rule entirely for this device if temperatureAlarmFlag == false, even when the threshold is exceeded

Click Add.


Benefits of this approach
- You can enable or disable alarms without editing a rule
- Each device can have its own alarm activation state
- Ideal for large projects with varying alerting policies across devices
- Easy to integrate with dashboards — operators can toggle the alarm using a simple switch
Next steps
-
Connect your device - Learn how to connect devices based on your connectivity technology or solution.
-
Data visualization - These guides contain instructions on how to configure complex ThingsBoard dashboards.
-
Data processing & actions - Learn how to use ThingsBoard Rule Engine.
-
IoT Data analytics - Learn how to use rule engine to perform basic analytics tasks.
-
Advanced features - Learn about advanced ThingsBoard features.
-
Contribution and Development - Learn about contribution and development in ThingsBoard.
Your feedback
Don't hesitate to star ThingsBoard on github to help us spread the word. If you have any questions about this sample, please contact us.